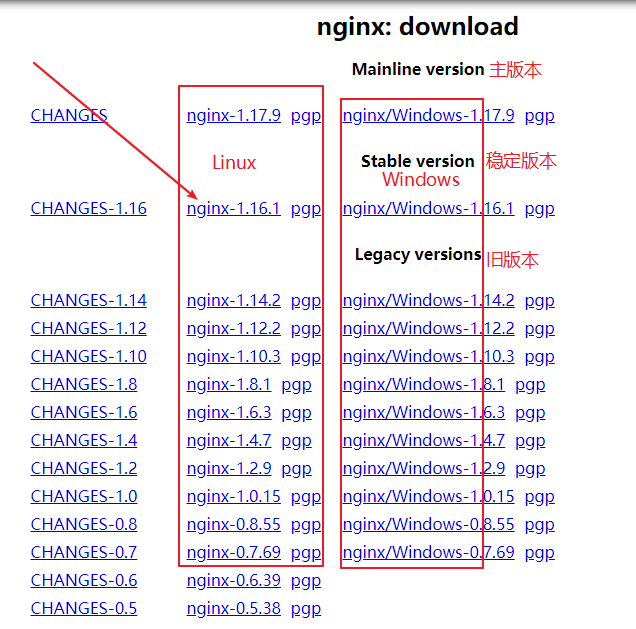
下载
- 点击进入下载地址
- 一般下载稳定版本
Linux 安装&启动
1 |
|
配置文件
配置文件地址nginx安装目录/conf/nginx.conf
- 基本模块
1
2
3
4
5
6
#工作进程数 1 ,不要超过计算机的核数,四核配置4,八核配置8
worker_processes 1;
#工作连接数,也就是线程,一个进程有1024个线程,
events {
worker_connections 1024;
} - http 基本配置
1
2
3
4
5
6
7
8
9
10
11
12
13
14
15
16
17
18
19
20
21
include mime.types;# 支持的类型
default_type application/octet-stream;# 默认流类型
#log_format main '$remote_addr - $remote_user [$time_local] "$request" '
# '$status $body_bytes_sent "$http_referer" '
# '"$http_user_agent" "$http_x_forwarded_for"';
# 访问日志
#access_log logs/access.log main;
#sendfile为发送文件,要on开启
sendfile on;
# 防止网络阻塞
#tcp_nopush on;
#keepalive_timeout 0;
#keepalive_timeout超时时间
keepalive_timeout 65;
# 开启压缩输出
#gzip on; - http server配置
1
2
3
4
5
6
7
8
9
10
11
12
13
14
15
16
17
18
19
20
21
22
23
24
25
26
27
28
29
30
31
32
33
34
35
36
37
38
39
40
41
42
43
44
45
46
47
48
49
50
51
52
53
54
55
56
57
58
59
60
61
server {
listen 80;#监听端口
server_name localhost;#监听ip,或域名
#charset koi8-r;#设置字符集
#access_log logs/host.access.log main;# 设置访问日志
location / { # 监听访问路径 -> localhost:80/
root html;# root是配置网站根目录位置,默认nginx安装目录的html目录
index index.html index.htm;# 配置文件首页文件
}
#error_page 404 /404.html;# 状态码404 就会访问地址 localhost:80/404.html
error_page 500 502 503 504 /50x.html;# 将服务器错误页面重定向到静态页面 /50x.html
location = /50x.html {# 注意:这里 = 表示精确匹配,完全相同
root html;
}
#PHP 脚本请求全部转发到Apache处理
#location ~ \.php$ {
# proxy_pass http://127.0.0.1;
#}
#PHP 脚本请求全部转发到FastCGI处理
#location ~ \.php$ {
# root html;
# fastcgi_pass 127.0.0.1:9000;
# fastcgi_index index.php;
# fastcgi_param SCRIPT_FILENAME /scripts$fastcgi_script_name;
# include fastcgi_params;
#}
#禁止访问 例如: .htaccess 文件
#location ~ /\.ht {
# deny all;
#}
#配置https服务,加密传输
#server {
# listen 443 ssl;
# server_name localhost;
# ssl_certificate cert.pem;
# ssl_certificate_key cert.key;
# ssl_session_cache shared:SSL:1m;
# ssl_session_timeout 5m;
# ssl_ciphers HIGH:!aNULL:!MD5;
# ssl_prefer_server_ciphers on;
# location / {
# root html;
# index index.html index.htm;
# }
#}
}
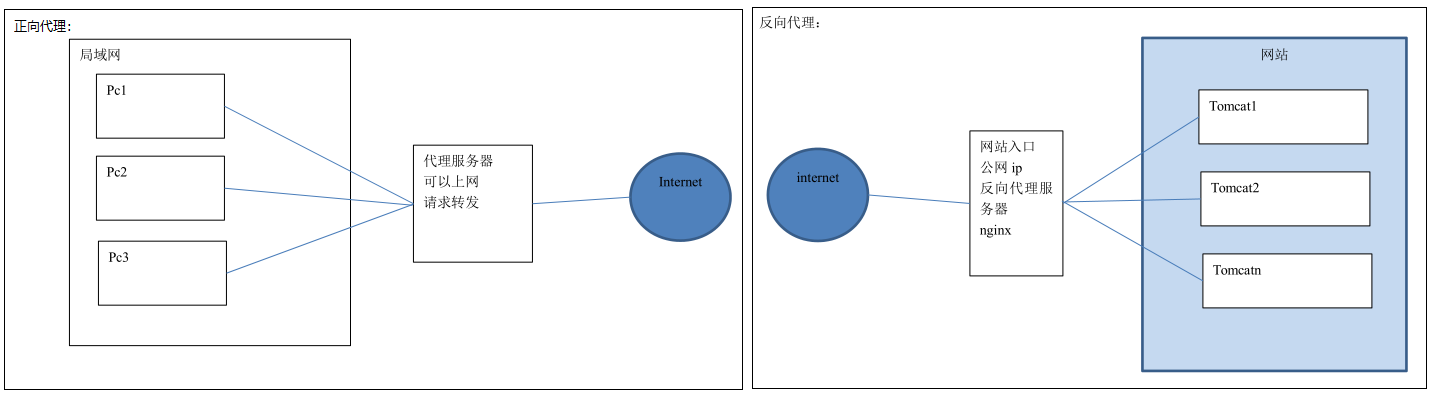
正&反向代理
1 | 2021-08-03 08:56:24 补 |
静态部署
看着图来理解:ip+端口=root root就是访问地址的根路径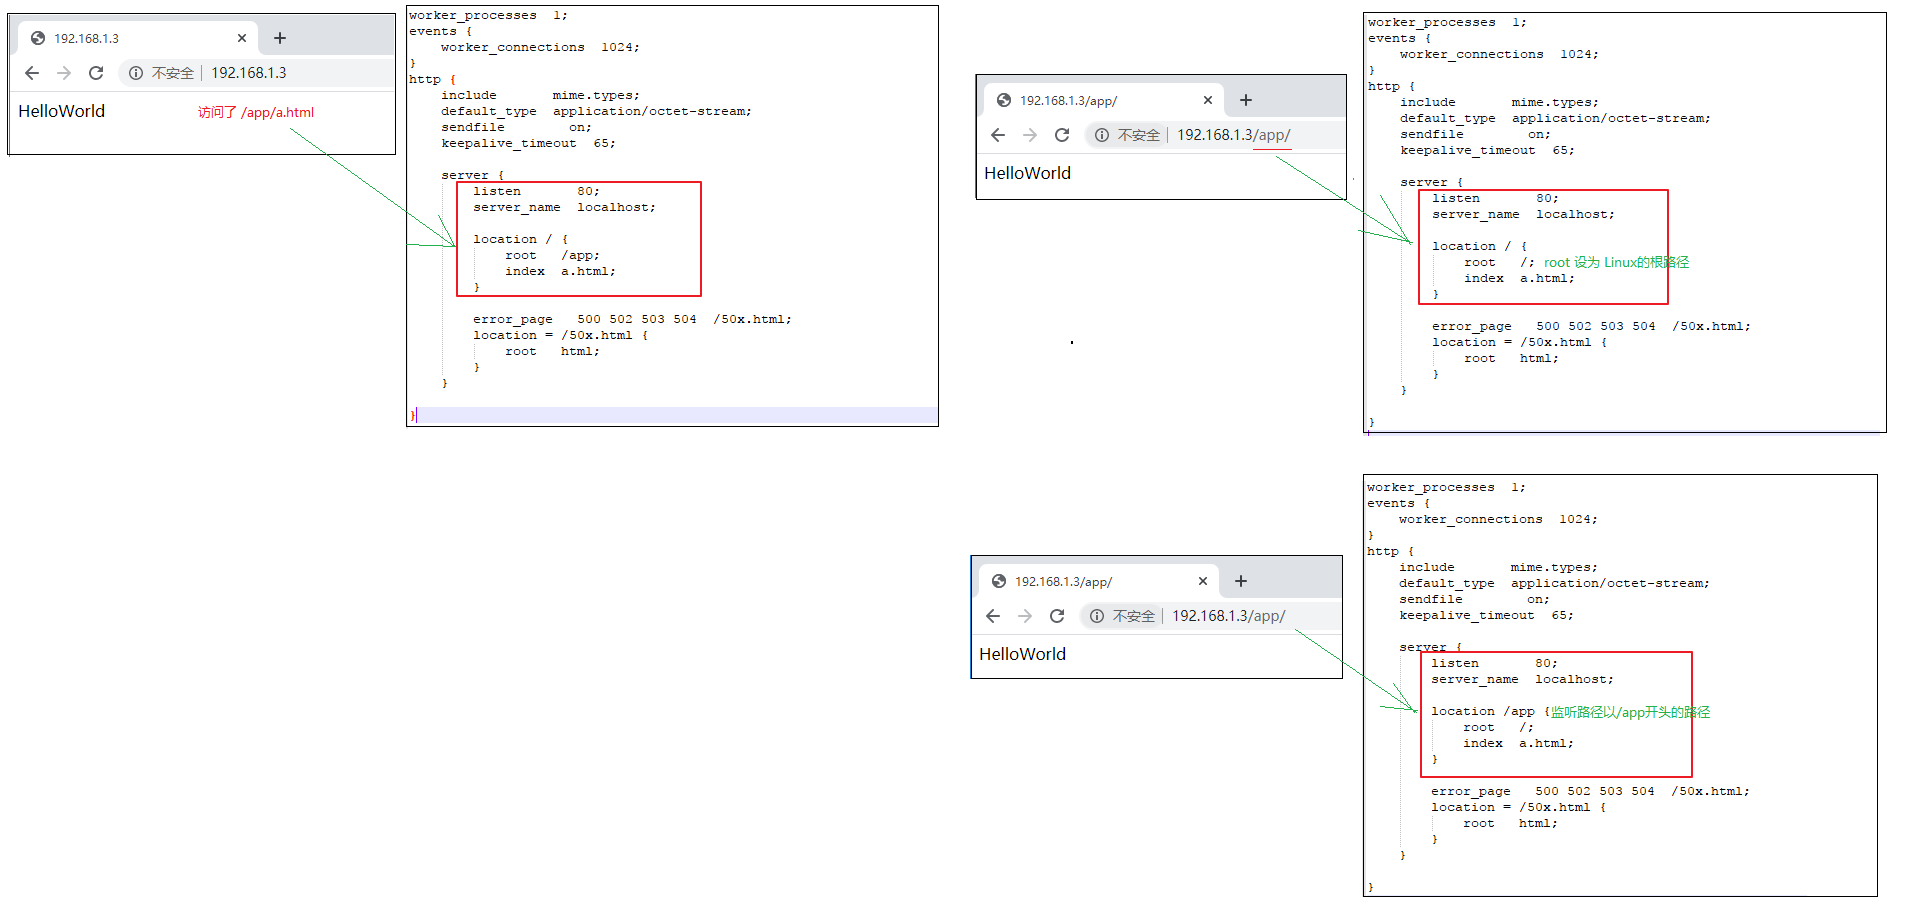
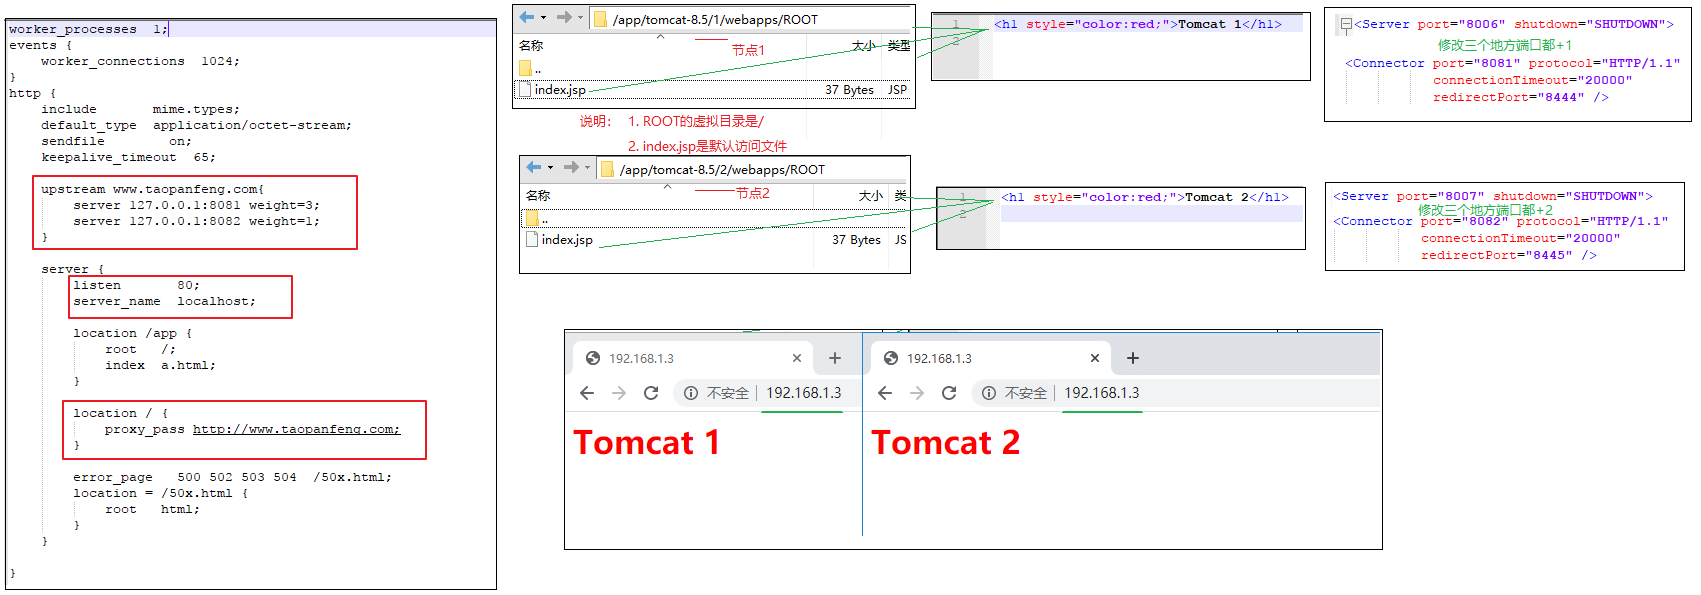
负载均衡
实战演示
- http模块上加:
1
2
3
4
upstream www.taopanfeng.top{
server 127.0.0.1:8081 weight=3;
server 127.0.0.1:8082 weight=1;
}说明:这里的
www.taopanfeng.top只是一个名称,取名abc也可以,一般用网址来代表可读性。server对应一个节点。weight表示权重,访问比率就是权重之比。权重越大,访问次数越多。一般高性能服务器权重配置大一些。故障检测:如果上面两个节点有一个挂了,upstream会检测到,这时候就会只访问其中一个节点。 - server模块上添加
1
2
3
location /myweb {
proxy_pass http://www.taopanfeng.top;
}注意:这里的
www.taopanfeng.top要与上面的upstream名称对应。 - 演示结果
简化配置
如果只有一个节点,可以简写。
1 | 方式1 |
均衡策略
策略一共四种。
1 | 1. 轮询(默认)。可以理解为听歌的列表循环。 |
其他配置
1 | 1. backup。其他所有非backup的节点都挂了,才会请求backup节点。 |
静态代理
概念
把所有的静态资源的访问改为访问Nginx,而不是访问Tomcat。【因为Nginx更擅长于静态资源的处理,性能更换,效率更高。】
所以在实际应用中,我们将静态资源比如图片,css,html,js等交给Nginx处理,而不是由Tomcat处理。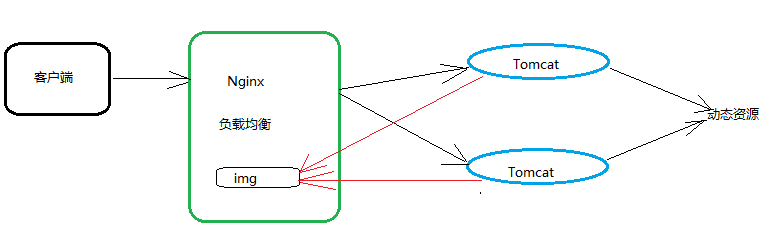
实现方式1
后缀名匹配。
1 | location ~.*\.(js|css|html|gif|jpg|jpeg|png|bmp|swf|ioc|rar|zip|txt|flv|mid|doc|ppt|pdf|xls|mp3|wma)$ { |
注意:放静态资源的目录要有权限,权限不足报403。赋权例如chmod 777 /app/nginx/static
正则可以参考正则表达式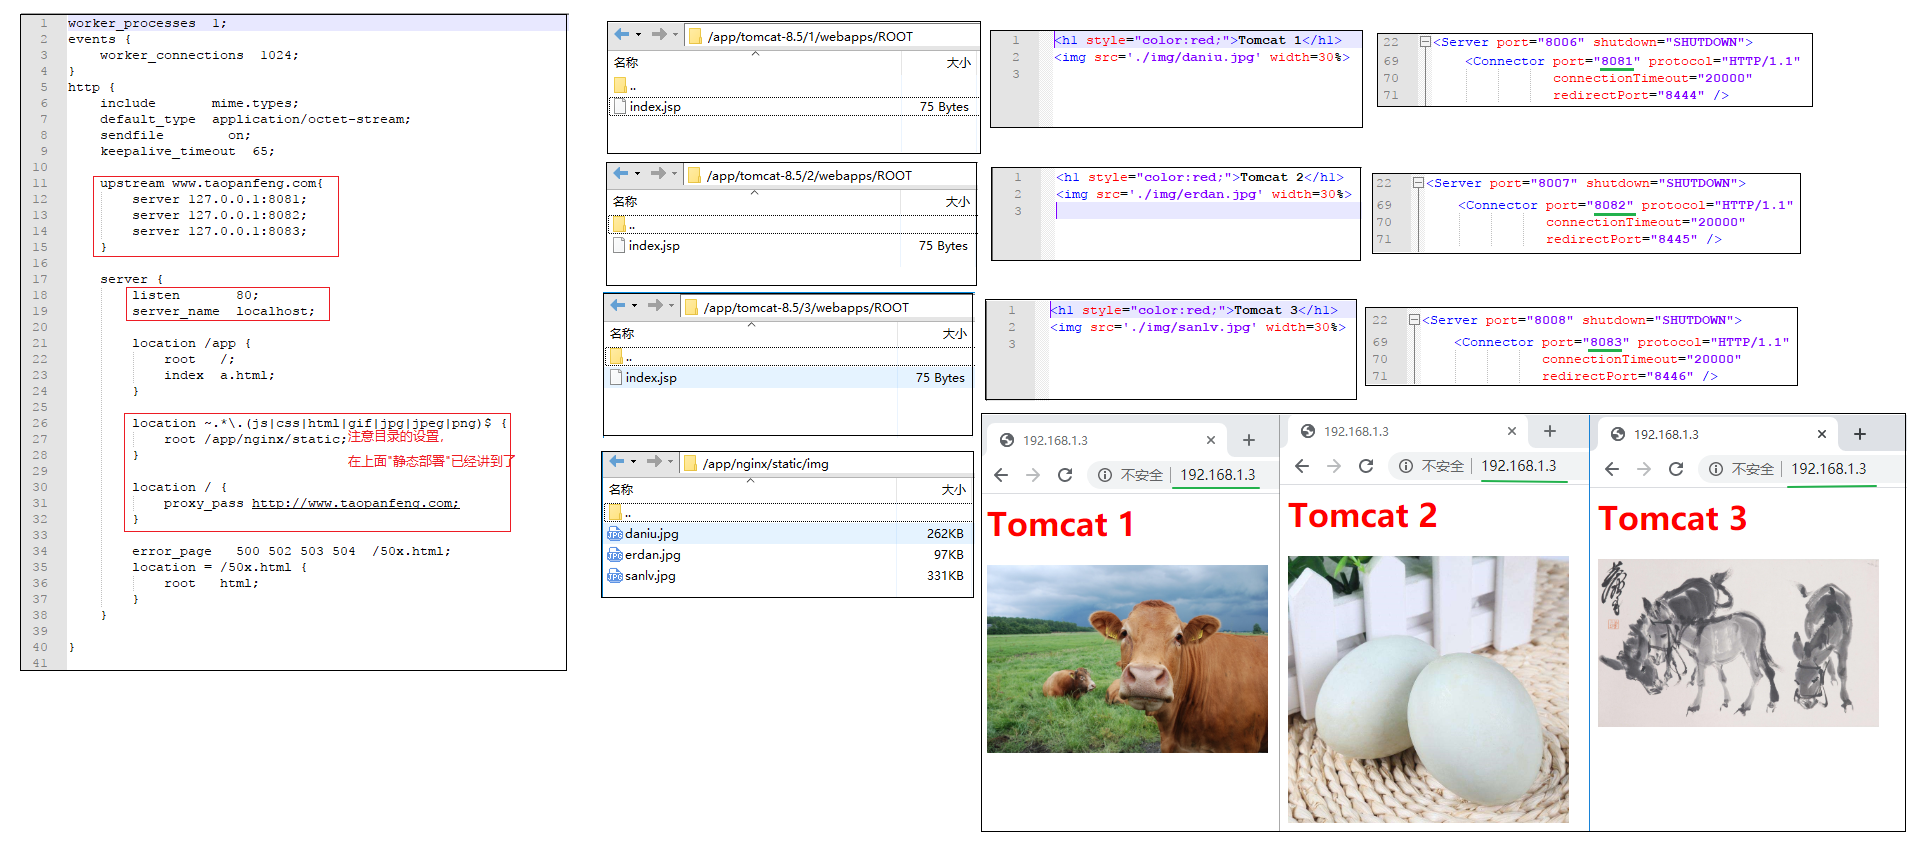
实现方式2
目录名匹配。
1 | location ~.*/(css|js|img) { |
其他都不变,只需要把上面的location进行替换就行了。~.*/(css|js|img)表示的含义是:匹配URL中含有/css /js /img的数据就去/app/nginx/static下面去找。
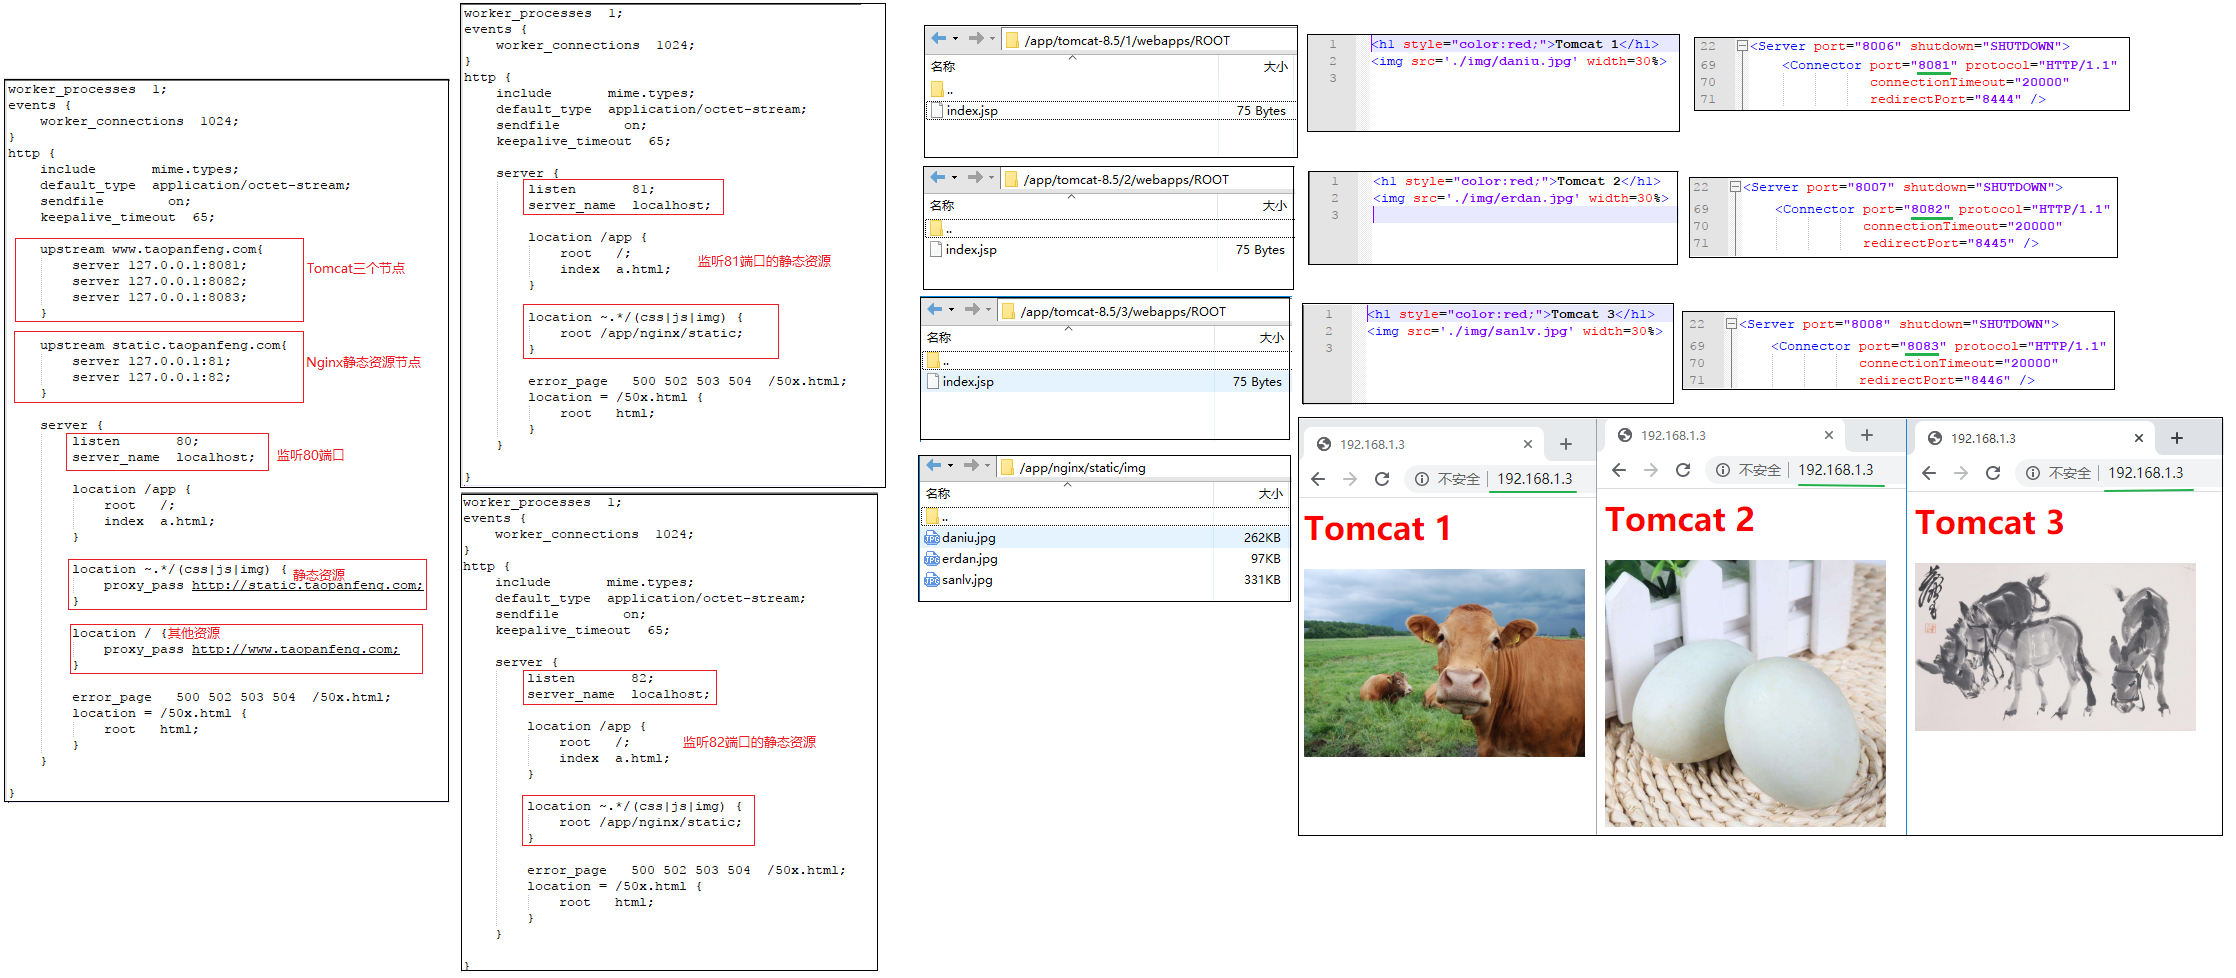
动静分离
概念
Nginx的负载均衡与静态代理结合在一起,我们可以实现动静分离,这是实际应用中常见的一种场景。
动态资源,如jsp由Tomcat或其他web服务器完成。
静态资源,如图片,css,js等由nginx服务器完成。
它们各司其职,从而达到合理的架构。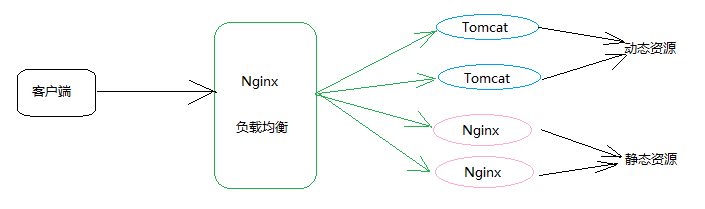
实现
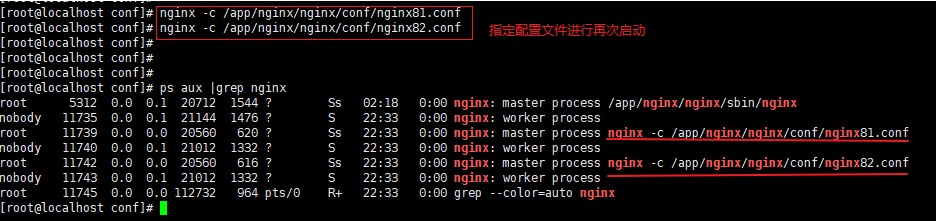
1 | 1. 这里我们启动三个Nginx,三个Tomcat。【再次启动nginx可以使用指定配置文件的方式】 |
1 | cd /app/nginx/nginx/conf |
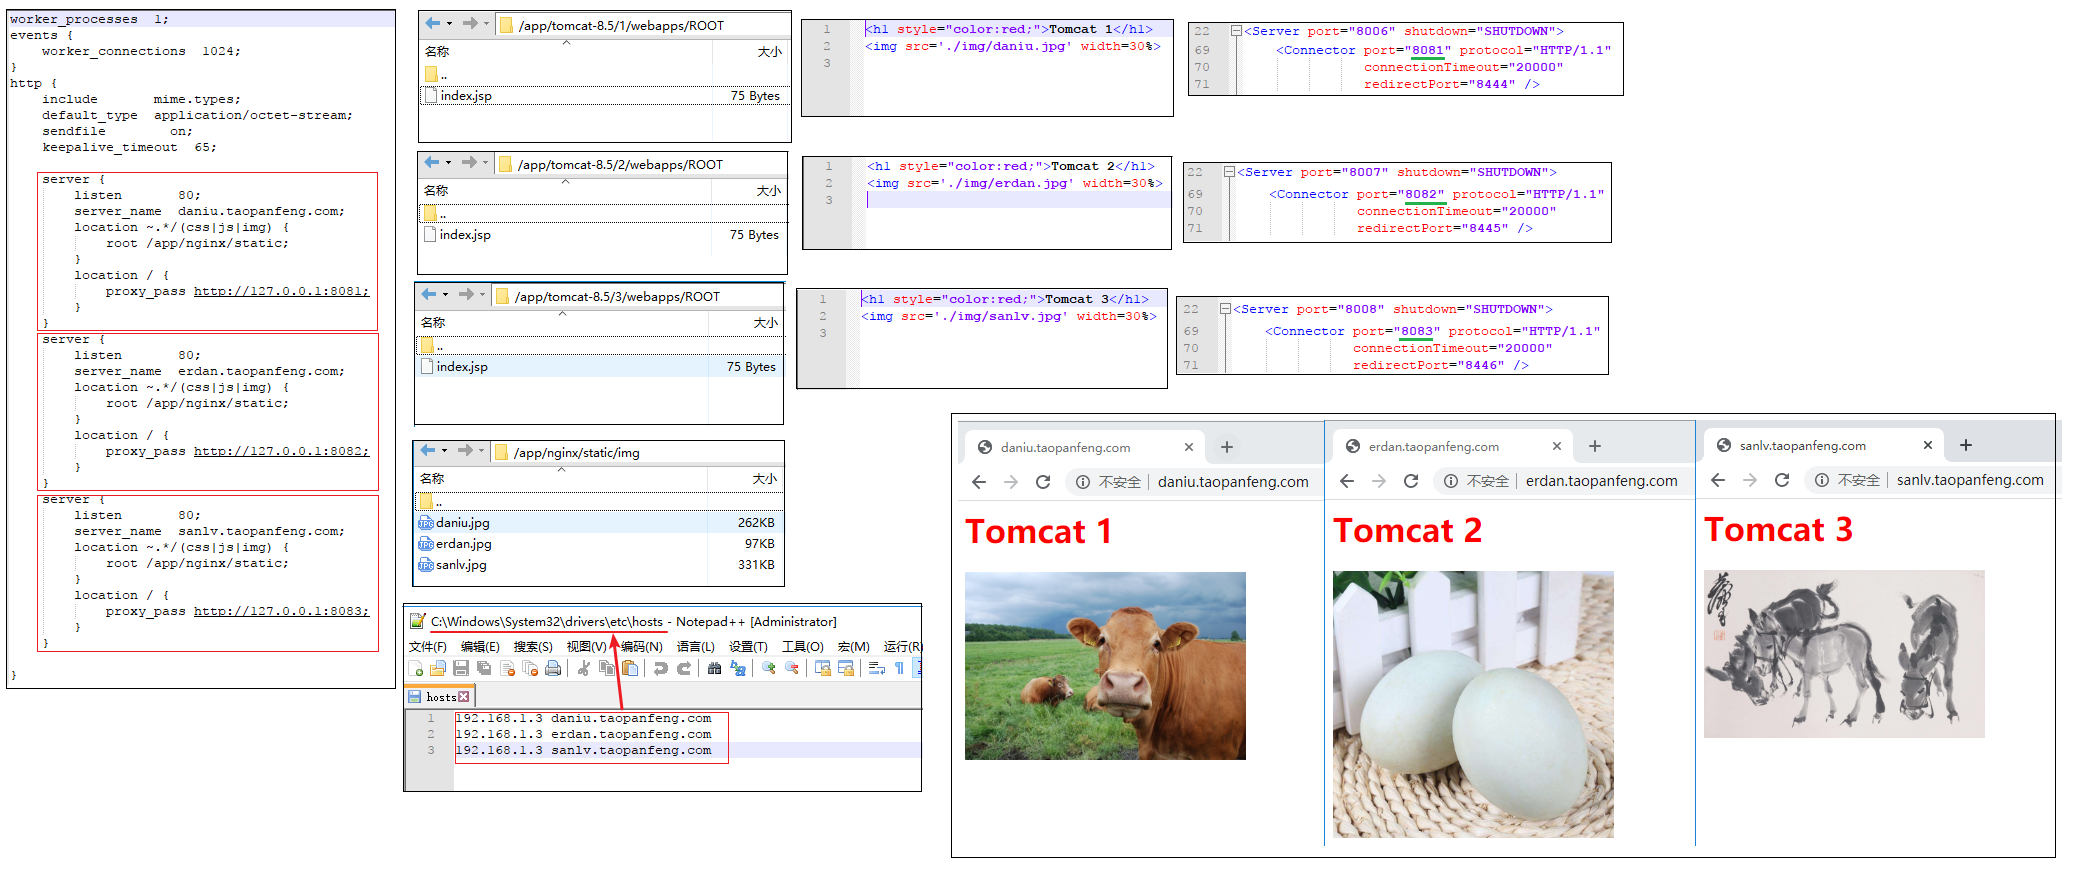
虚拟主机
概念
虚拟主机,就是把一台服务器划分成多个”虚拟”的服务器,这样我们的一台服务器就可以当多台服务器使用,从而可以配置多个网站。
Nginx提供虚拟主机的地址,就是为了我们不需要安装多个Nginx,就可以运行多个网站。
Nginx的虚拟主机就是通过nginx.conf中的server节点指定的,一个Server标签就是一个虚拟主机,想要设置多个虚拟主机,配置多个server节点即可。
配置主机通常有下面两种方式
端口实现
基于端口的虚拟主机配置,使用端口来区分。
浏览器使用 同一个域名+端口 或 同一个ip地址+端口访问。
1 | server { |
说明一下:
如果你访问www.taopanfeng.top:81 就会代理到 http://127.0.0.1:8081
如果你访问www.taopanfeng.top:82 就会代理到 http://127.0.0.1:8082
域名实现
1 | server { |
需要配置本地的hosts文件,文件位置C:\Windows\System32\drivers\etc\hosts
1 | # 添加映射 |
案例

访问流程
我这上面标注了七步。这里仅是我自己理解的逻辑,并不是执行顺序。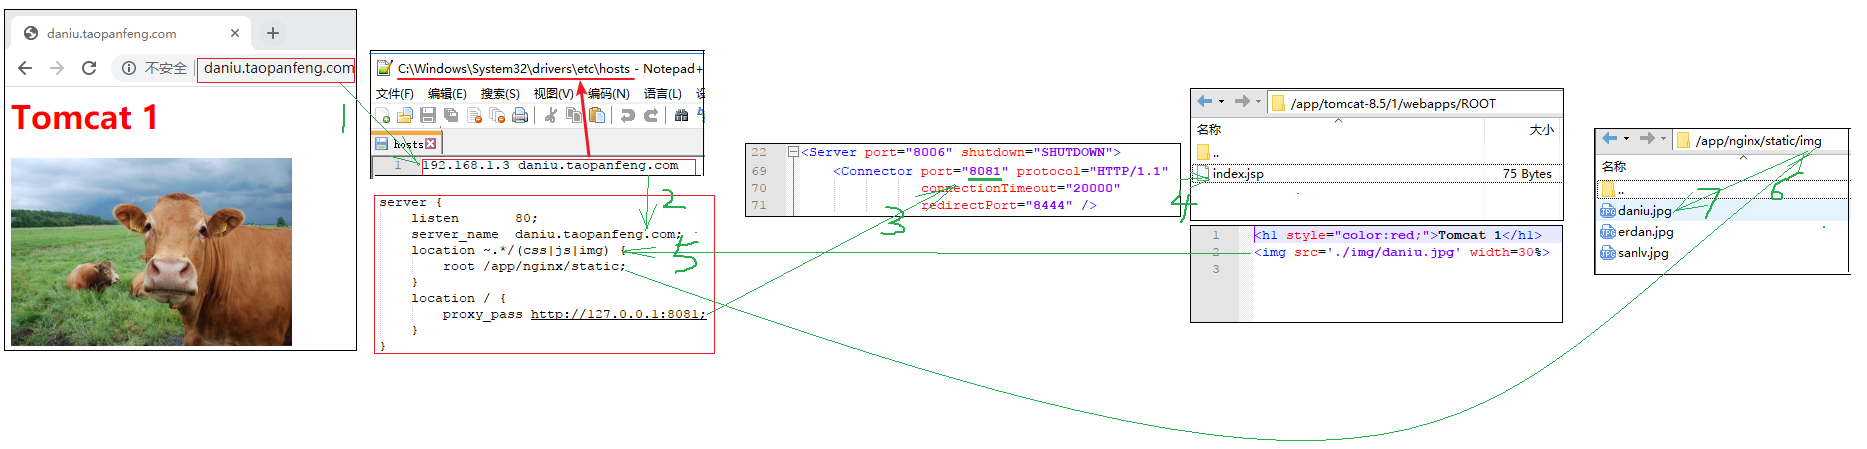
简化逻辑
通过include的方式引入虚拟主机的配置。不要引入错了,这行代码要放在http模块中。include /app/nginx/nginx/conf/myserver.conf;
文件是隔开的,配置更清晰,主文件没有那么多的server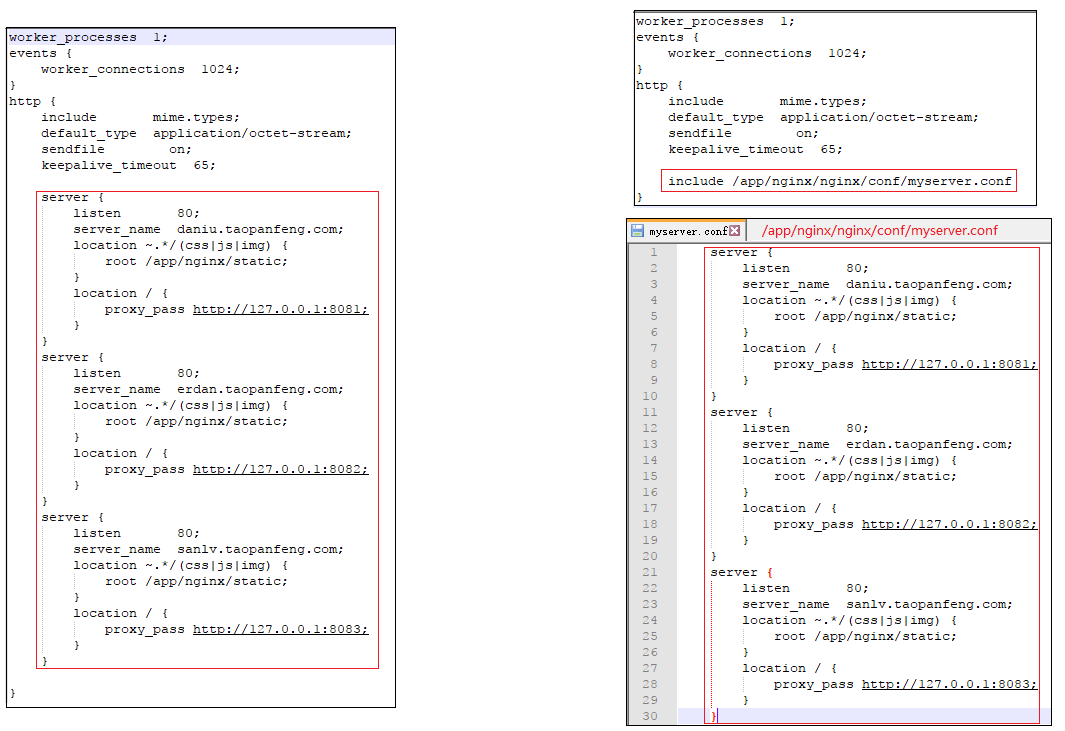
完结
2020-03-14 02:26:16
终于总结完了,看着都爽。
以后有新的知识的话,还会往里面加。
对于nginx配合模块使用,图片上传,代理头设置…还不是很了解。这里都是一些简单的可以入门的。