一、总览SpringBoot
前言
1 | VI. 2022-09-29 08.01 周四 |
Spring
1 | 2. 2022-09-29 08.17 |
JarLauncher
1 | 36. 2022-09-29 08.40 |
【日期标记】2022-09-29 11:31:38 以上同步完成
Maven 依赖
二选一
1 | <parent> |
容器
1 | 嵌入式 Java Web => Servlet => Tomcat Jetty Undertow |
1 | Servlet Web |
1 | package com.example.demo5; |
自动装配
1 | @SpringBootApplication |
1 | # 自动装配 |
二、走向自动装配
注解驱动发展史
1 | 2022-10-12 08:47:24 |
Spring注解编程模型
1 | + 1、元注解 (Meta-Annotations); |
- 2、Spring 模式注解 (Stereotype Annotations); ===> 注解的派生性
Spring注解驱动设计模式
1 | @Enable模块驱动 ===> @Import |
236页
【日期标记】2022-10-17 10:01:10 以上同步完成
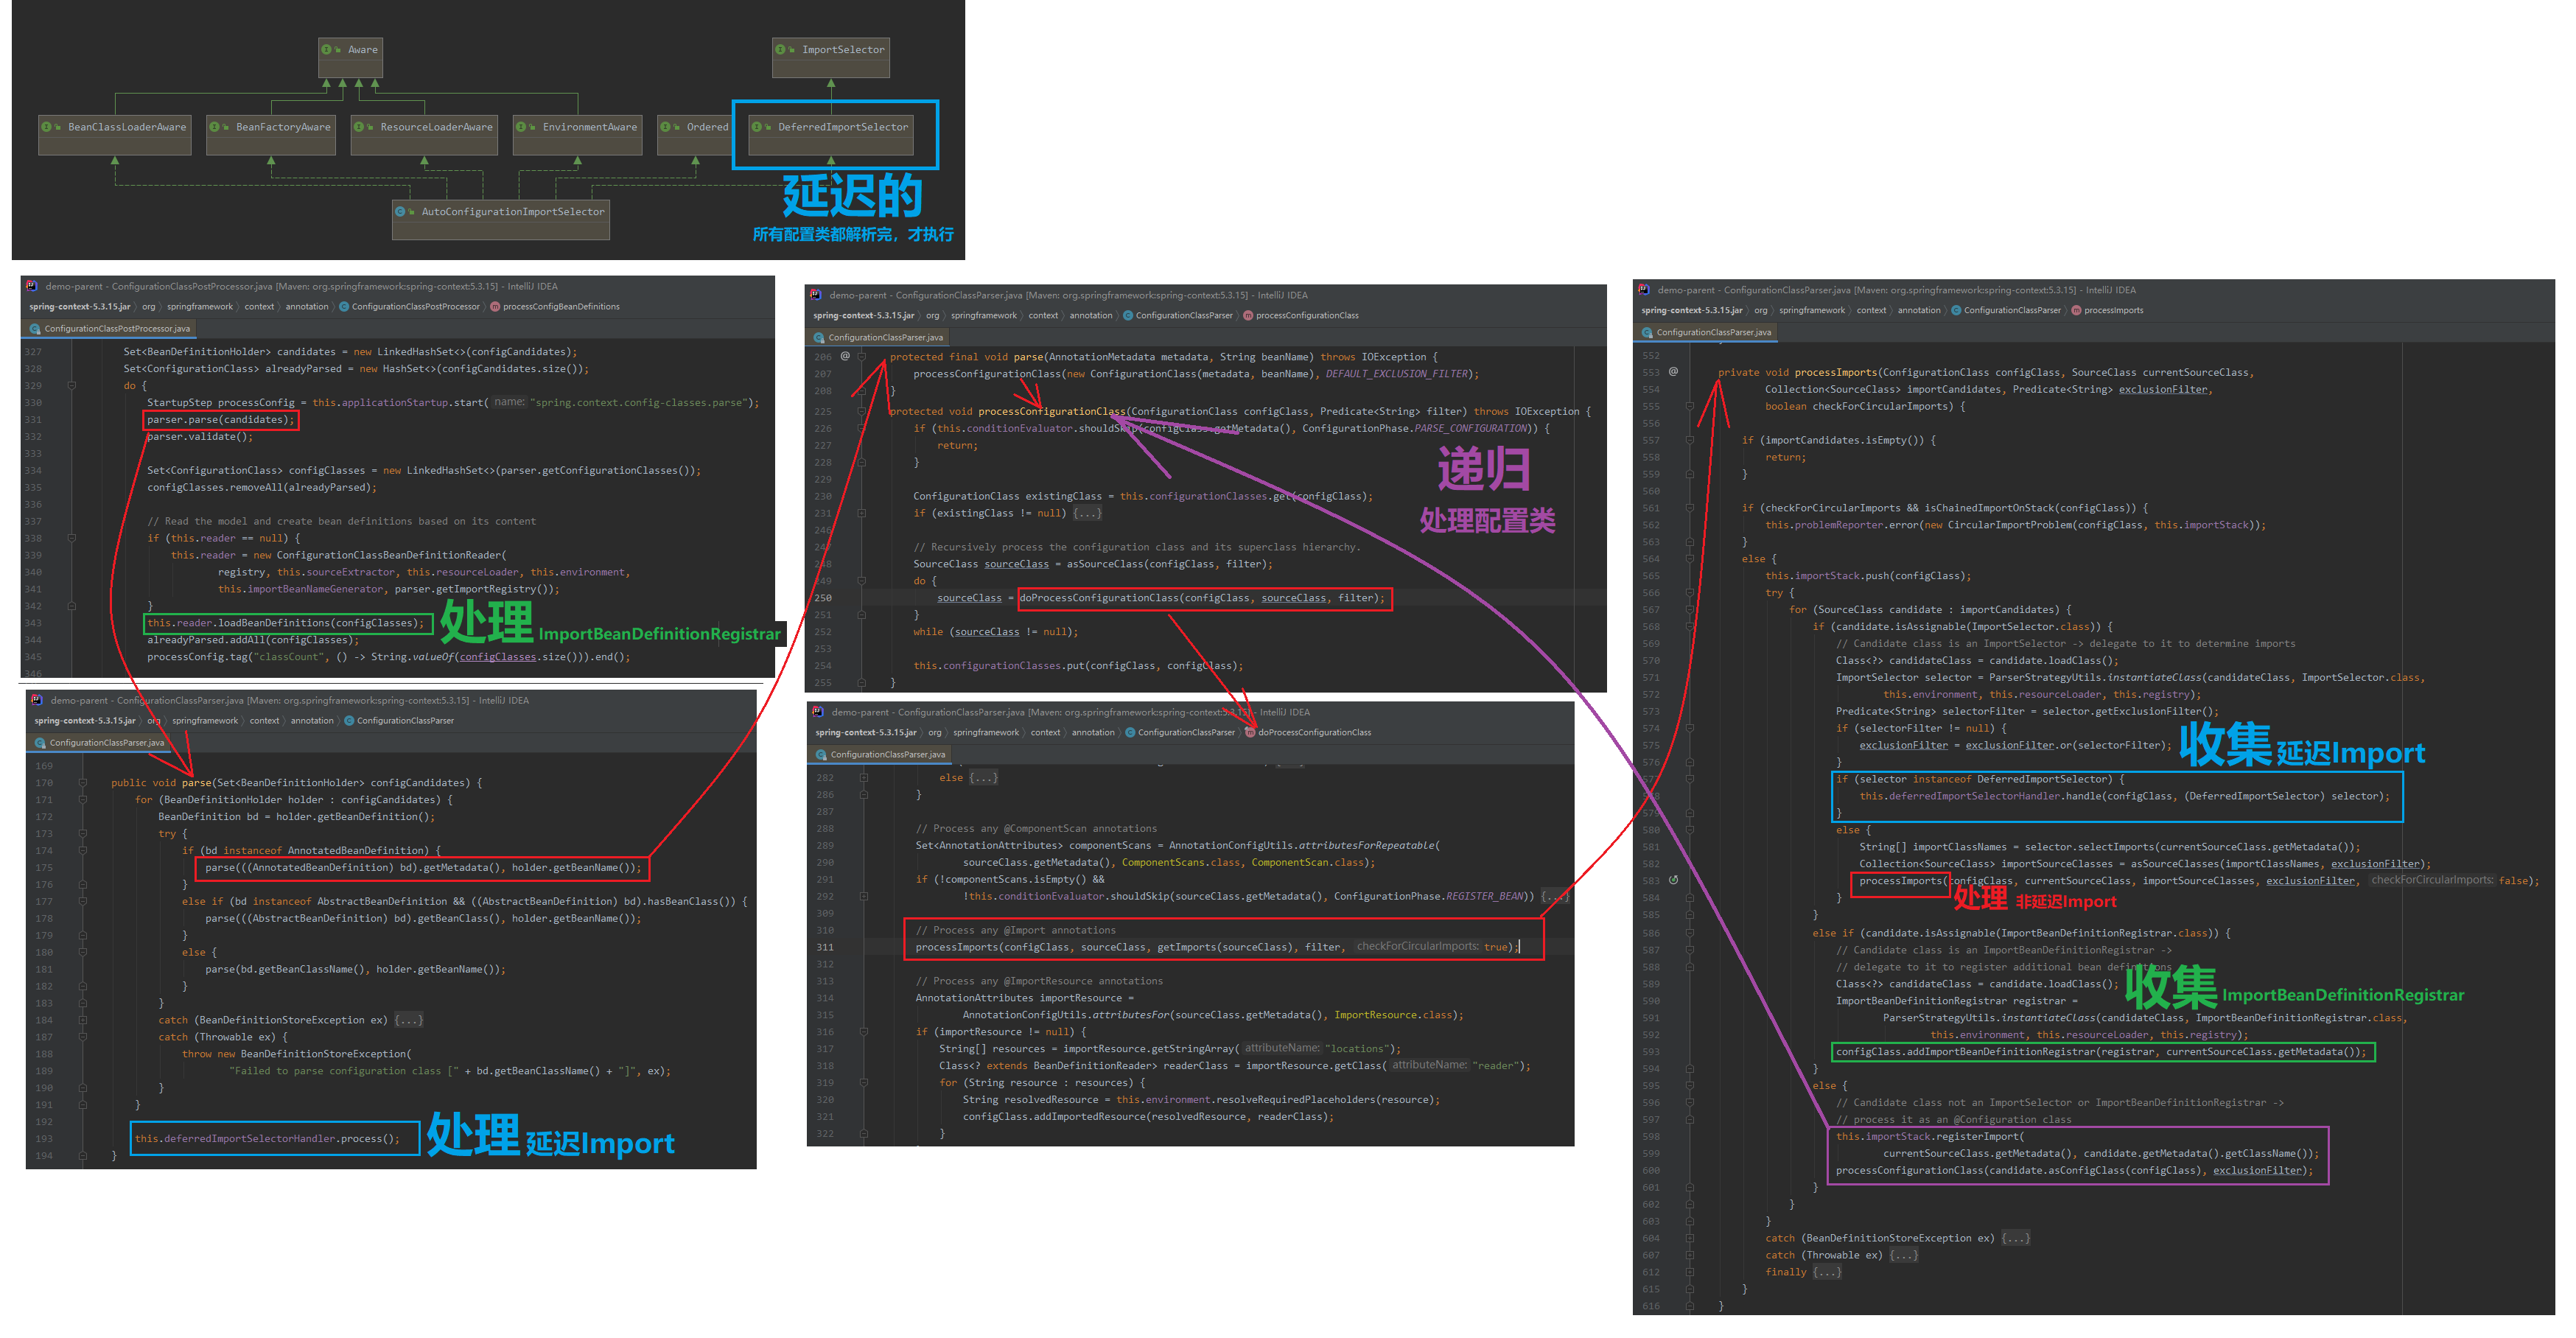
上面是使用方式,下面开始讲实现“ConfigurationClassPostProcessor 三阶段”。
250页
【日期标记】2022-10-17 18:31:12 以上同步完成
- 阶段1:ConfigurationClassPostProcessor 创建 BeanDefinition
- 阶段2:解析@Configuration(scan,parse,@Import,load),BeanDefinition注册
- 阶段3:enhance(CGLIB代理@Configuration,拦截@Bean)
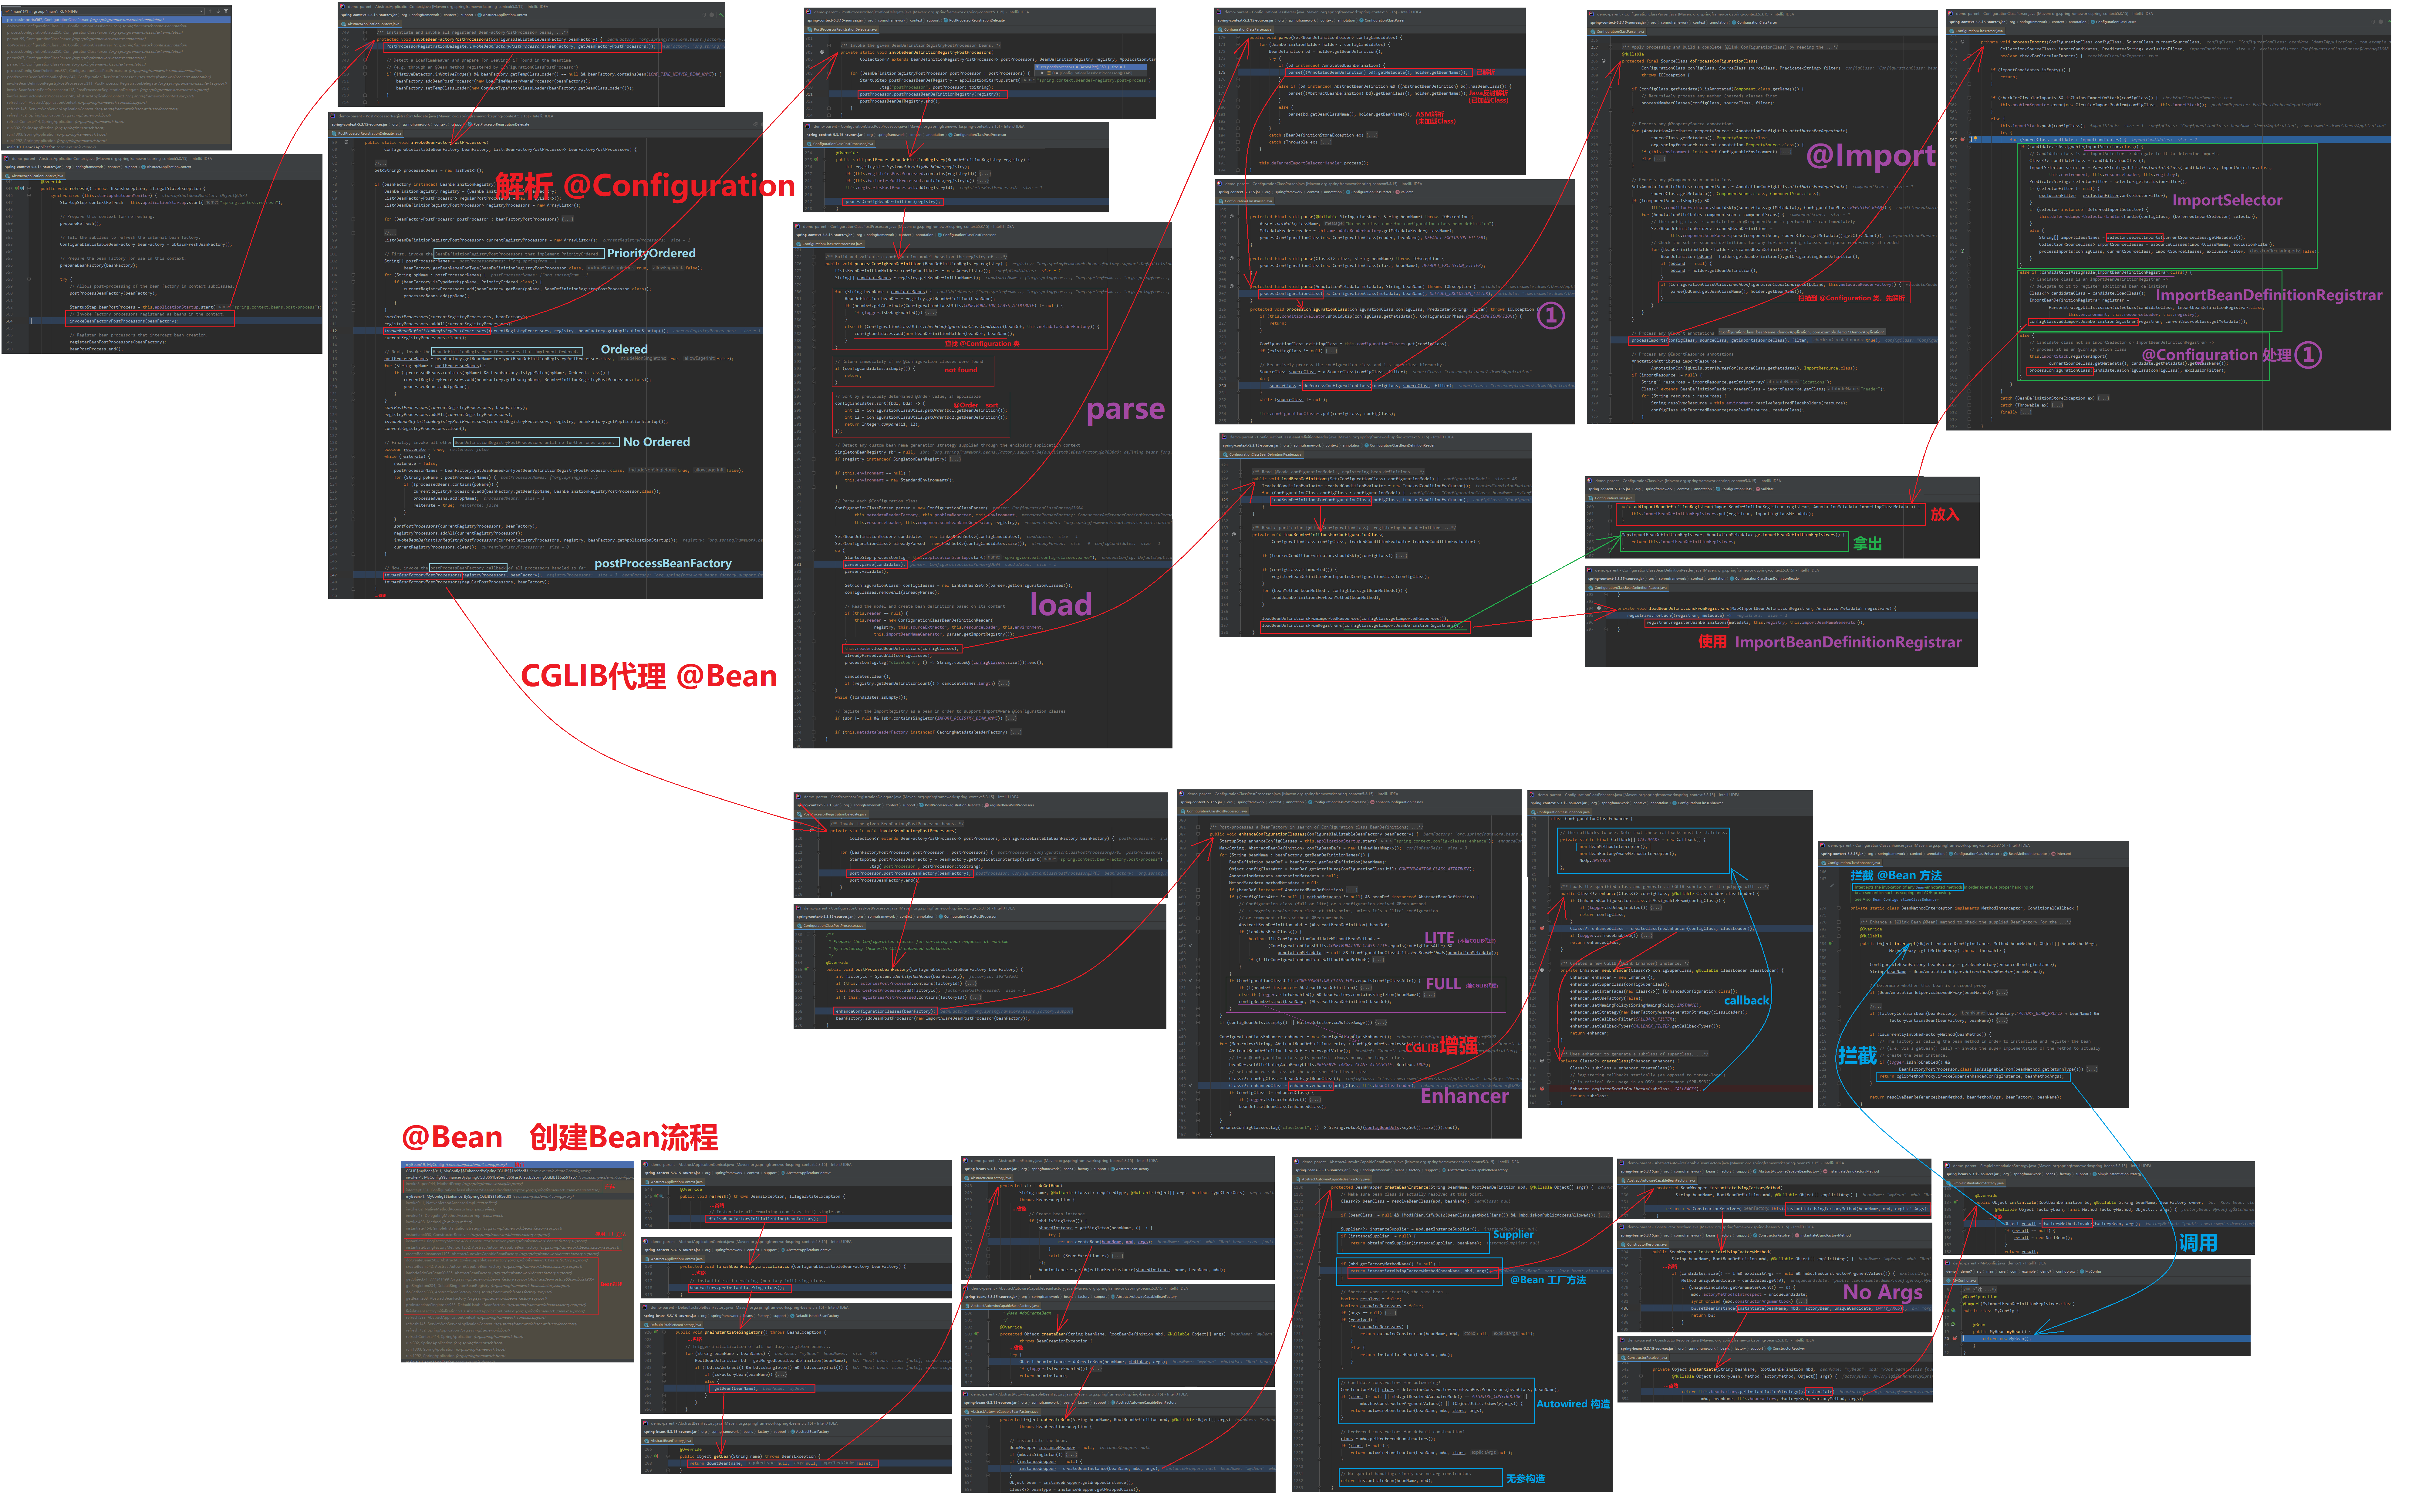
补充:查找配置类候选人(FULL、LITE)(2022-10-27 10:16:41)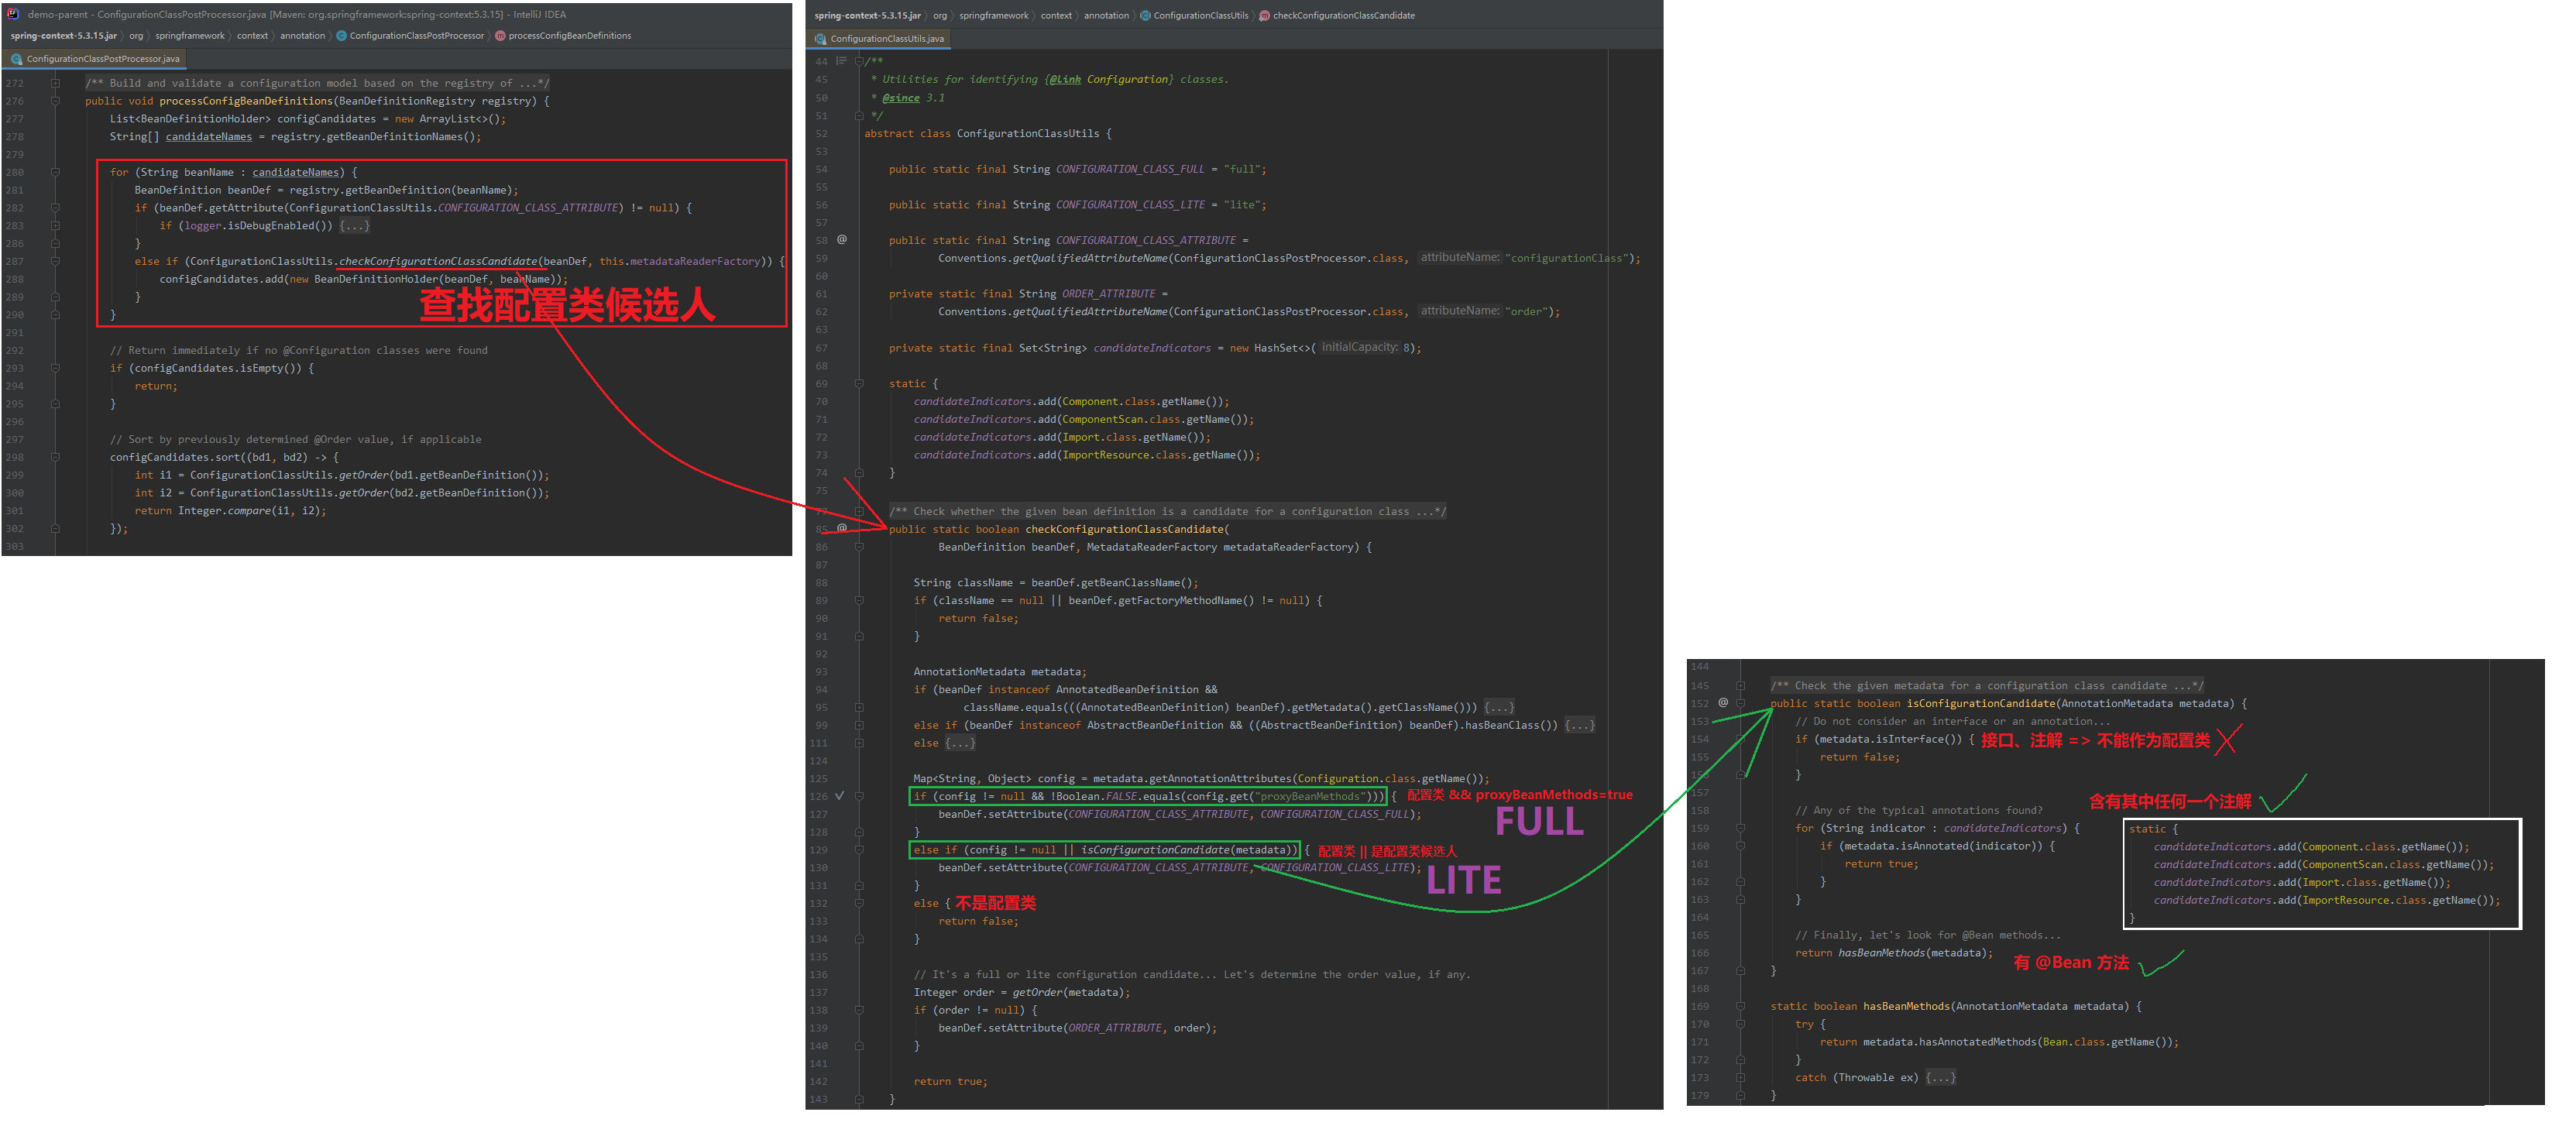
【日期标记】2022-10-18 17:24:14 以上同步完成
1 | 综上所述,ConfigurationClassPostProcessor 负责筛选 @Component Class、@Configuration Class 及 @Bean方法的 Bean定义(BeanDefinition), |
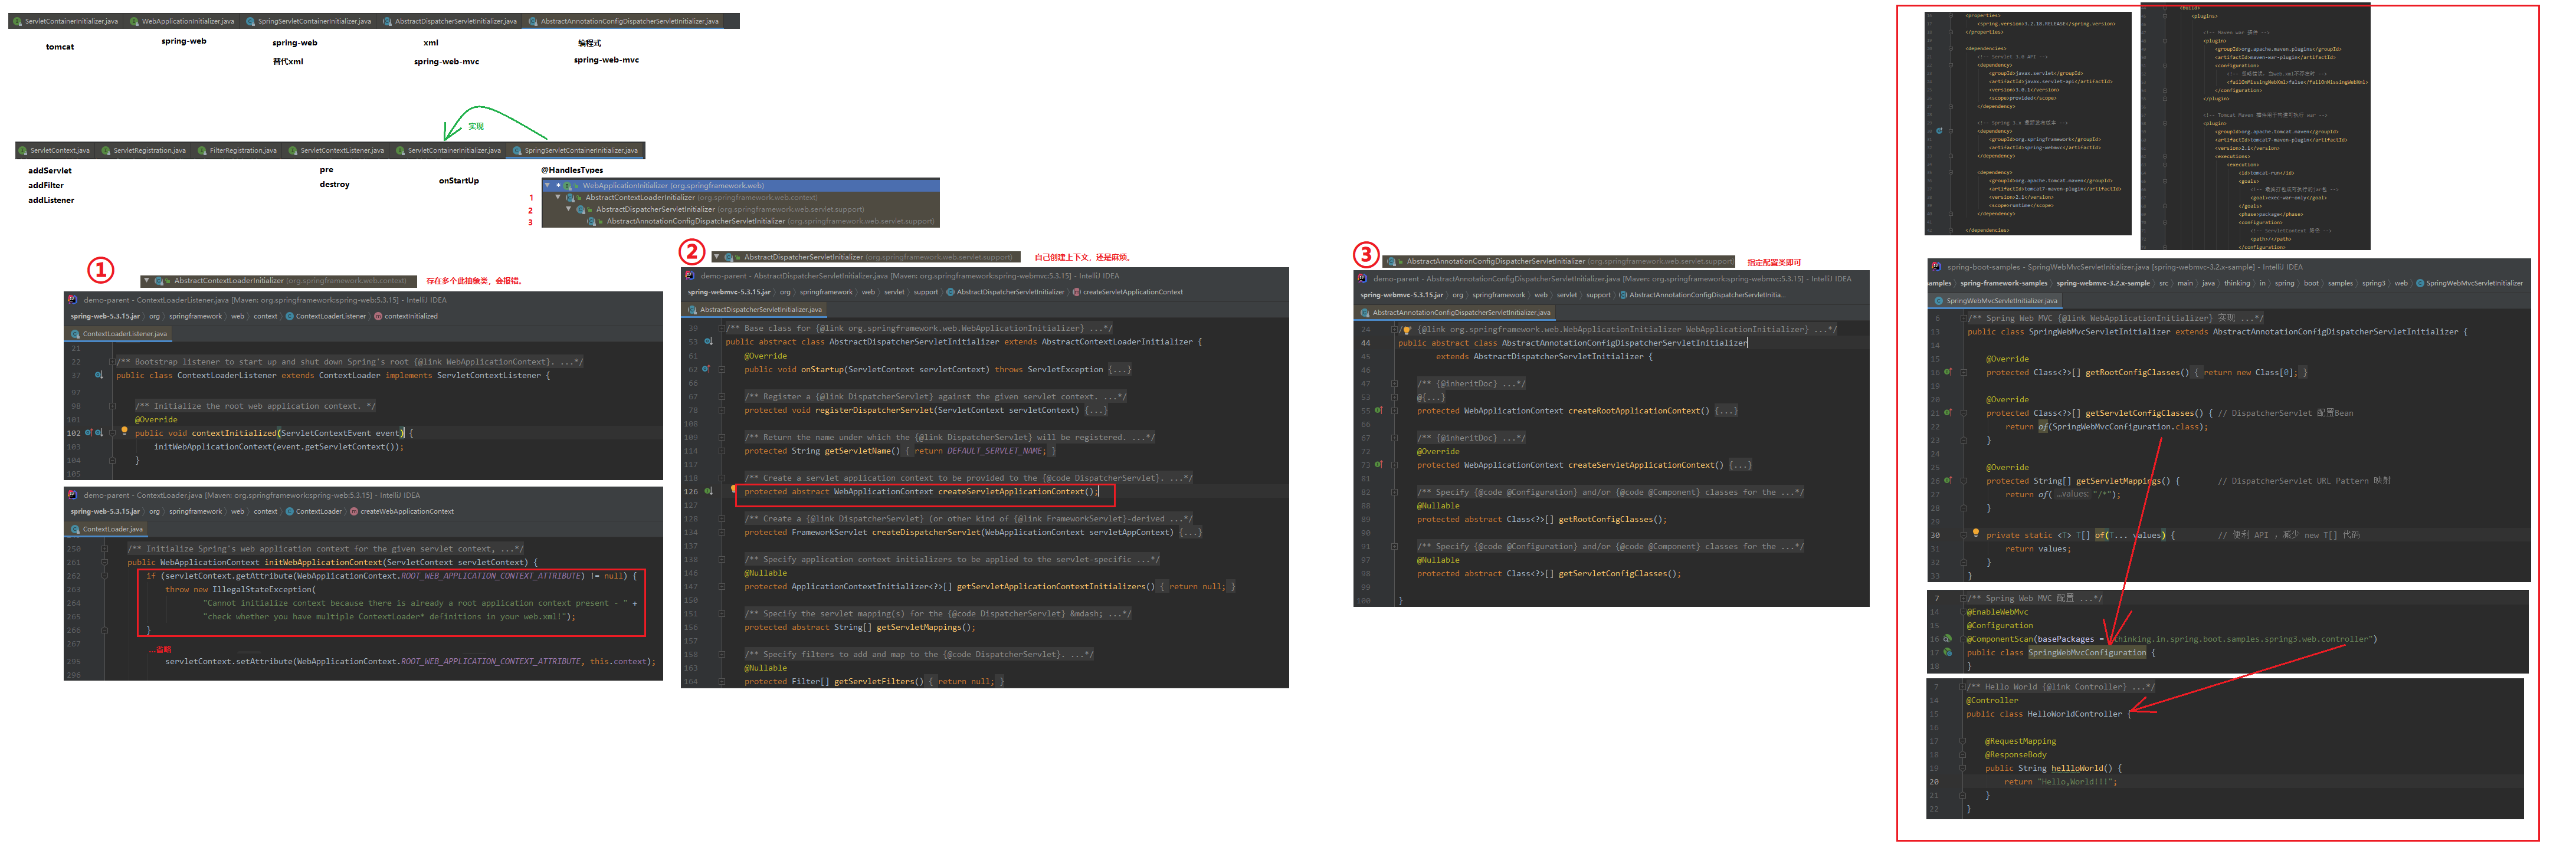
Spring-Web 自动装配
1 | tomcat |
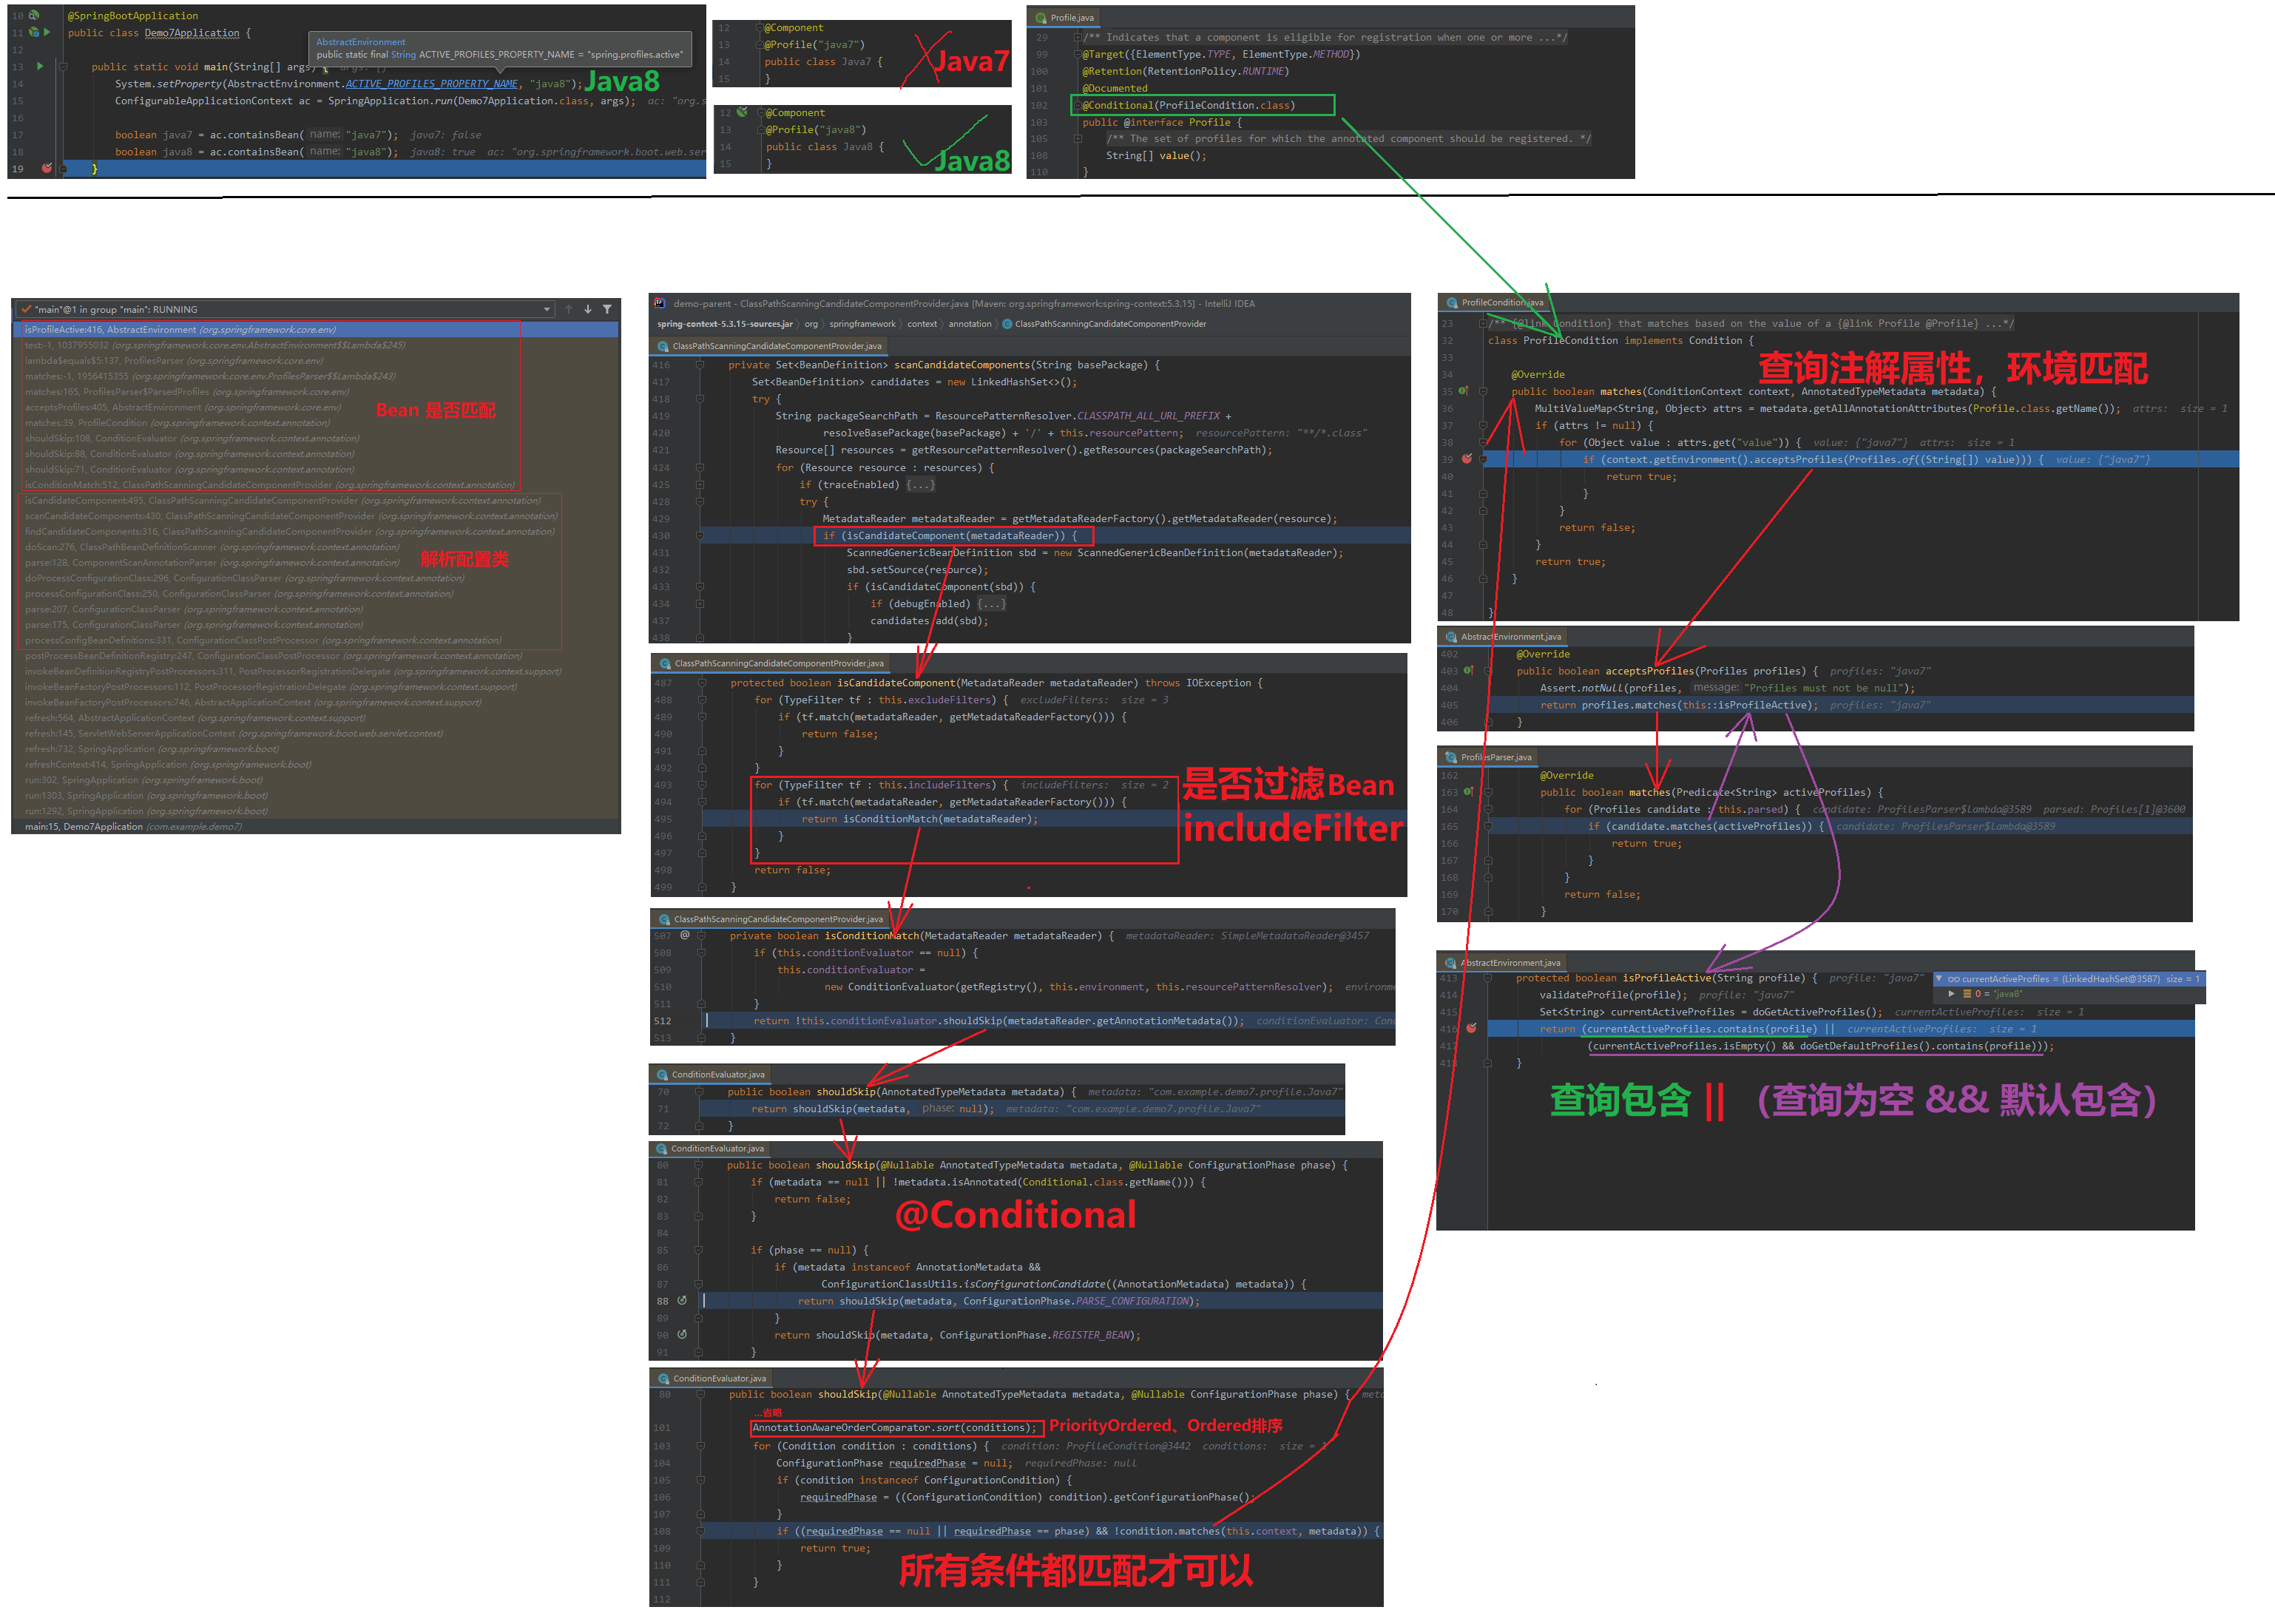
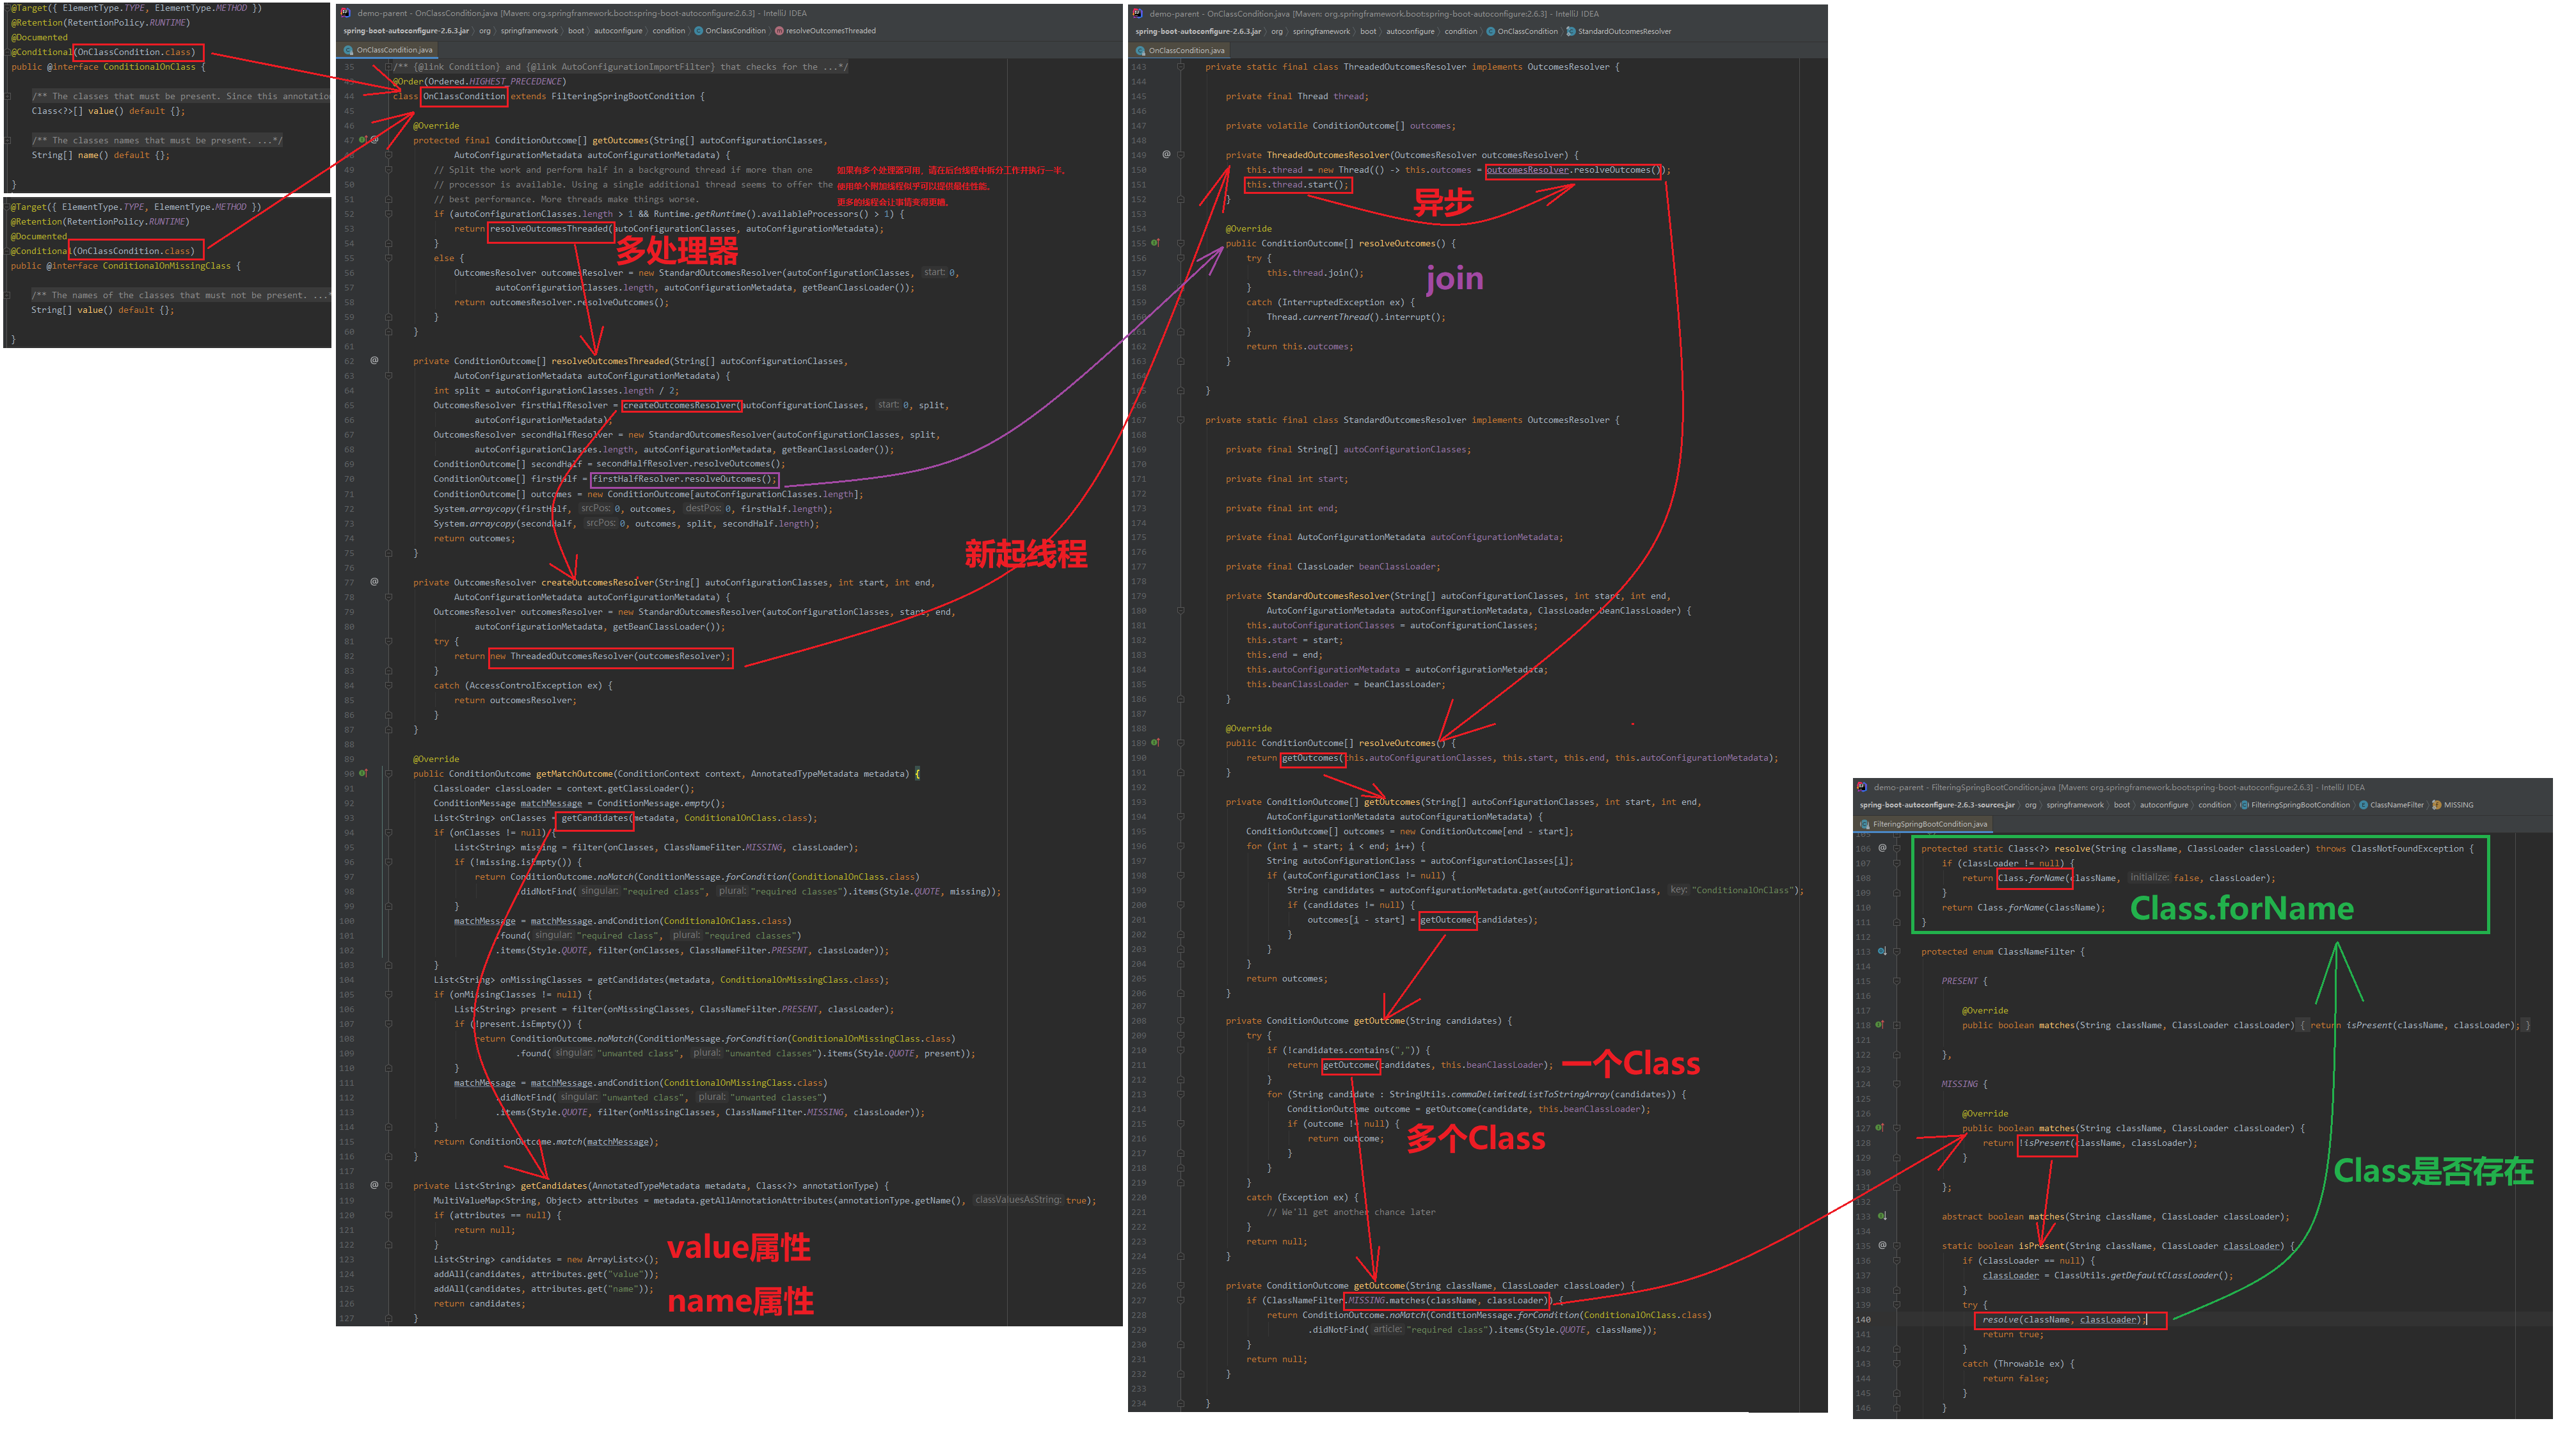
XML条件装配
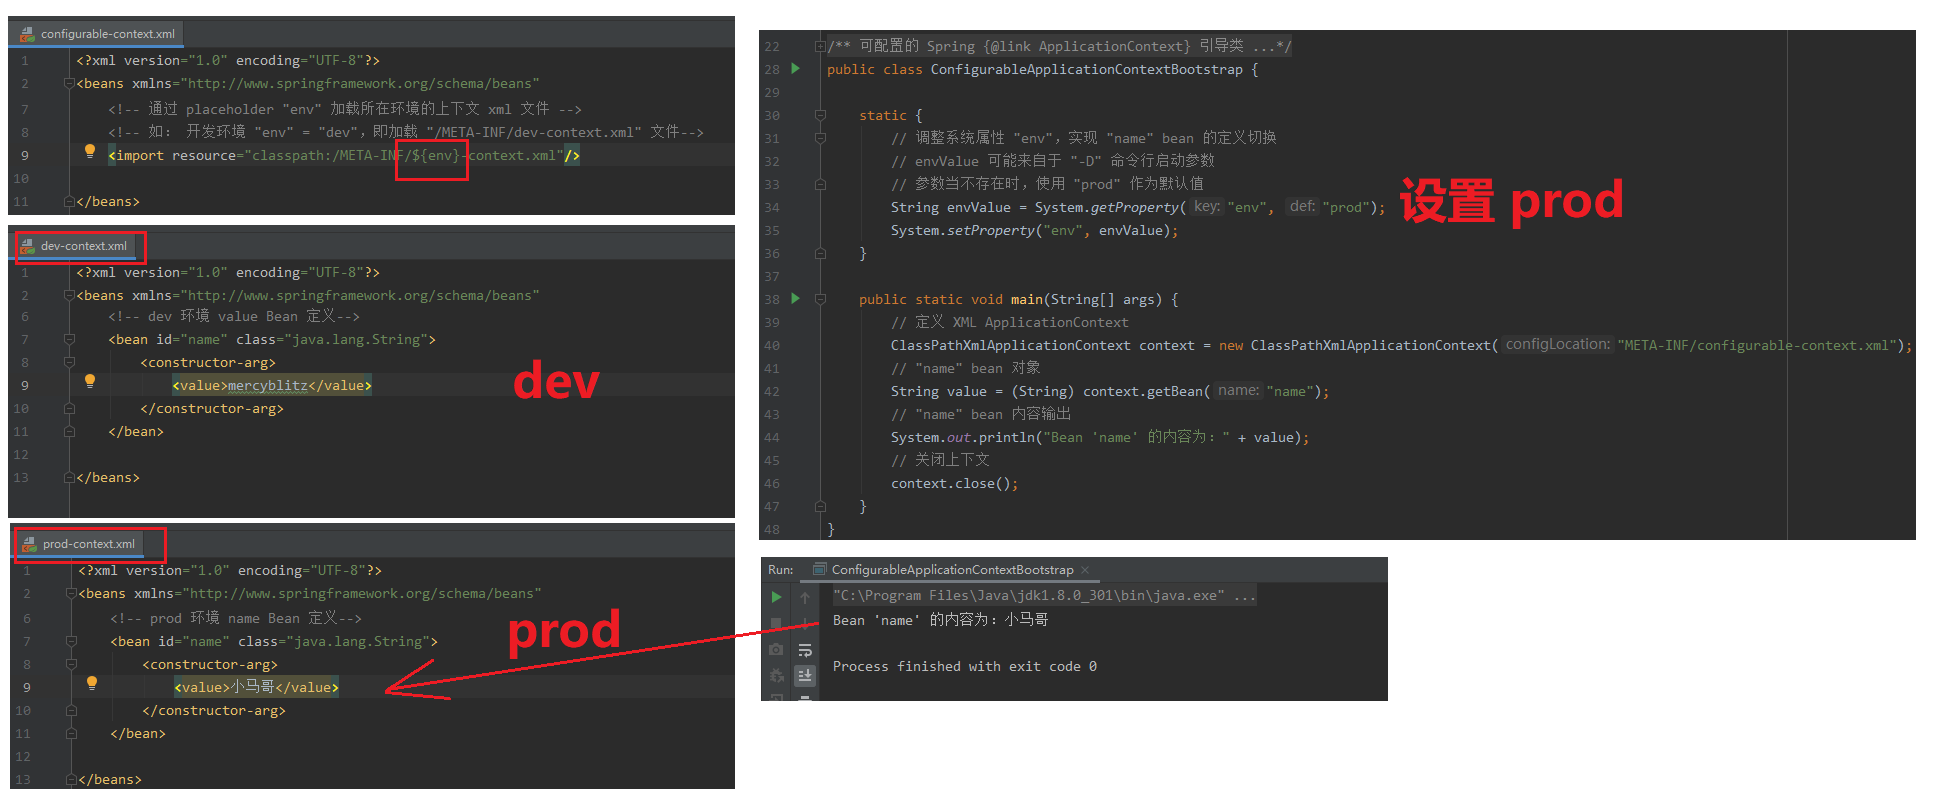
条件装配原理
- 配置条件装配原理:处理流程
280页
【日期标记】2022-10-20 18:43:31 以上同步完成 - shouldSkip @Conditional 条件匹配

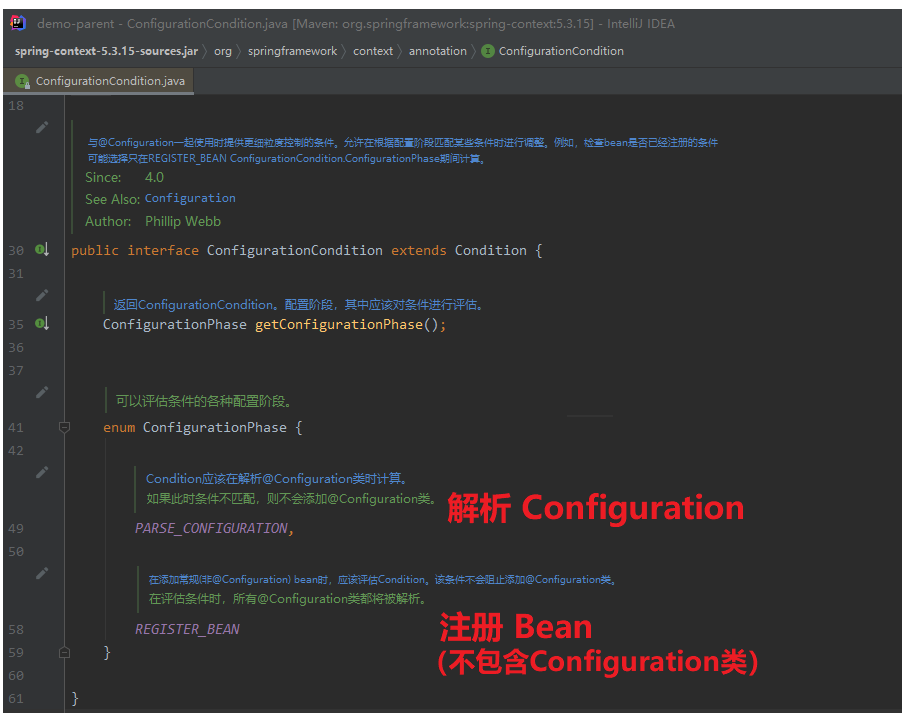
- ConfigurationCondition 接口(ConditionEvaluator 评估两阶段:“Bean 注册阶段”和“Configuration Class 解析阶段”。)
1 | 至此,关于 Spring Framework 走向注解驱动编程 (Annotation-Driven)的讨论告一段落。 |
291页
【日期标记】2022-10-21 09:31:57 以上同步完成
开启自动装配
开启自动装配 @EnableAutoConfiguration
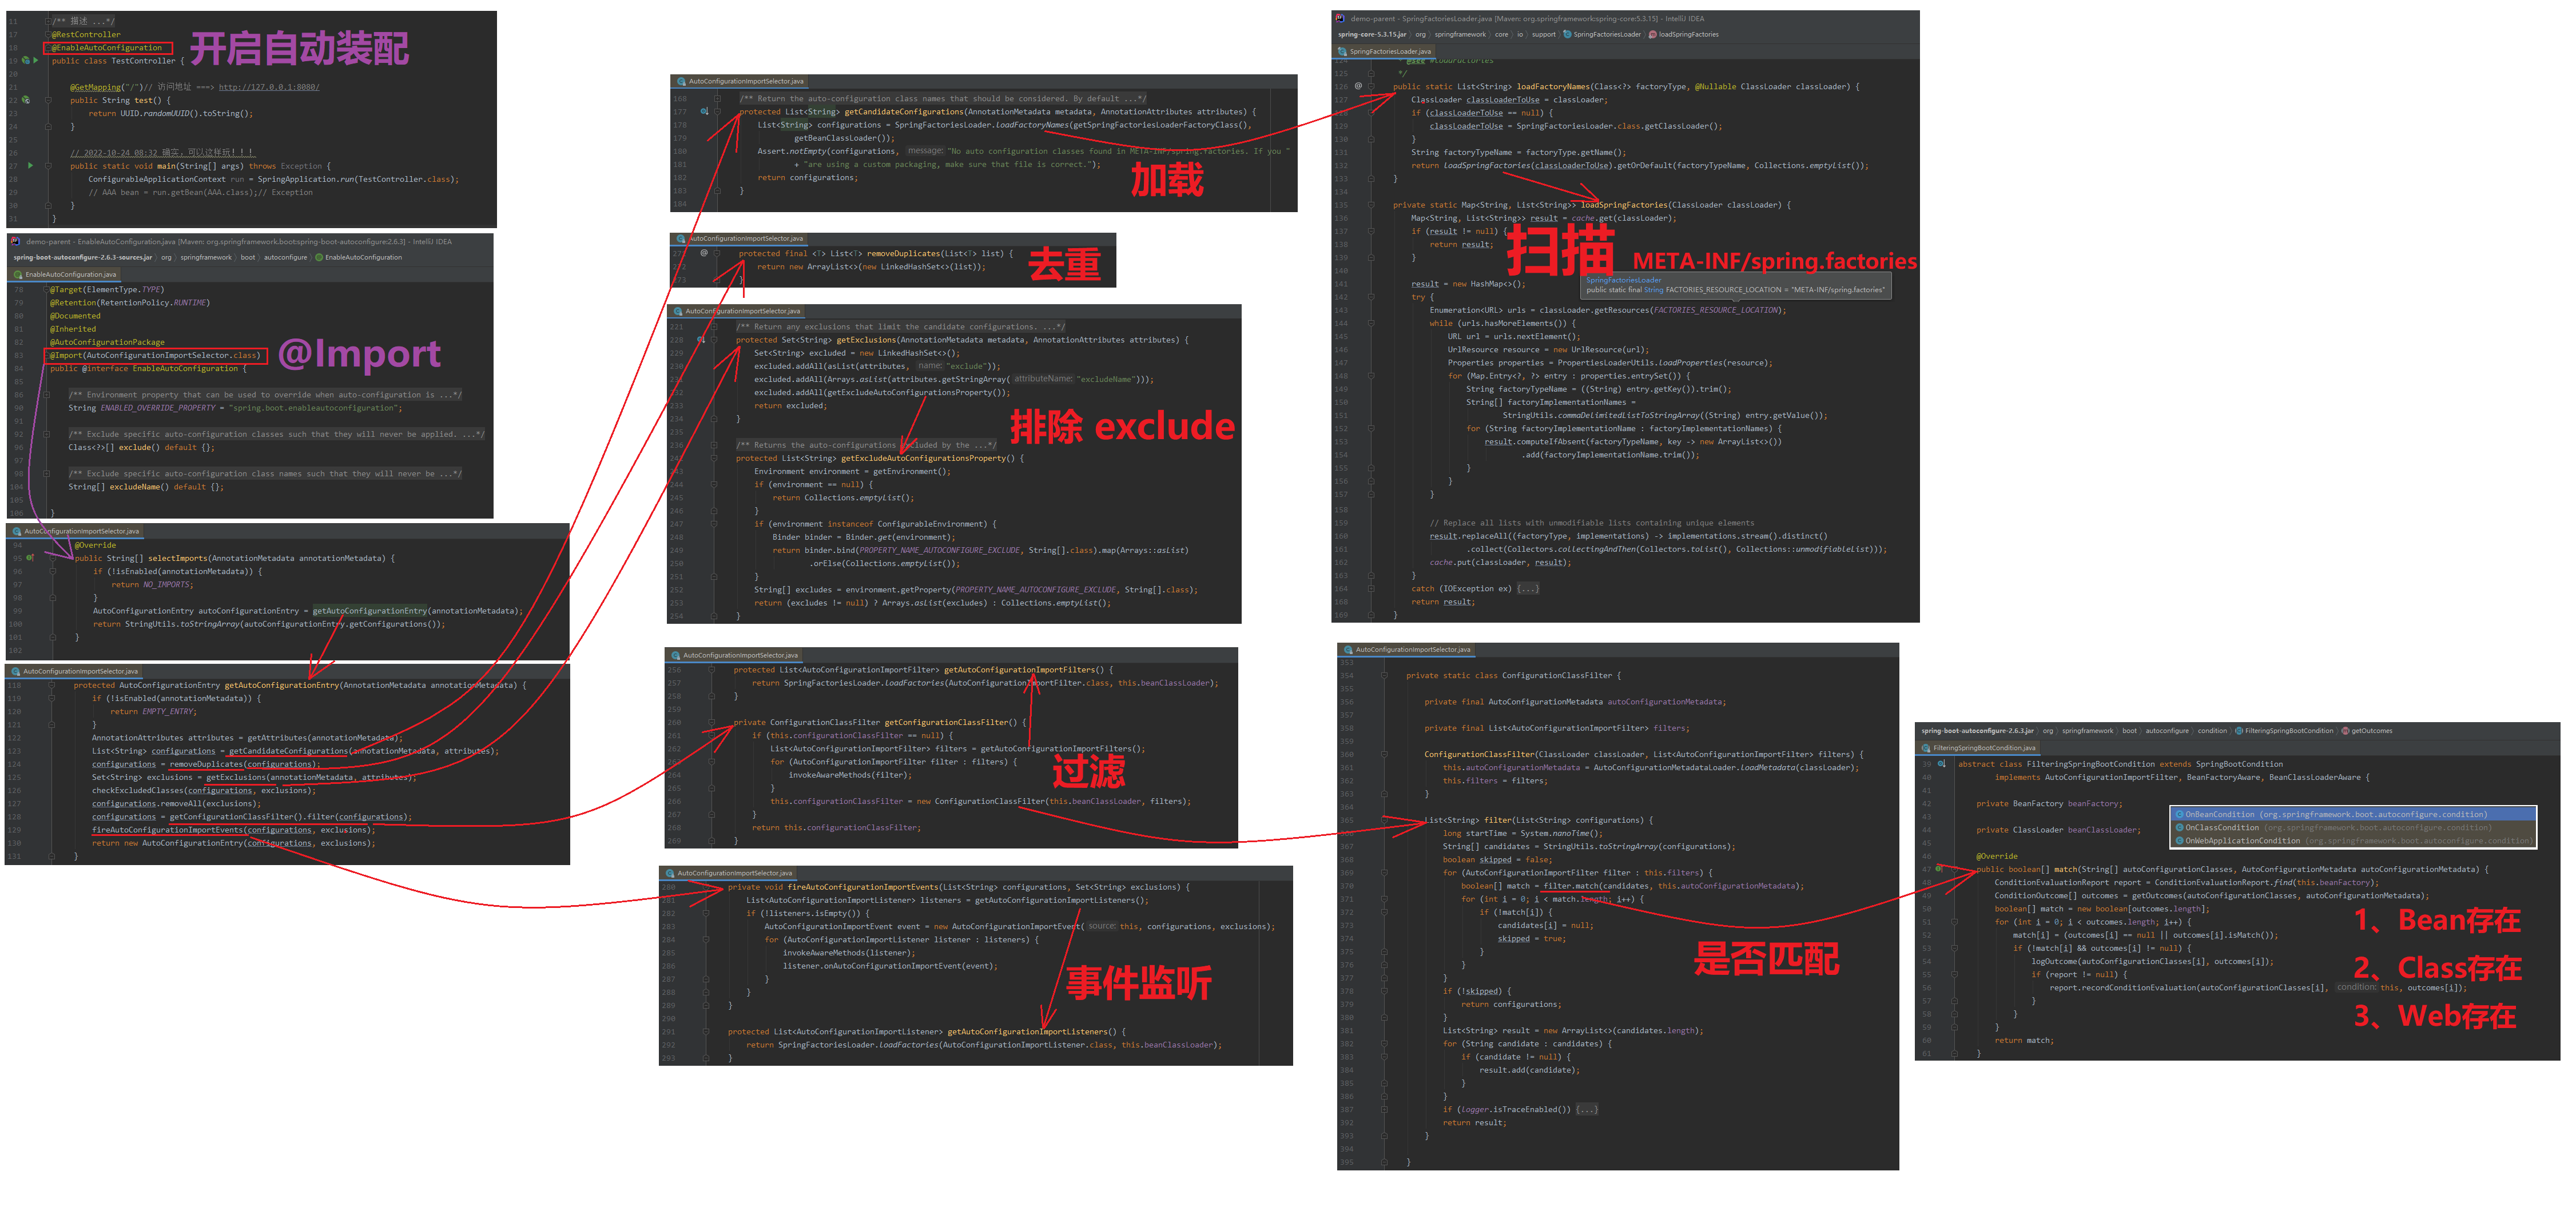
316页
【日期标记】2022-10-24 10:40:29 以上同步完成(看完待整理)
【日期标记】2022-10-31 13:56:07 以上同步完成(整理完成)AutoConfigurationImportSelector 延迟导入
324页
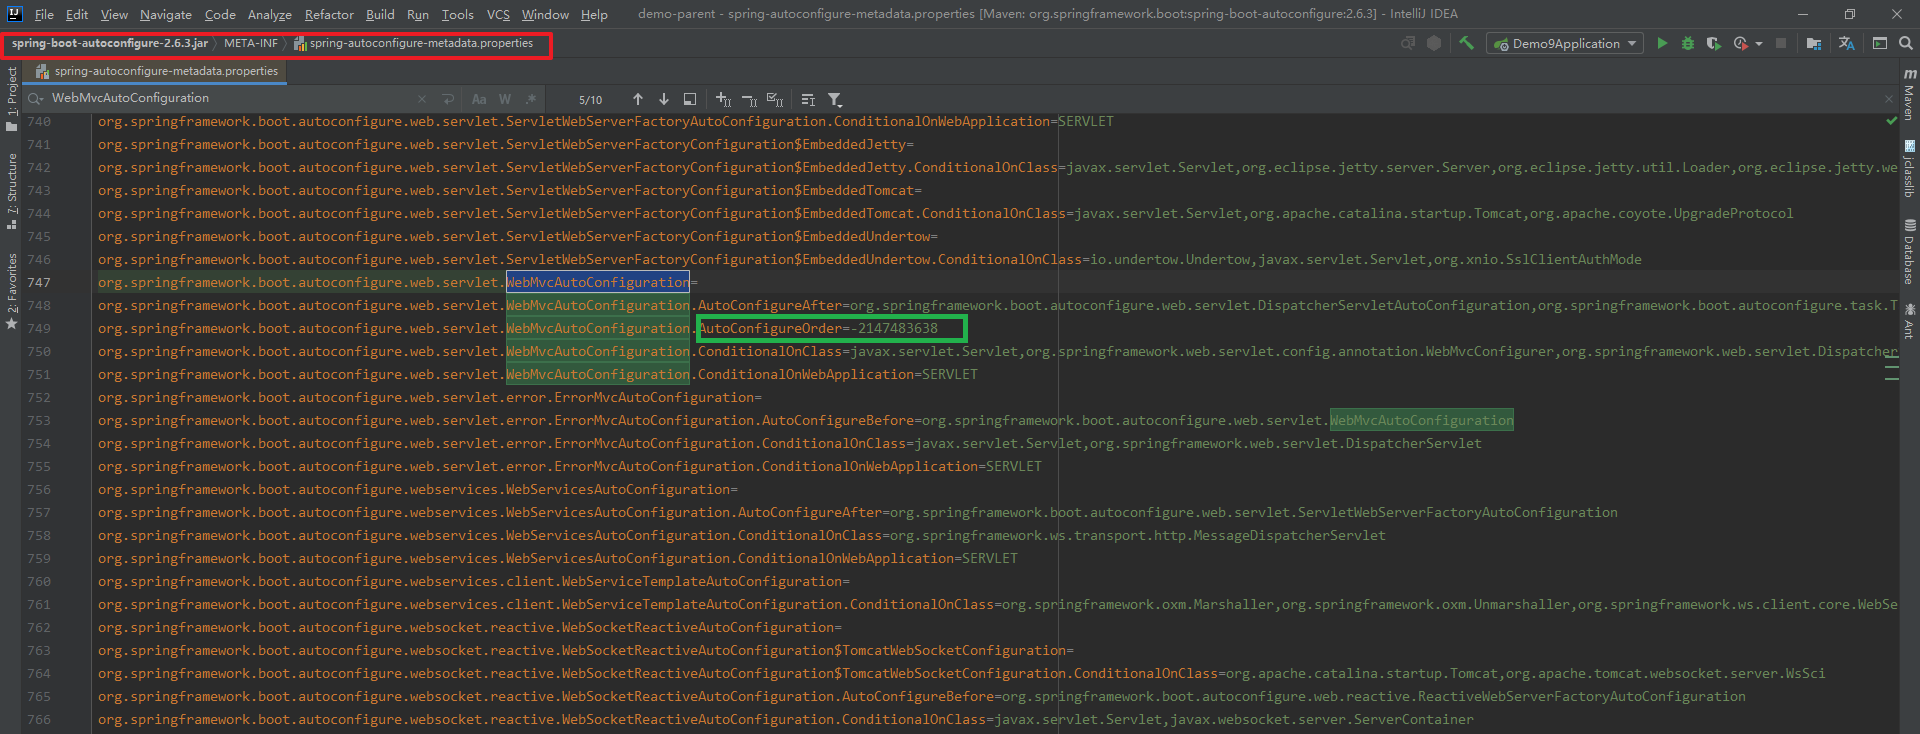
【日期标记】2022-11-01 08:14:35 以上同步完成排序:@AutoConfigureBefore、@AutoConfigureAfter、@AutoConfigureOrder
1
2
3
4
5
6# 元注解配置文件
META-INF/spring-autoconfigure-metadata.properties
# 好处 => 提升性能
存在其中,直接读取;
不存在,则需要 ClassLoader加载反射读取 或 字节码ASM读取
332页
【日期标记】2022-11-01 10:50:58 以上同步完成自动扫描包 @AutoConfigurationPackage(JPA entity扫描)
自定义starter
1 | 0. 配置 |
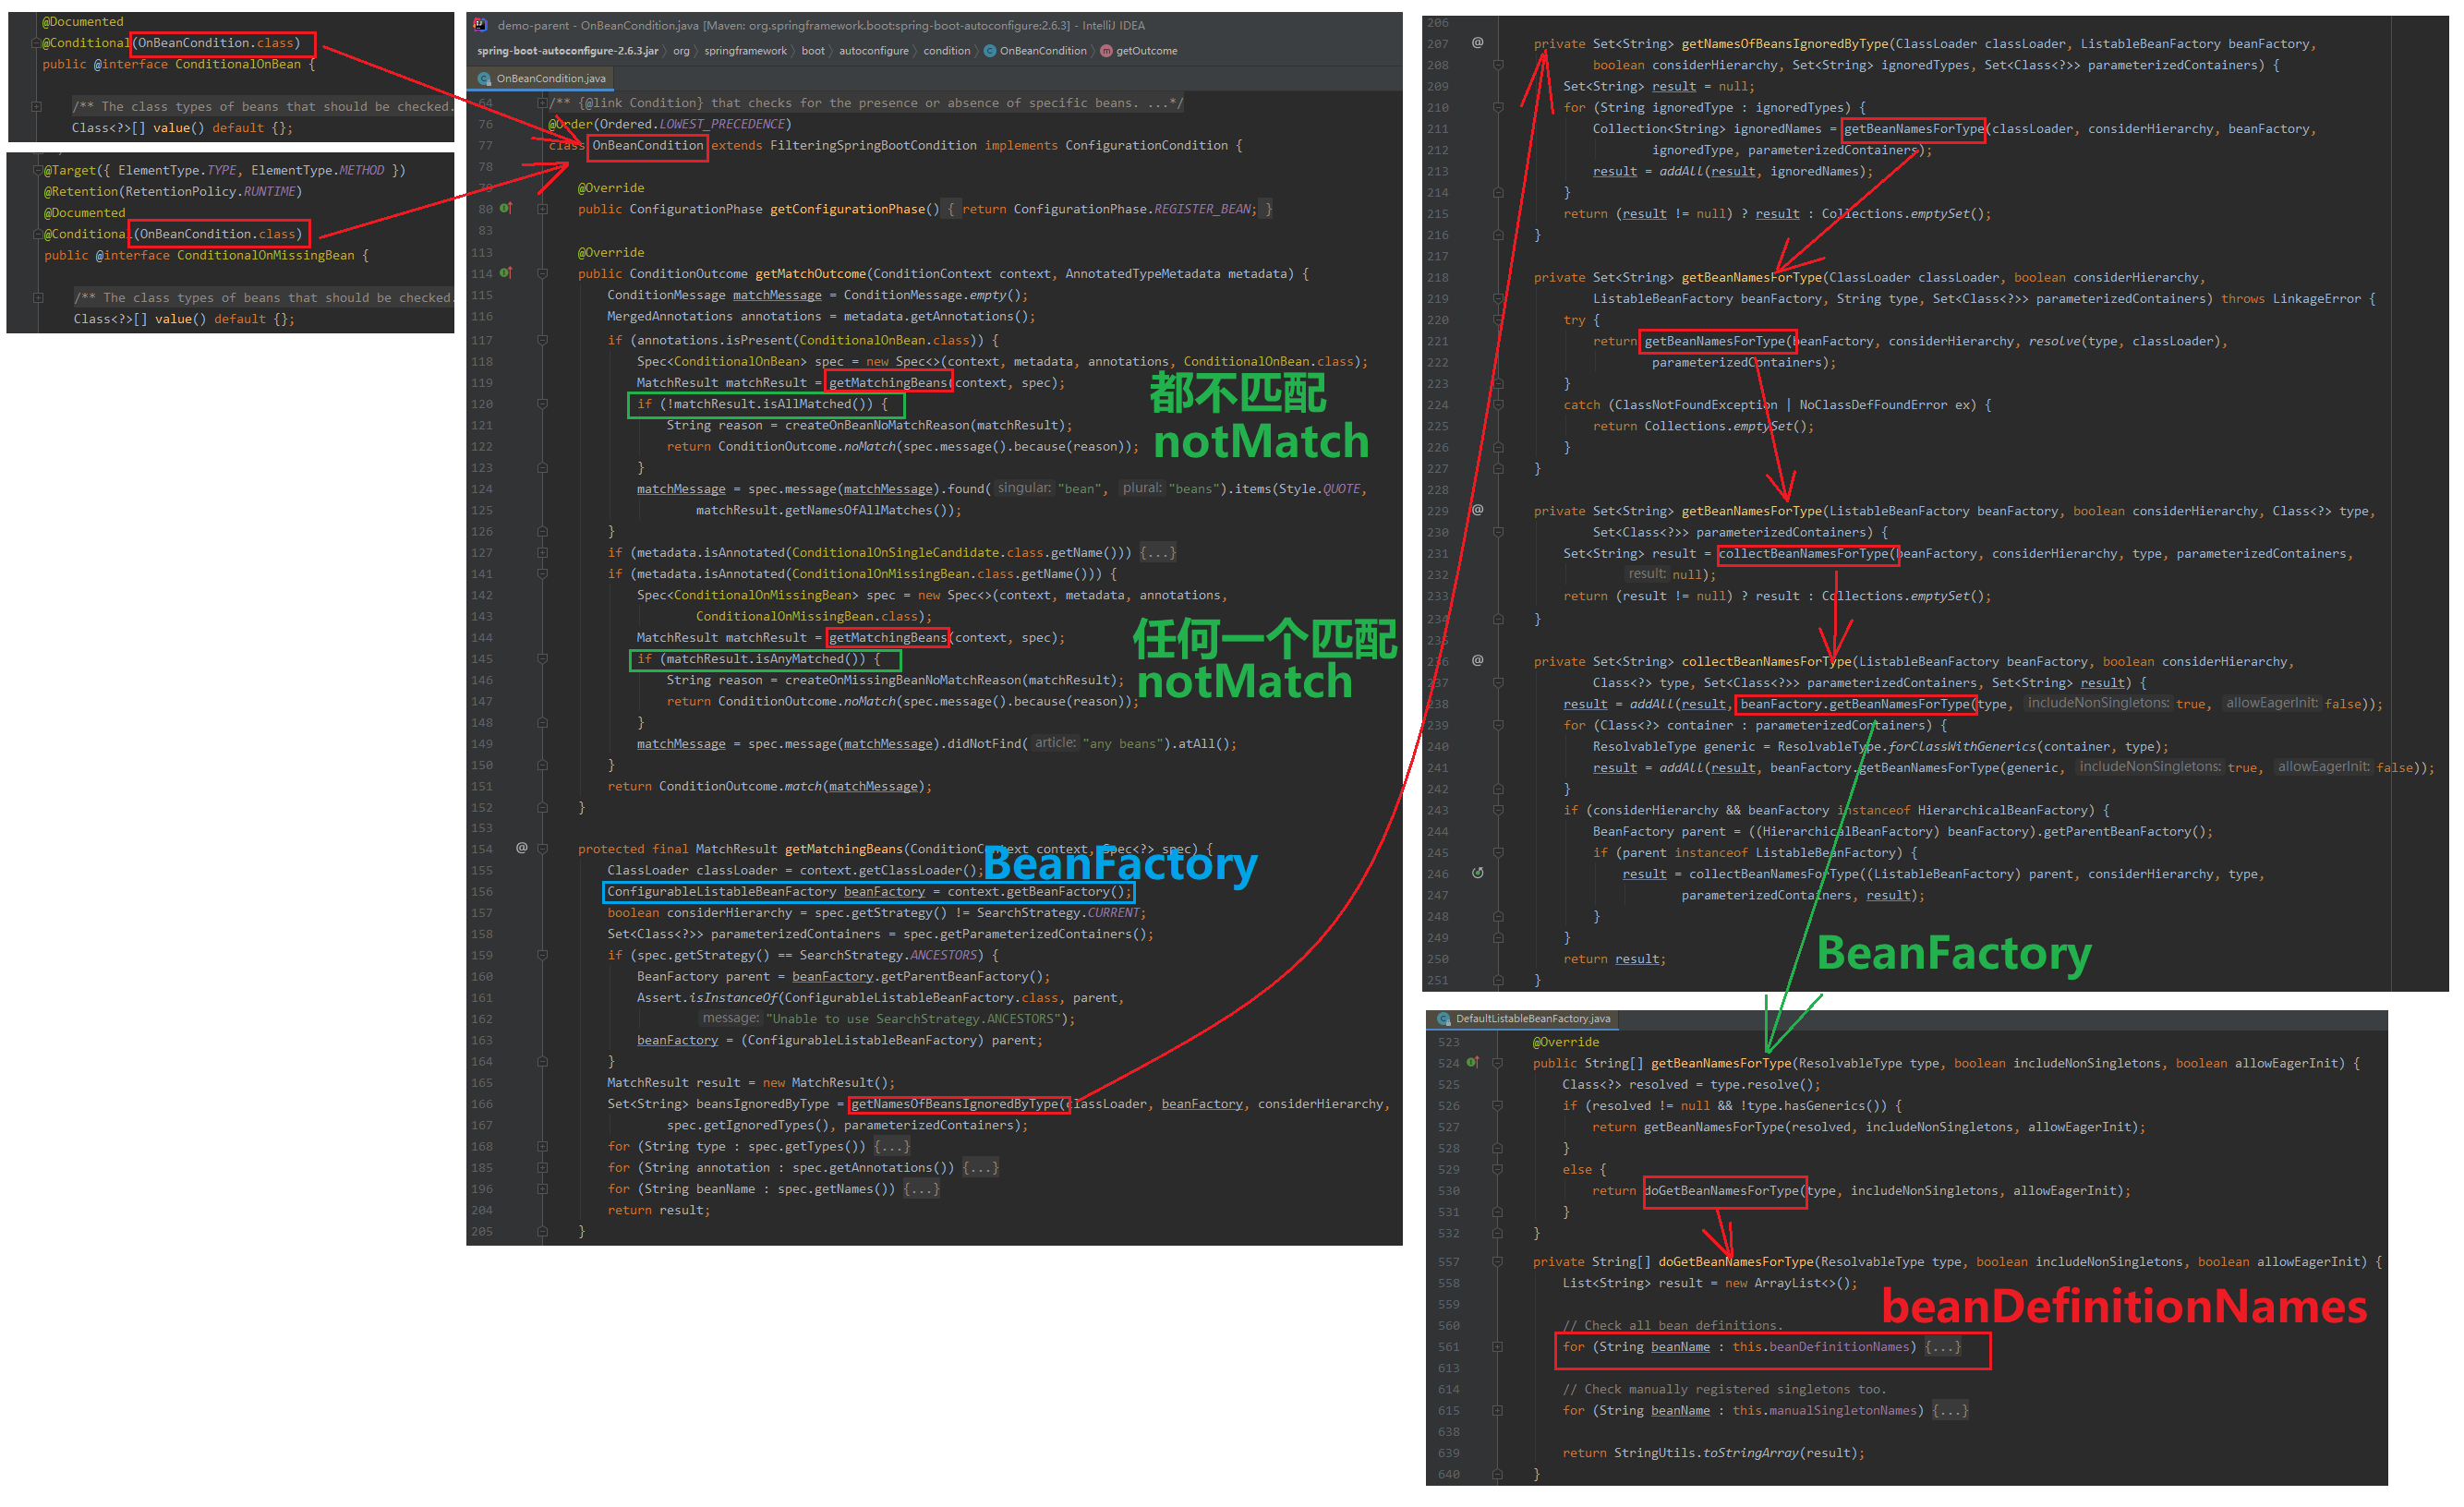
@ConditionOn*
代码参考: thinking-in-spring-boot-samples — gitee
starter ===> spring-boot-2.0-samples/formatter-spring-boot-starter
使用案例 ===> spring-boot-2.0-samples/auto-configuration-sample
- Class ===> Class.forName加载是否存在
1
2
3
4
5
6starter optional=true
@ConditionalOnClass(name = "xxx")
@ConditionalOnMissingClass(value = "xxx")
已启动 => 未生效
加入依赖 => 生效!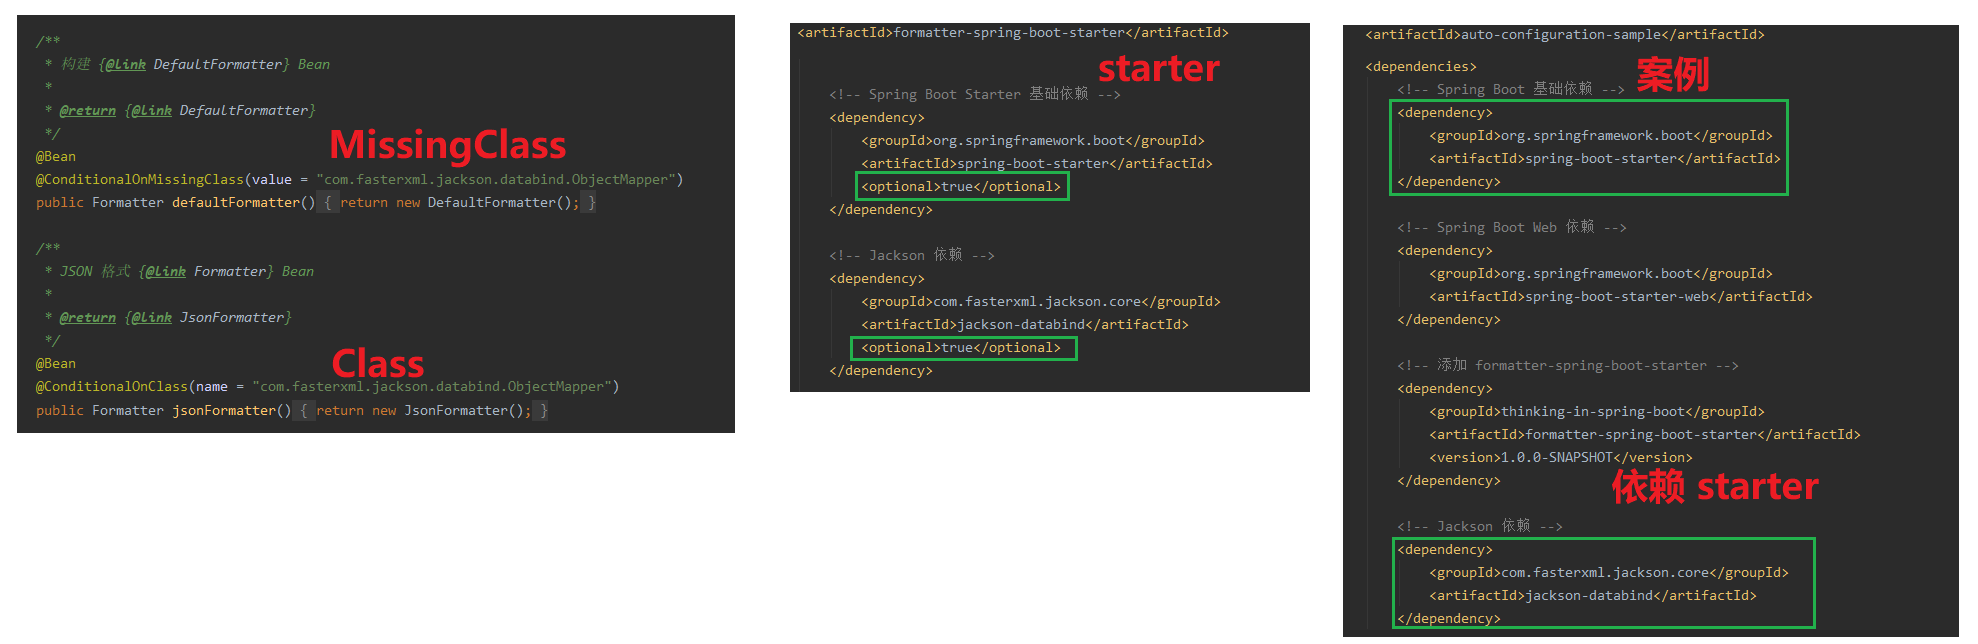
358页
- Bean ===> BeanFactory 获取
class 与 Bean 同时使用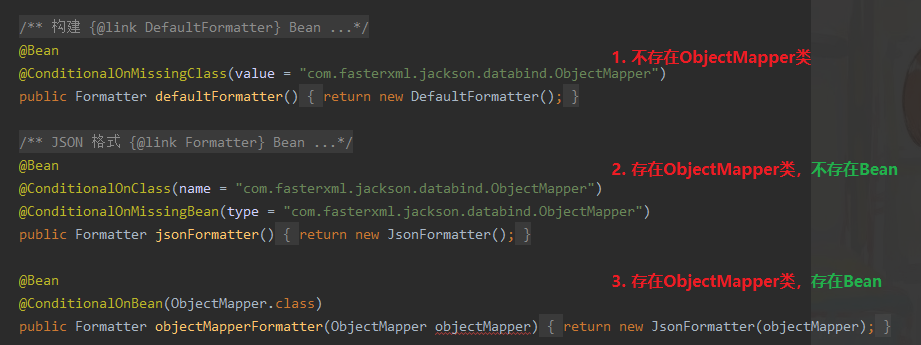
370页
- Property ===> Environment获取进行Value匹配 String.equalsIgnoreCase
1
2
3
4
5
6
7
8
9
10prefix + name => key
havingValue => value(配置的如果是这个值,才生效;否则不是这个值,则不失效)
matchIfMissing => 没配置key,默认匹配成功
# 例如:AOP自动装配
# havingValue = "true" 配置必须是 true 才可以;如果配置false,则关闭
# matchIfMissing = true 不配置默认也开启
@Configuration(proxyBeanMethods = false)
@ConditionalOnProperty(prefix = "spring.aop", name = "auto", havingValue = "true", matchIfMissing = true)
public class AopAutoConfiguration {
375页
- Resource
- Web
- SpEL
小总结
1 | Spring:1.x => 5.0 => 渐进式发展(核心特性,注解能力,) |
SpringApplication
1 | # 1. 构造阶段 |
SpringApplication 准备阶段
1 | public ConfigurableApplicationContext run(String... args) { |
理解 SpringApplicationRunListeners
1 | SringBoot 监听 |
- 源码:SpringBoot 广播器、Spring 广播器 低版本相同
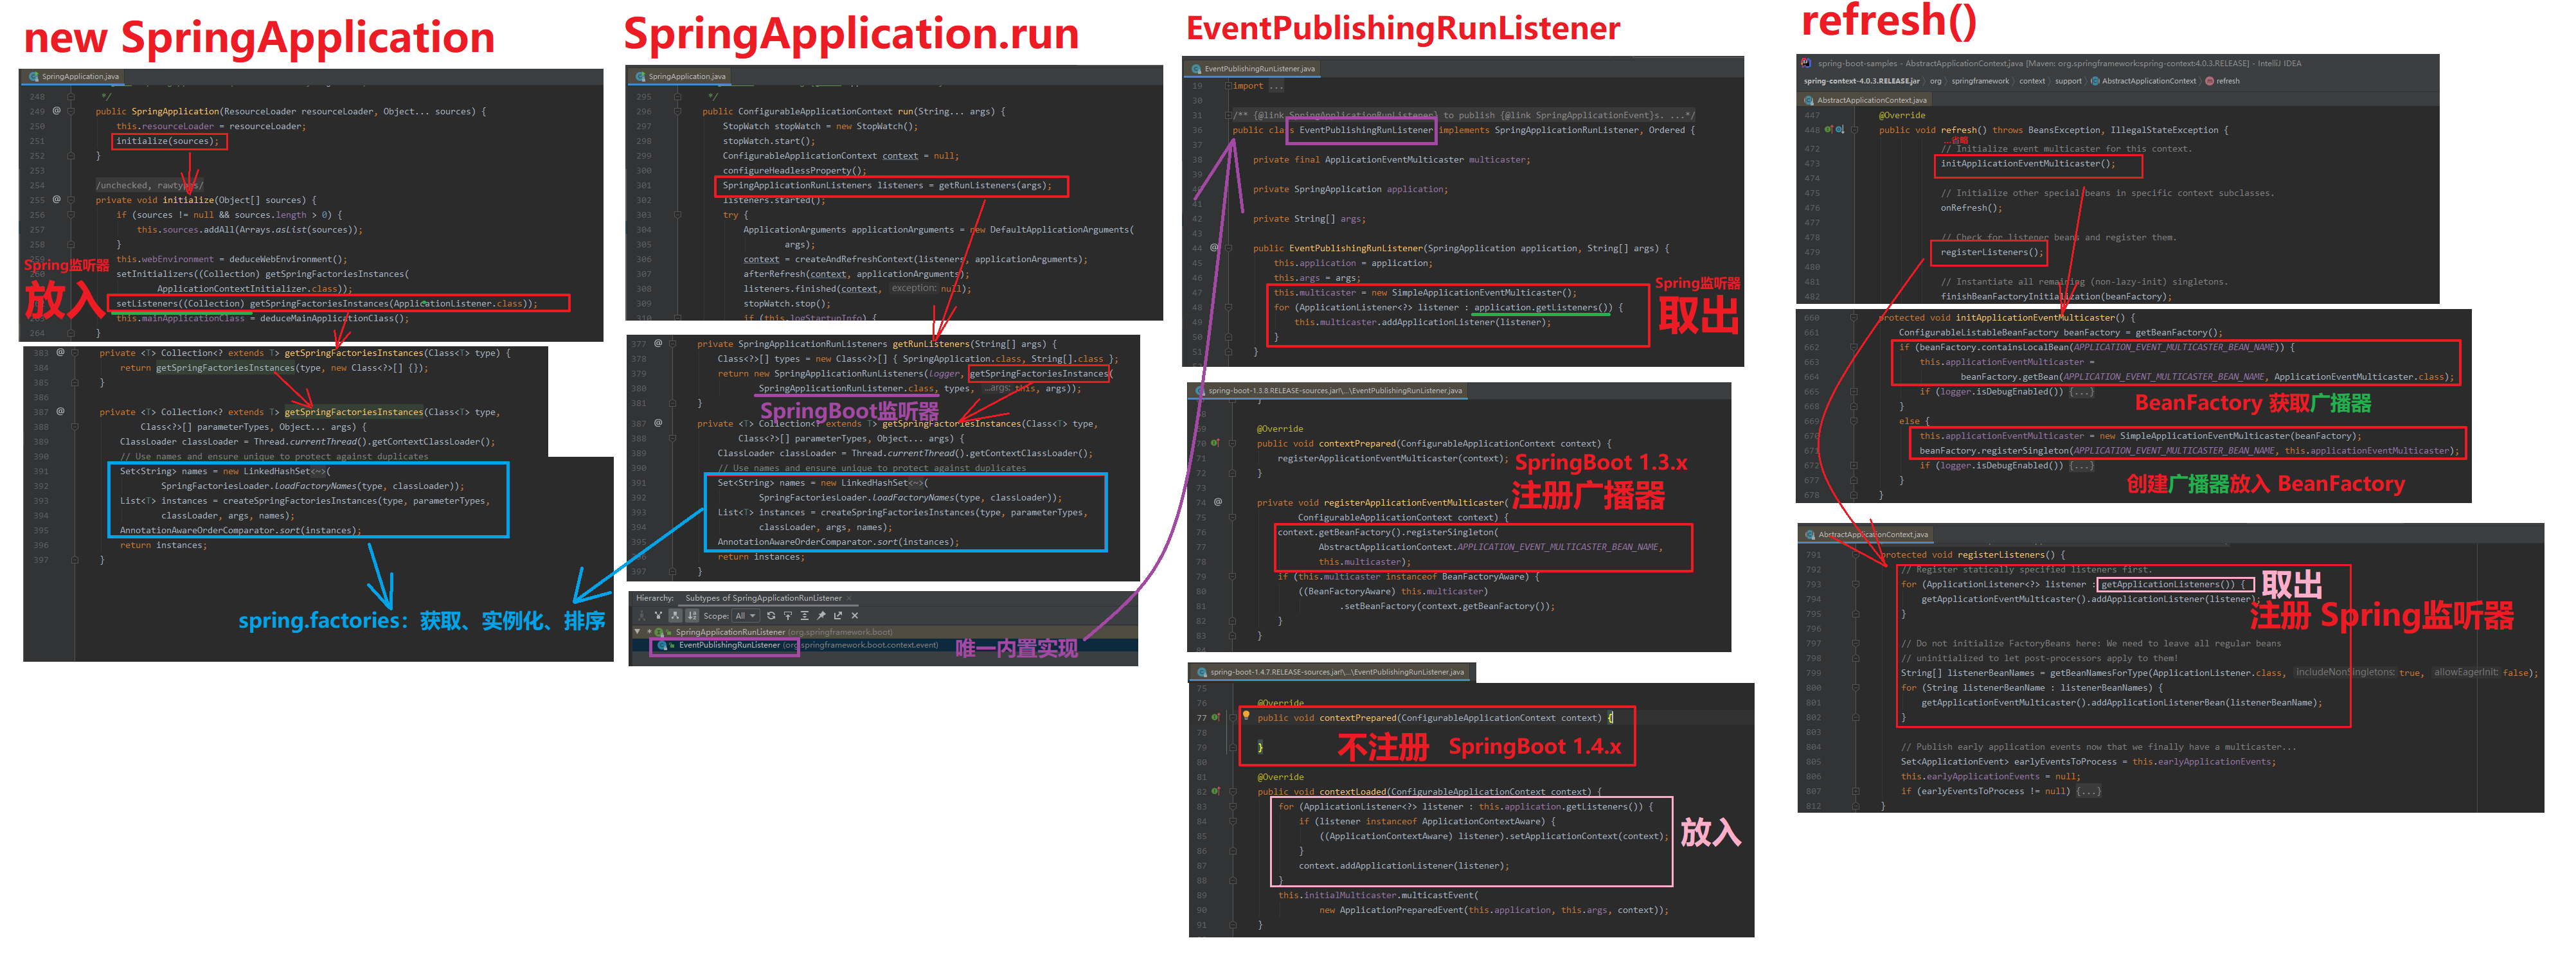
- 案例:不同版本对比 SpringBoot 1.3相同广播器、SpringBoot 输出事件顺序
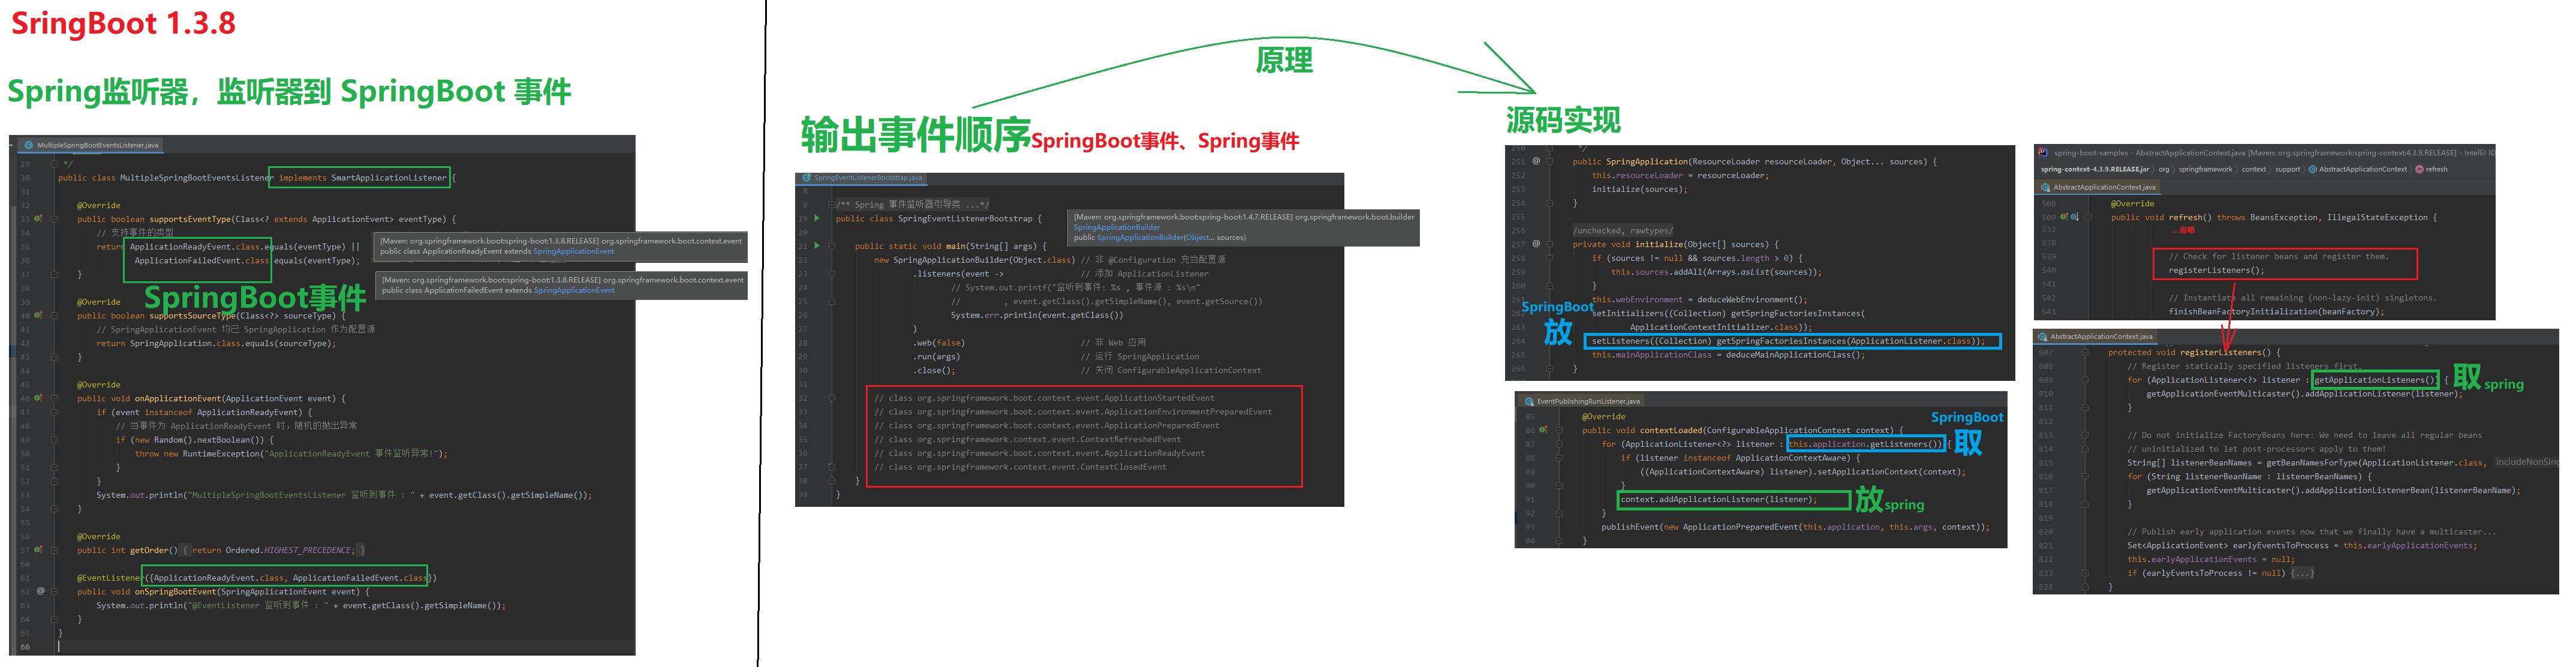
- Spring 事件监听:拍书本 UML图、微信公众号案例

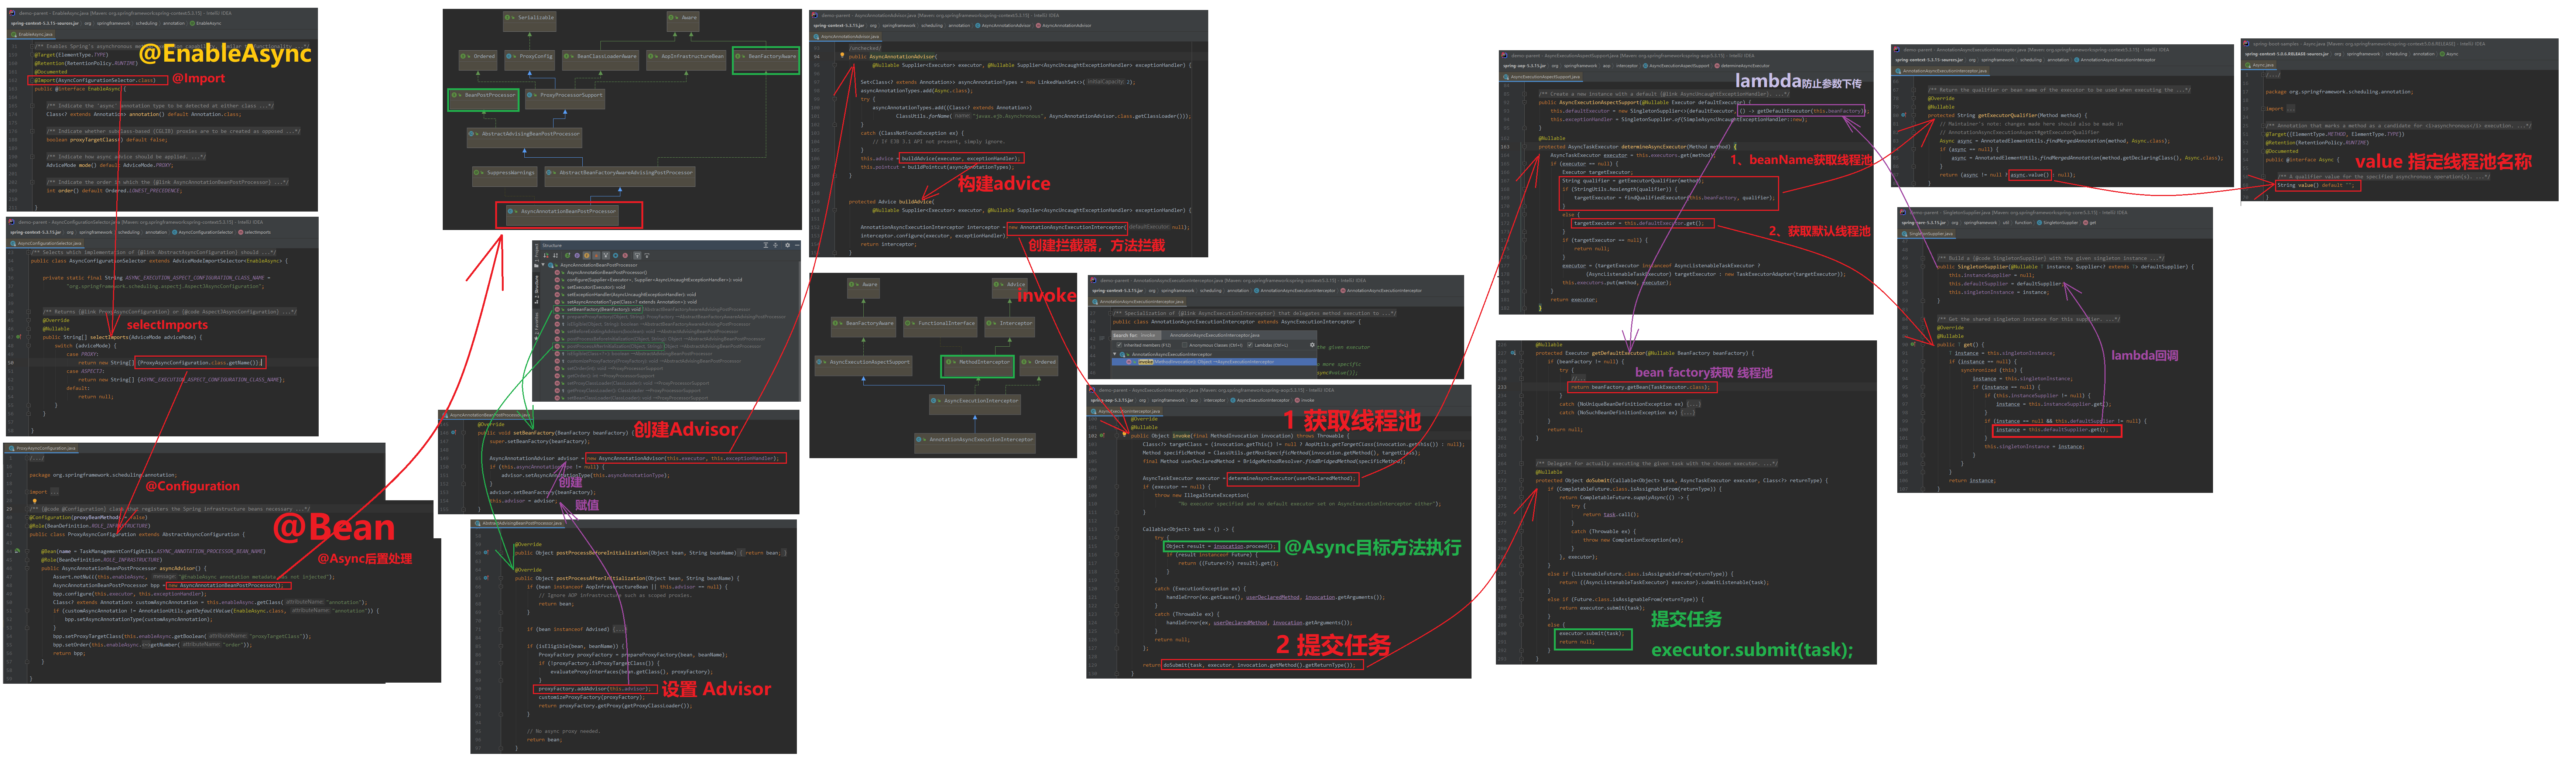
- @EnableAsync:源码分析
508页
【日期标记】2022-11-16 11:49:36 以上同步完成
装配 ApplicationArguments
1 | 封装参数,带有--表示可选参数,不带有--表示非可选参数,例如:--name=taopanfeng 会解析为 name:taopanfeng 键值对 |
准备 ConfigurableEnvironment
1 | TODO 待补充 |
创建 Spring应用上下文(ConfigurableApplicationContext)
1 | 根据类是否存在,判断上下文类型 |
Spring应用上下文运行前准备
1 | # 设置 Spring应用上下文 ConfigurableEnvironment |
537页
【日期标记】2022-11-17 10:36:53 以上同步完成
Spring应用上下文启动阶段
Spring应用上下文进入了实质性的启动阶段。
1 | public ConfigurableApplicationContext run(String... args) { |
Spring应用上下文启动后阶段
1 | public ConfigurableApplicationContext run(String... args) { |
549页
【日期标记】2022-11-18 07:59:40 以上同步完成
SpringApplication 正常结束
1 | 最后,发布事件 ApplicationReadyEvent |
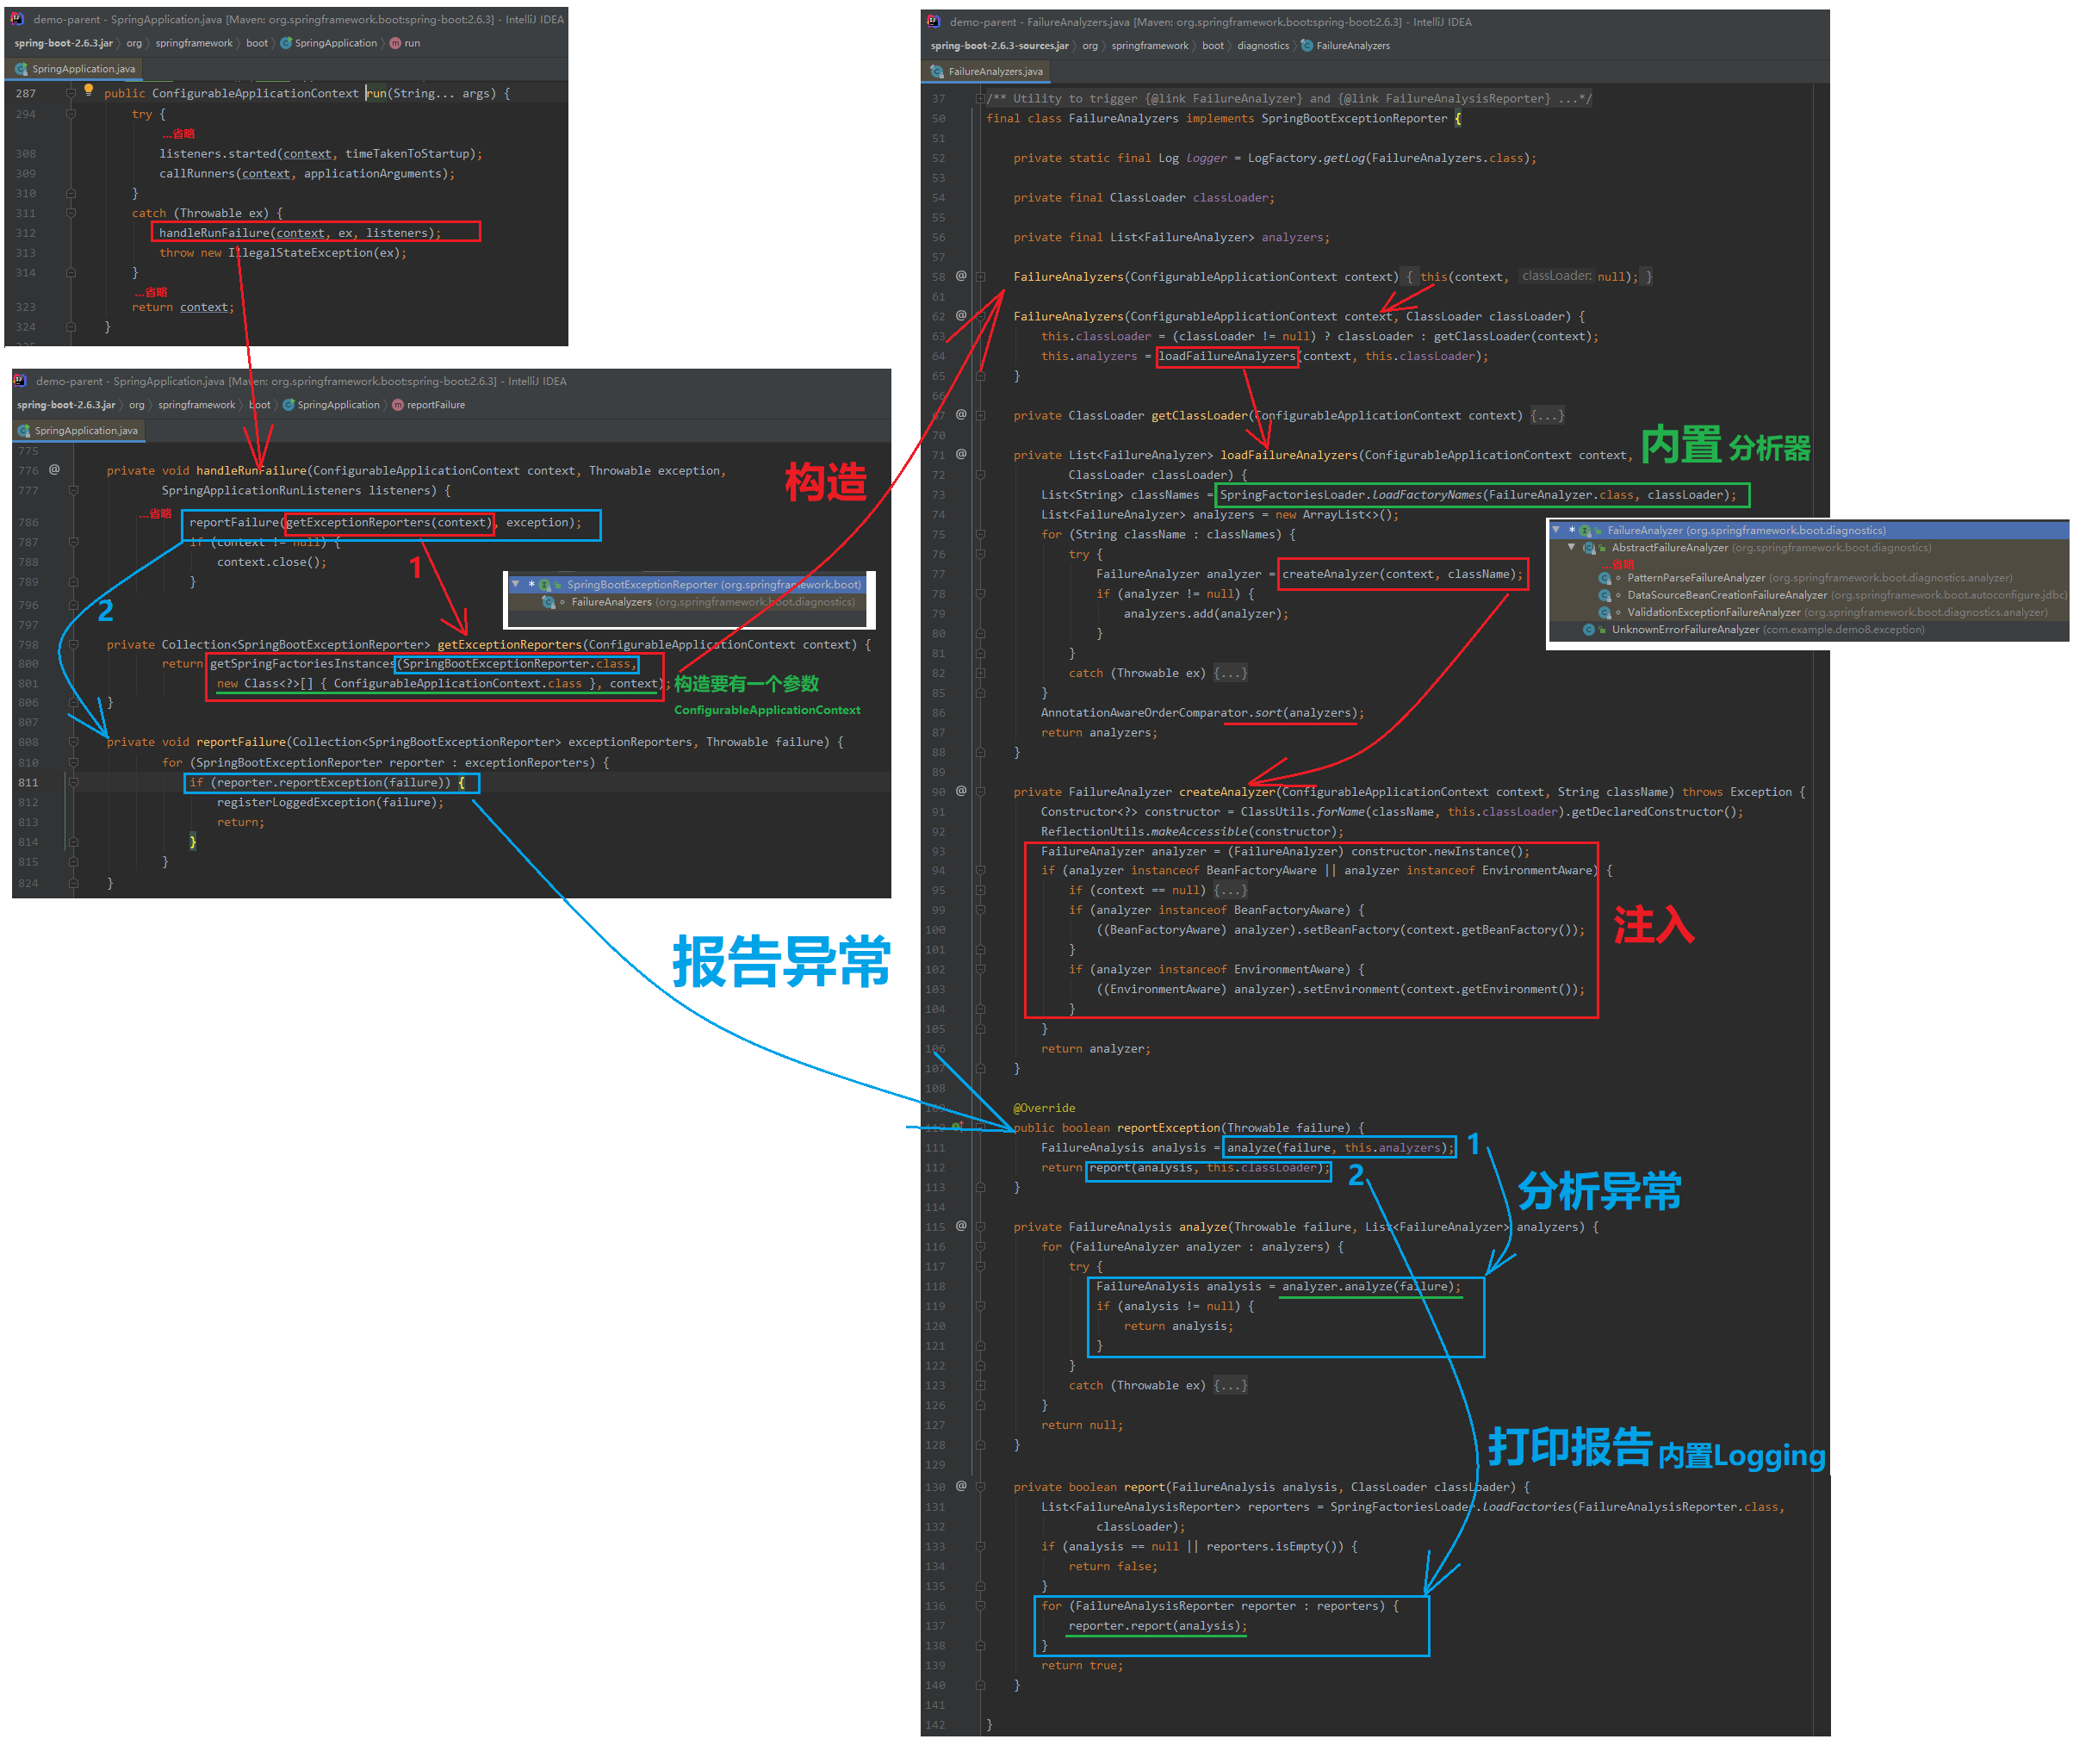
SpringApplication 异常结束
1 | 启动中间有任何一环错误,都会触发异常 |
- 【案例】SpringBoot 自定义错误分析器,错误报告器
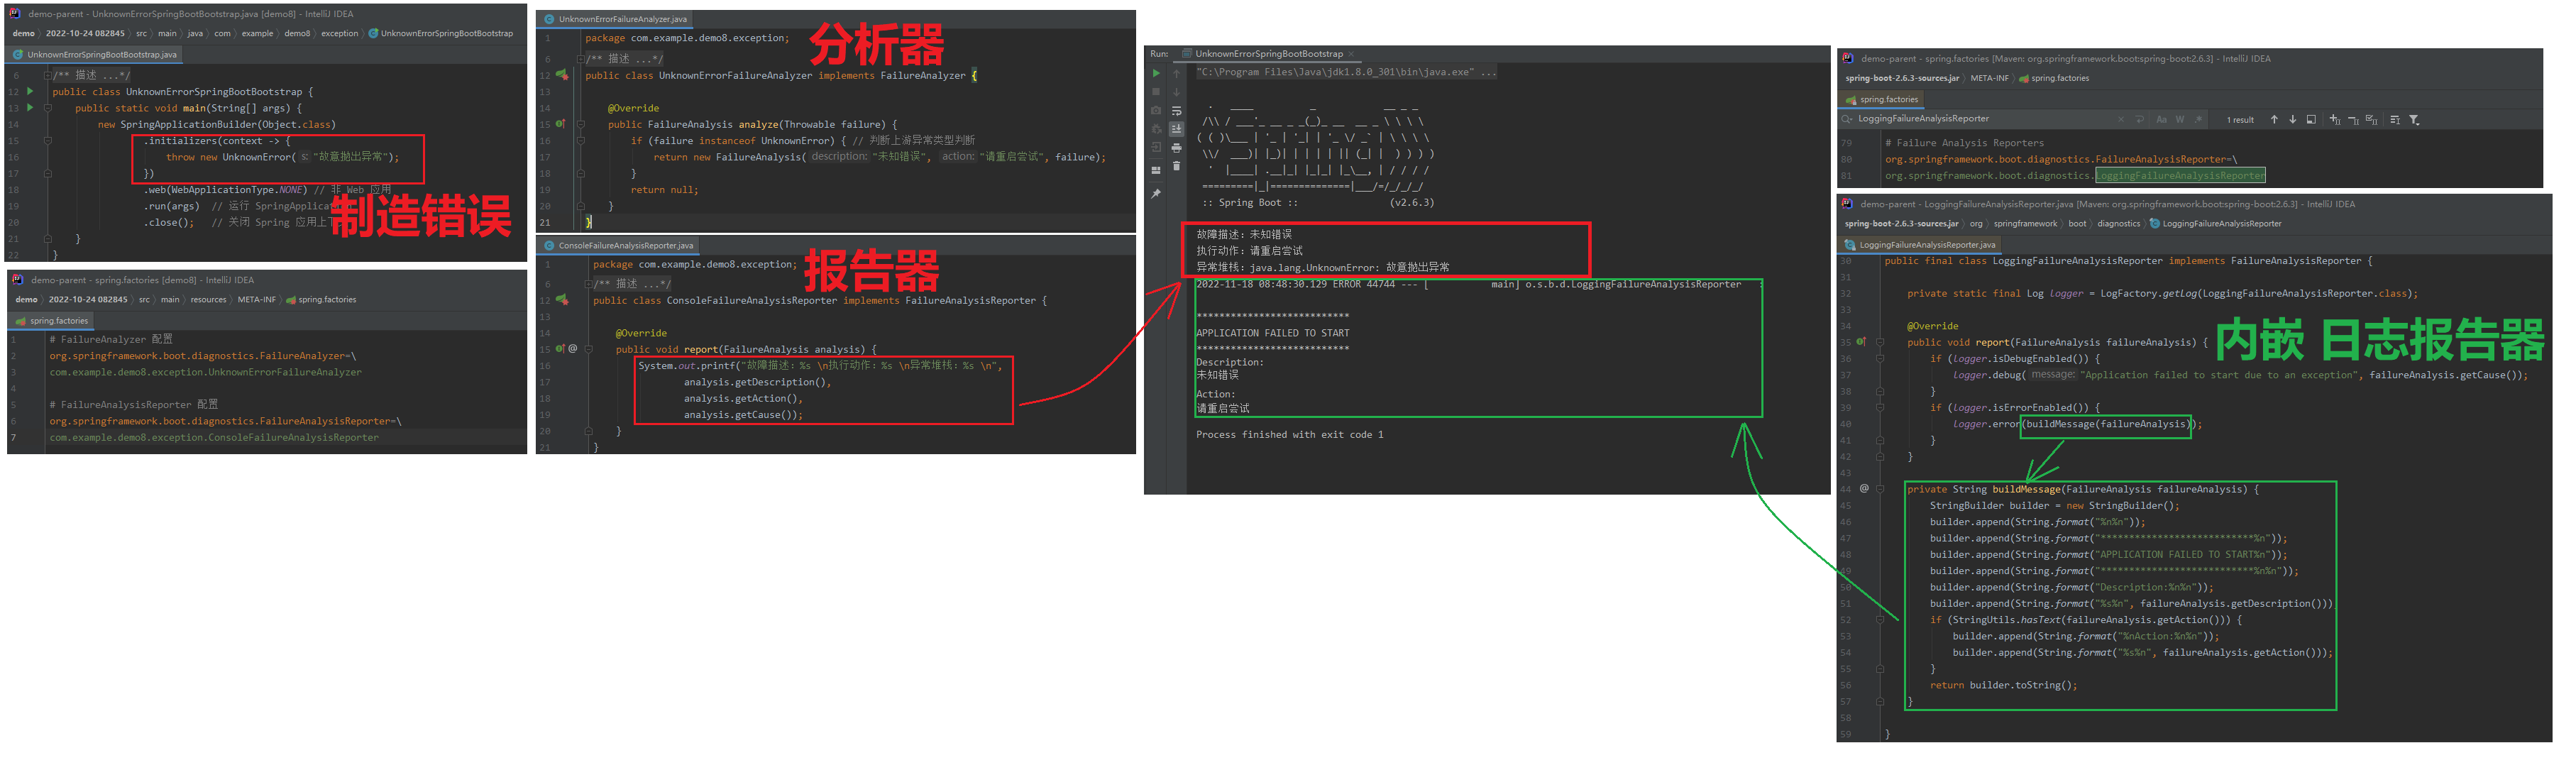
- 【源码分析】SpringBoot 启动异常处理 handleRunFailure
570页
【日期标记】2022-11-18 09:40:39 以上同步完成
1 | 2022-11-18 09:53:44 |
SpringBoot 应用正常退出
1 | 1、手动调用,进行退出 SpringApplication#exit(ApplicationContext, ExitCodeGenerator...) |
SpringBoot 应用异常退出
1 | 1、处理异常,其中就有异常码处理 |
- 源码:SpringBoot handleExitCode 处理异常码
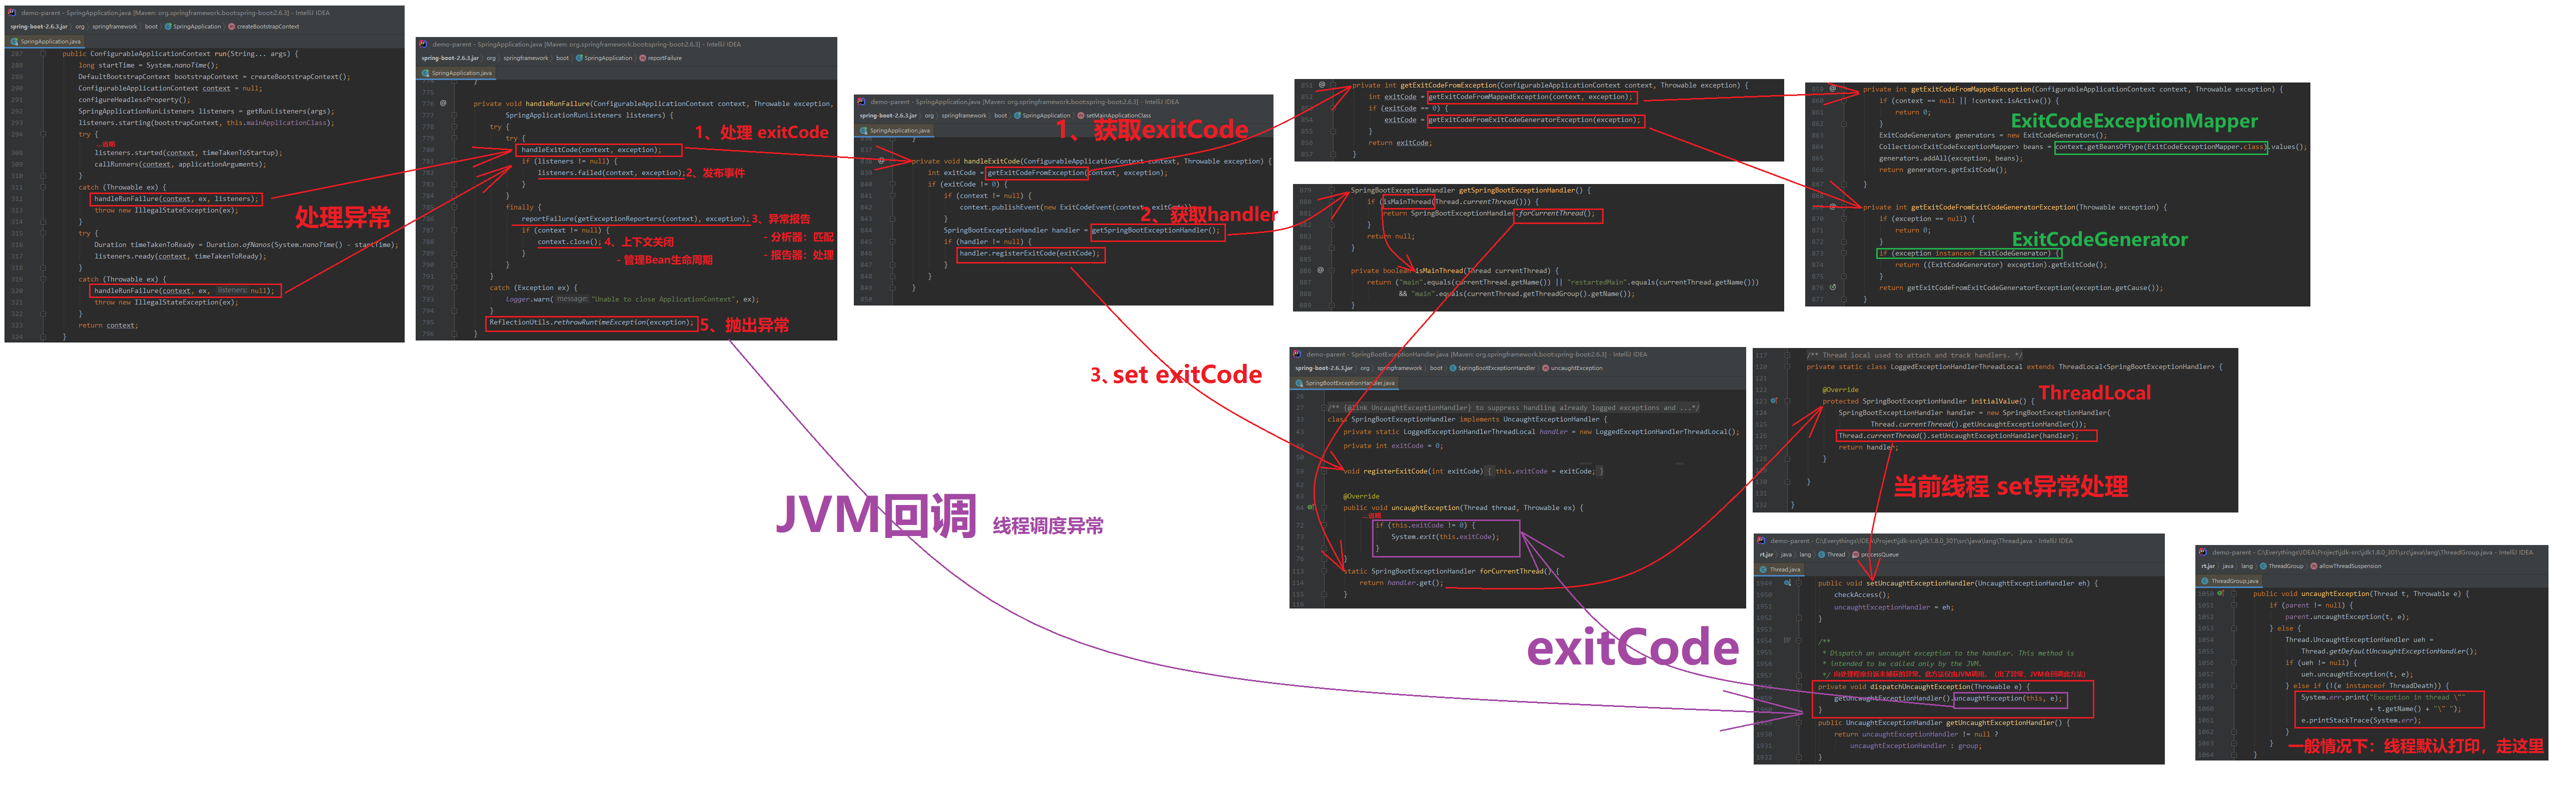
- 小总结
1
2
3
4
5
6
7
8
9
10
11
12
13
14
15
16
17
18
19
20
21
22
23
24
25
26
27
28
29
30
31
32
33
34
35
36
37
38
39
40
41
42
43
44
45
46
Spring Framework时代,Spring 应用上下文通常由容器启动。
===> 如 ContextLoaderListener 或 WebApplicationInitializer 的实现类由 Servlet容器(如:Tomcat容器)装载并启动。

到了 Spring Boot时代,Spring 应用上下文的启动则通过调用 SpringApplication#run(Object, String...) 或 SpringApplicationBuilder#run(String...)方法,
并配合 @SpringApplication 或 @EnableAutoConfiguration 注解的方式完成。

===> 注意,上面并没有说 SpringApplication 限定在嵌入式 Web应用场景,而是强调 Spring应用上下文的启动,
     不仅因为 SpringApplication 可以引导非 Web应用和嵌入式 Web应用,而且它还能出现在 SpringBoot应用部署在传统 Servlet 3.0+容器中的场景。
     后续在“Web篇”会讲到,war file部署 SpringBoot应用,使用主引导类继承 SpringBootServletInitializer。

===> SpringBootServletInitializer 是 WebApplicationInitializer的实现类,因此,SpringBoot应用在部署 Servlet 3.0+容器中时,其 onStartUp(ServletContext)方法将在启动时回调。
     (关于 WebApplicationInitializer 在上面 “## Spring-Web 自动装配” 有讲到。)
            public abstract class SpringBootServletInitializer implements WebApplicationInitializer {
                @Override
                public void onStartup(ServletContext servletContext) throws ServletException {
                    ...
                    WebApplicationContext rootApplicationContext = createRootApplicationContext(servletContext);
                    ...
                }
                protected WebApplicationContext createRootApplicationContext(ServletContext servletContext) {
                    SpringApplicationBuilder builder = createSpringApplicationBuilder();
                    builder.main(getClass());
                    ...
                    SpringApplication application = builder.build();
                    ...
                    return run(application);
                }
            }
------------------------------------------------

SpringApplication 同样运用在 SpringBoot应用部署到传统 Servlet3.0+容器的场景中,所以说,SpringApplication并非为 SpringBoot嵌入式Web应用“量身定制”。
既然如此,无论在哪种 SpringBoot应用场景下,功能组件均为 Spring Bean,那么为何不直接使用 ConfigurableApplicationContext实现类来引导 Spring应用呢???
=> 如注解驱动的 AnnotationConfigApplicationContext,尤其是非 Web应用场景下所创建的 ConfigurableApplicationContext实例就是 AnnotationConfigApplicationContext。
=> 个人认为SpringBoot引入 SpringApplication是对 Spring Framework的应用上下文生命周期的补充。

传统的 Spring应用上下文生命的启动源于 ConfigurableApplicationContext对象的创建,运行则由其 refresh()方法引导,而终止于 close()方法的调用。
Spring Framework内建的 ConfigurableApplicationContext实现类均继承与 抽象类 AbstractApplicationContext。
在 AbstractApplicationContext#refresh() 方法执行过程中,伴随着组件 BeanFactory、Environment、ApplicationEventMulticaster 和 ApplicationListener 的创建,
它们的职责分别涉及 Bean容器、Spring属性配置、Spring事件广播和监听。

实际上,SpringApplication并未从本质上改变这些,因为 AbstractApplicationContext提供了扩展接口,
如 setEnvironment(ConfigurableEnvironment)方法允许替换默认的 Environment对象,以及 initApplicationMulticaster 和 ApplicationListener Bean的机制。

不过,这些扩展接口被 SpringApplication 在 Spring应用上下文调用 refresh()方法之前予以运用,
在 SpringApplicationRunListener实现类 EventPublishingRunListener的帮助下,全新地引入 SpringBoot事件,并且间接地过渡到外部化配置,而后者是运维篇“超过外部化配置”重点讨论。
597页,完结。
【日期标记】2022-11-21 09:20:43 以上同步完成