概念
项目管理工具
一个对 Maven 比较正式的定义是这么说的:Maven 是一个项目管理工具,它包含了一个项目对象模 型 (POM:Project Object Model),一组标准集合,一个项目生命周期(Project Lifecycle),一个依赖管 理系统(Dependency Management System),和用来运行定义在生命周期阶段(phase)中插件(plugin)目标 (goal)的逻辑。
下载&安装
- 下载,进入https://maven.apache.org
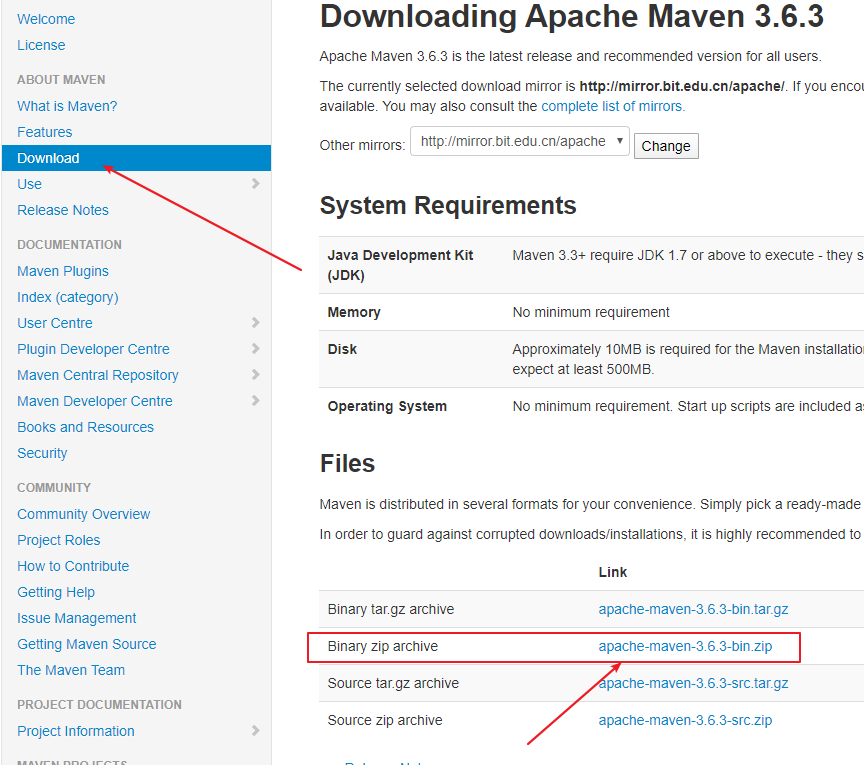
- 安装,直接解压就行了。
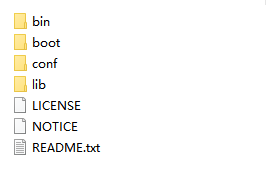
bin:存放了 maven 的命令,比如我们前面用到的mvn tomcat:runboot:存放了一些 maven 本身的引导程序,如类加载器等conf:存放了 maven 的一些配置文件,如 setting.xml 文件lib:存放了 maven 本身运行所需的一些 jar 包
环境变量
- 首先要有Java环境,这就不多说了。其次再配置Maven的环境变量。
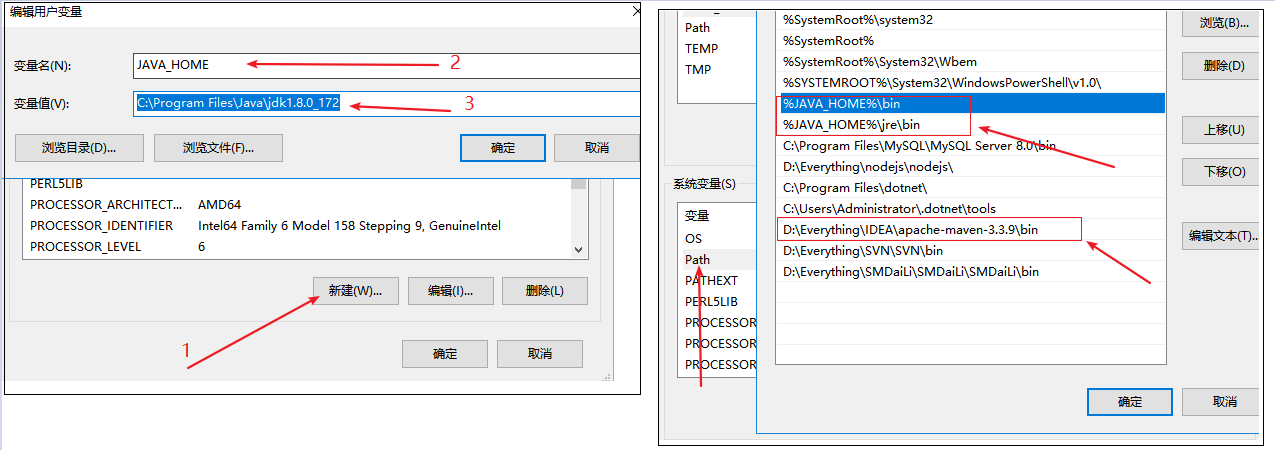
- 其次再添加两个变量(2021-12-14 14:05:23 补充)
M2_HOME=C:\Everythings\Maven\Maven\apache-maven-3.8.2-bin\apache-maven-3.8.2MAVEN_HOME=C:\Everythings\Maven\Maven\apache-maven-3.8.2-bin\apache-maven-3.8.2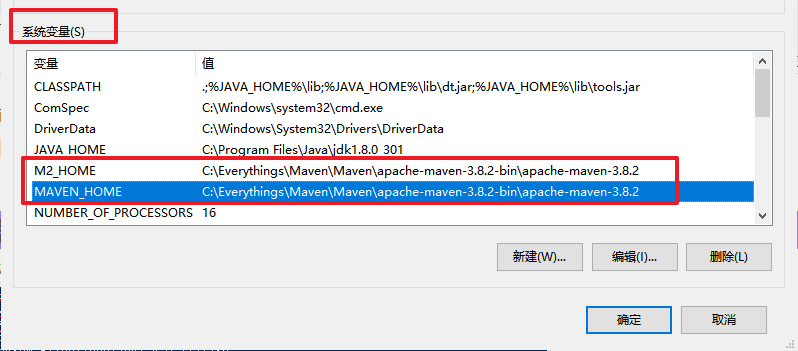
查看版本号
输入mvn -v查看版本号
Maven仓库
本地仓库用来存储从远程仓库或中央仓库下载的插件和 jar 包,项目使用一些插件或 jar 包, 优先从本地仓库查找 默认本地仓库位置在windows用户目录/.m2/repository远程仓库(私服)如果本地需要插件或者 jar 包,本地仓库没有,默认去远程仓库下载。 远程仓库可以在互联网内也可以在局域网内中央仓库一般使用阿里云的中央仓库在mirrors标签中设置阿里云中央仓库
1
2
3
4
5
6<mirror>
<id>alimaven</id>
<name>aliyun maven</name>
<url>http://maven.aliyun.com/nexus/content/groups/public/</url>
<mirrorOf>central</mirrorOf>
</mirror>在profiles标签中设置JDK版本
1
2
3
4
5
6
7
8
9
10
11
12<profile>
<id>jdk18</id>
<activation>
<activeByDefault>true</activeByDefault>
<jdk>1.8</jdk>
</activation>
<properties>
<maven.compiler.source>1.8</maven.compiler.source>
<maven.compiler.target>1.8</maven.compiler.target>
<maven.compiler.compilerVersion>1.8</maven.compiler.compilerVersion>
</properties>
</profile>
本地仓库配置
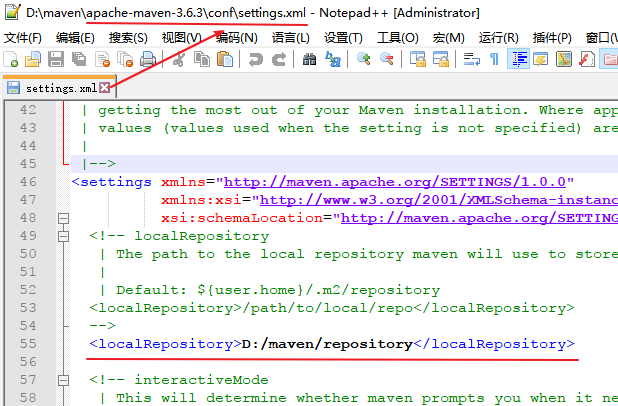
Maven工程目录结构
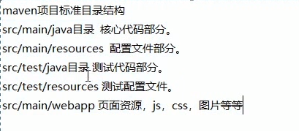
生命周期

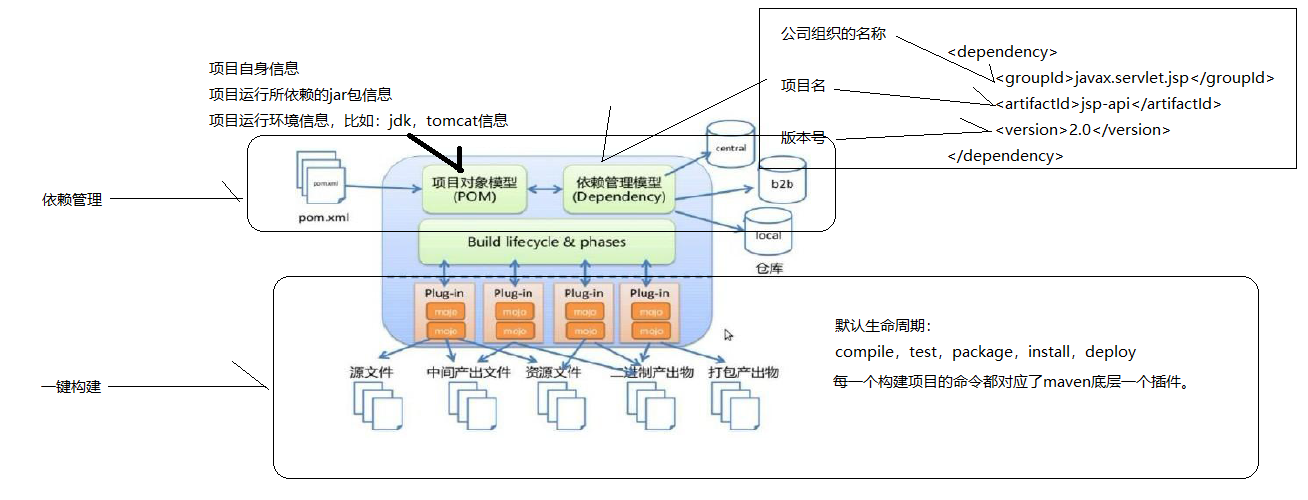
概念模型
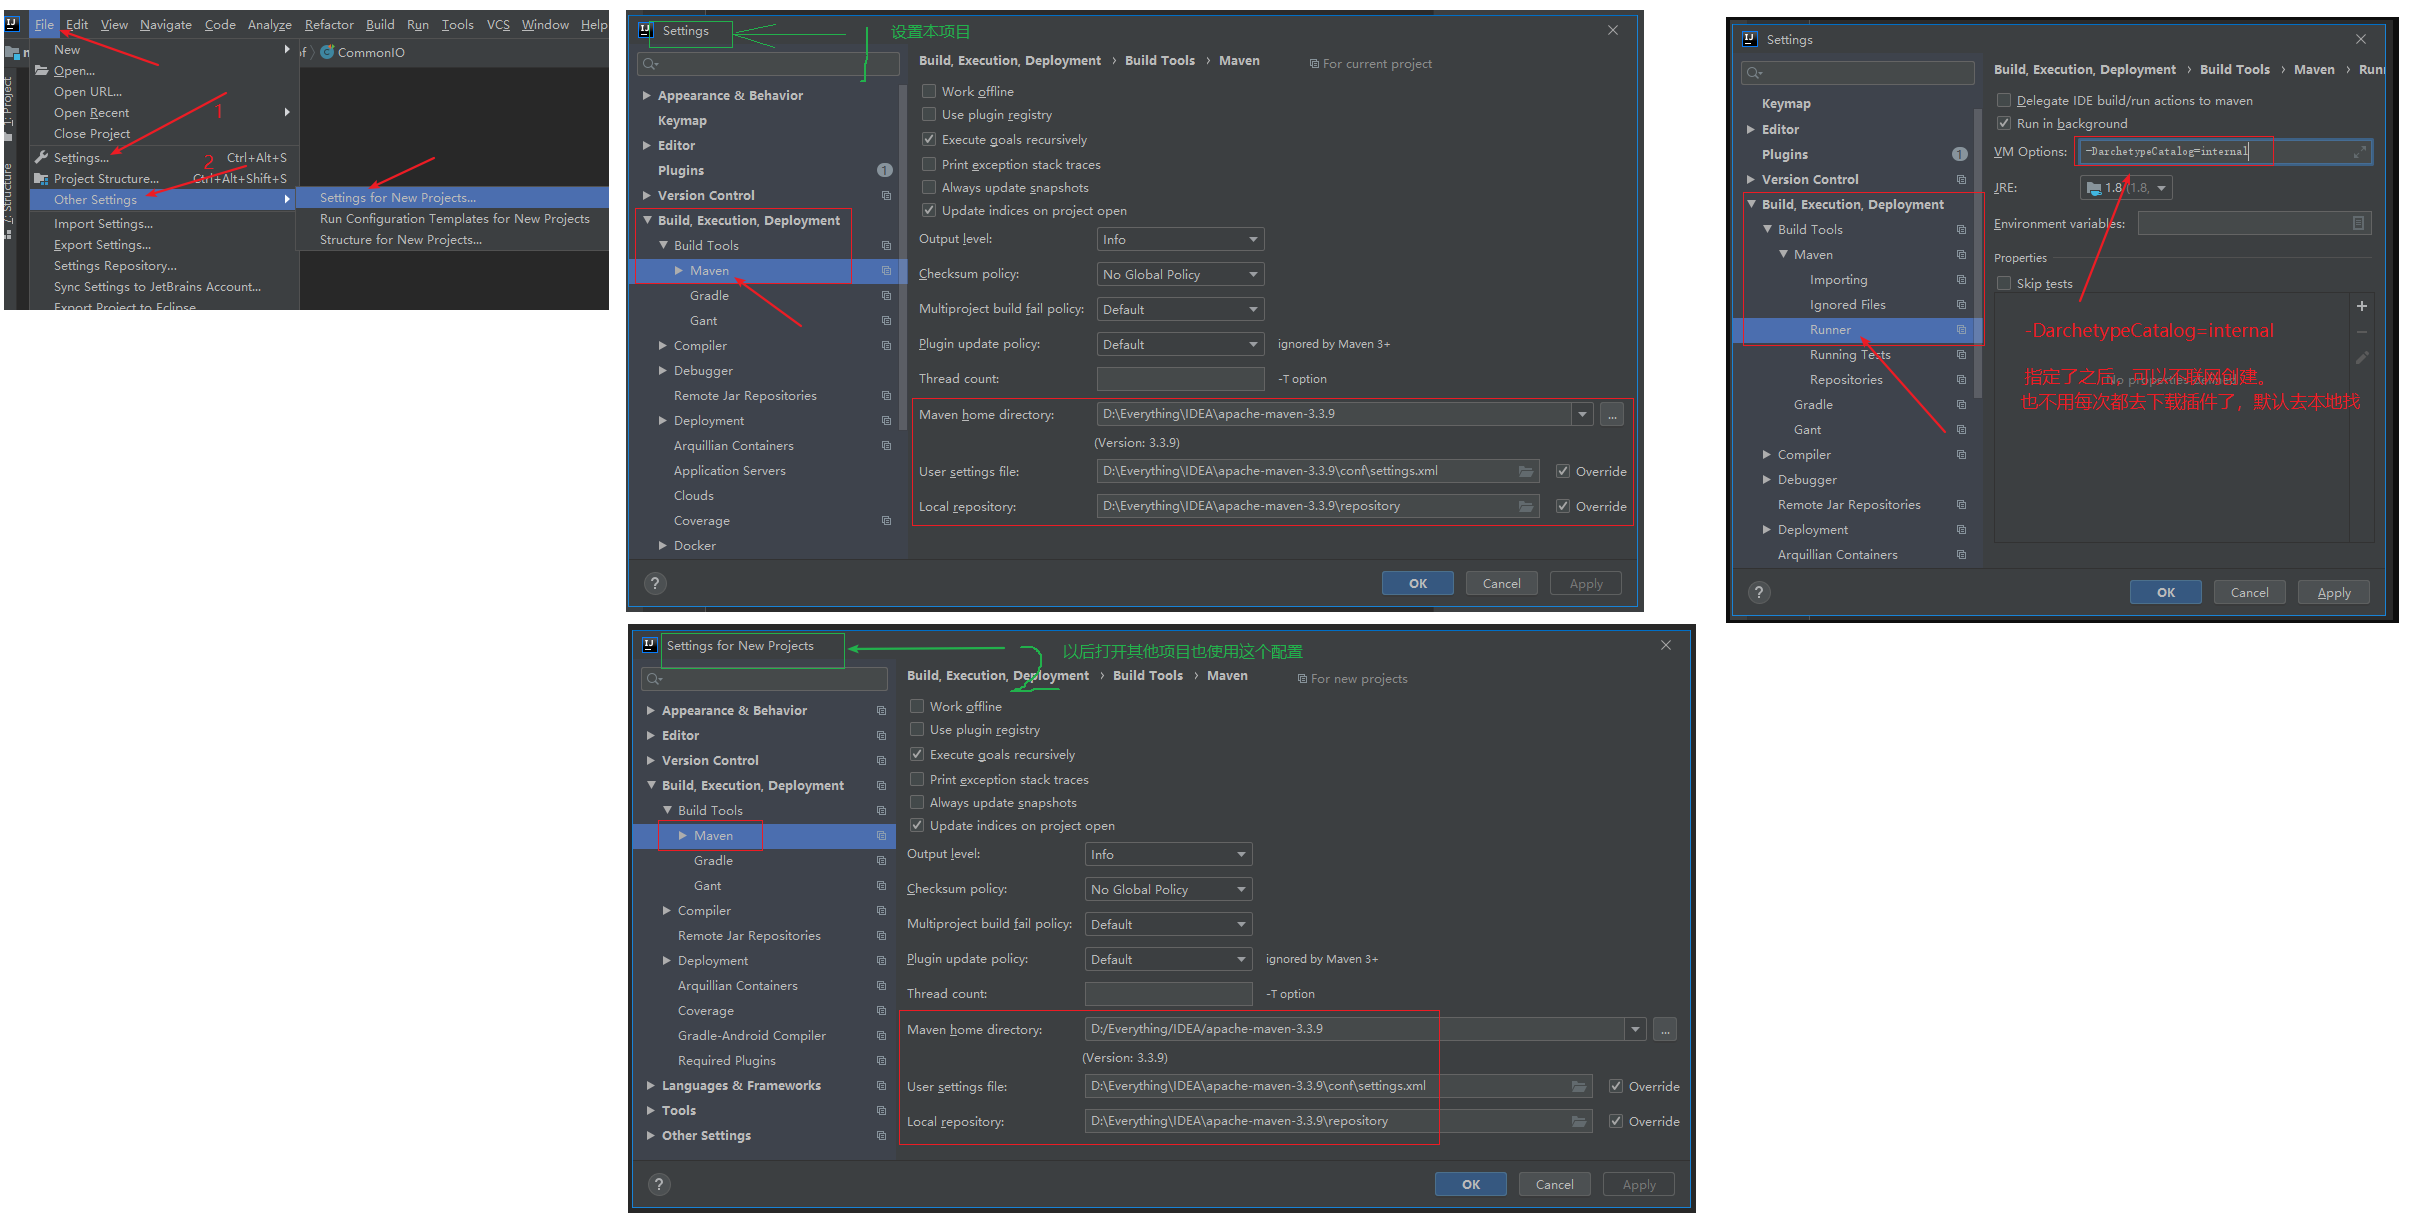
IDEA集成Maven
1 | -DarchetypeCatalog=internal |
创建工程
- 创建默认Maven项目
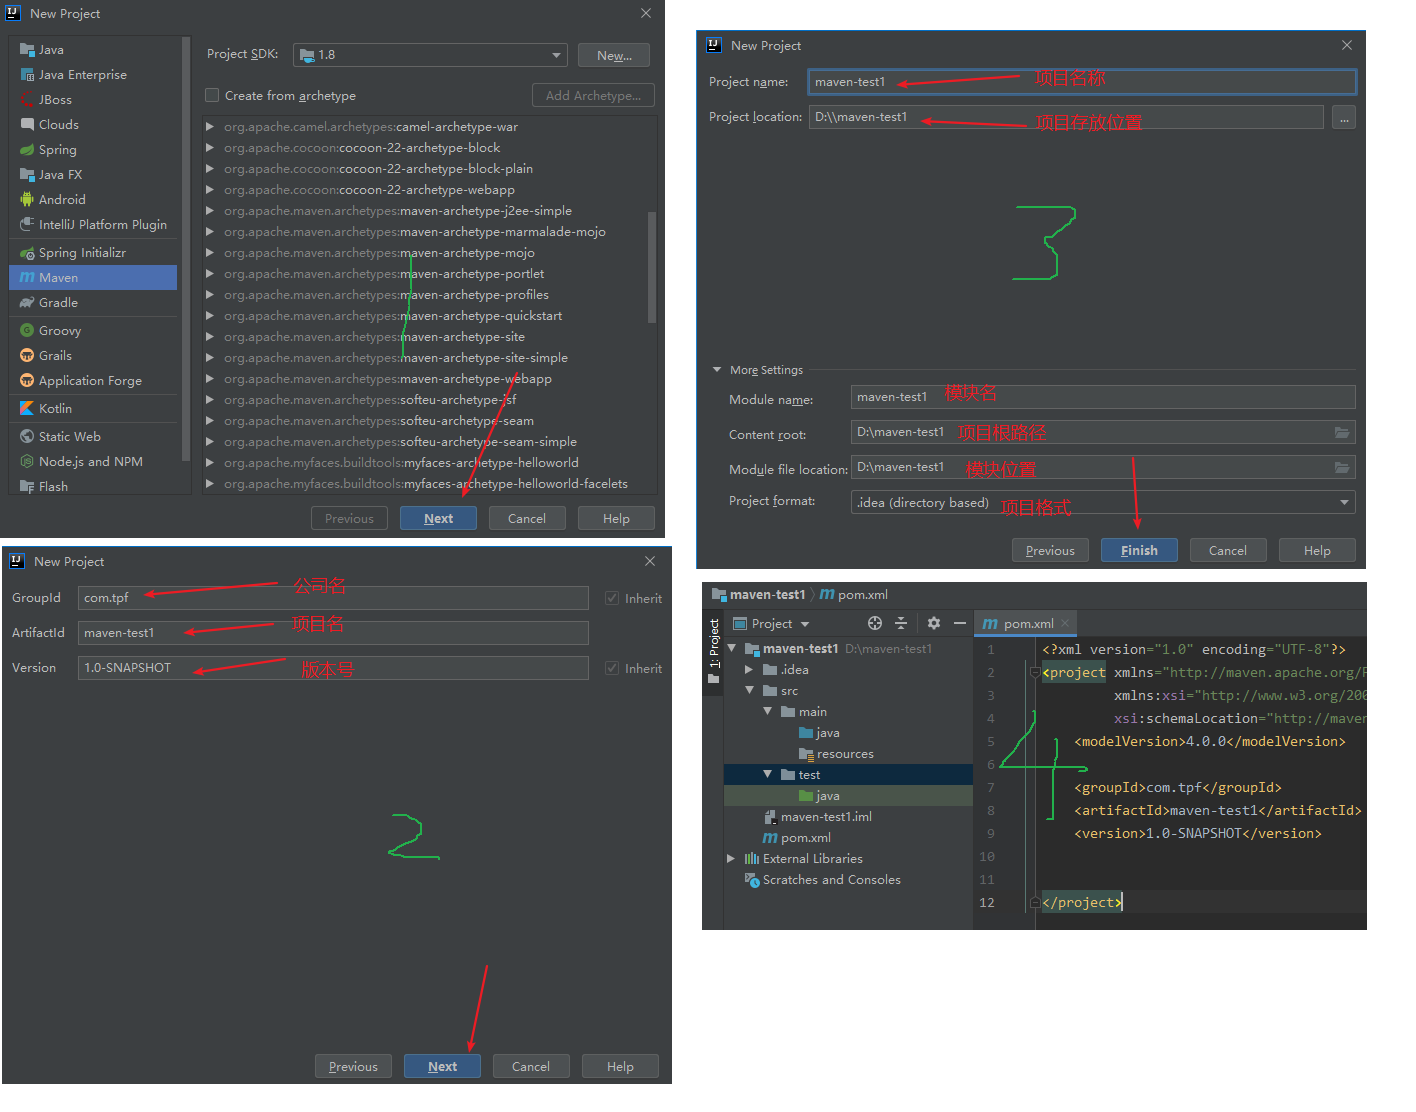
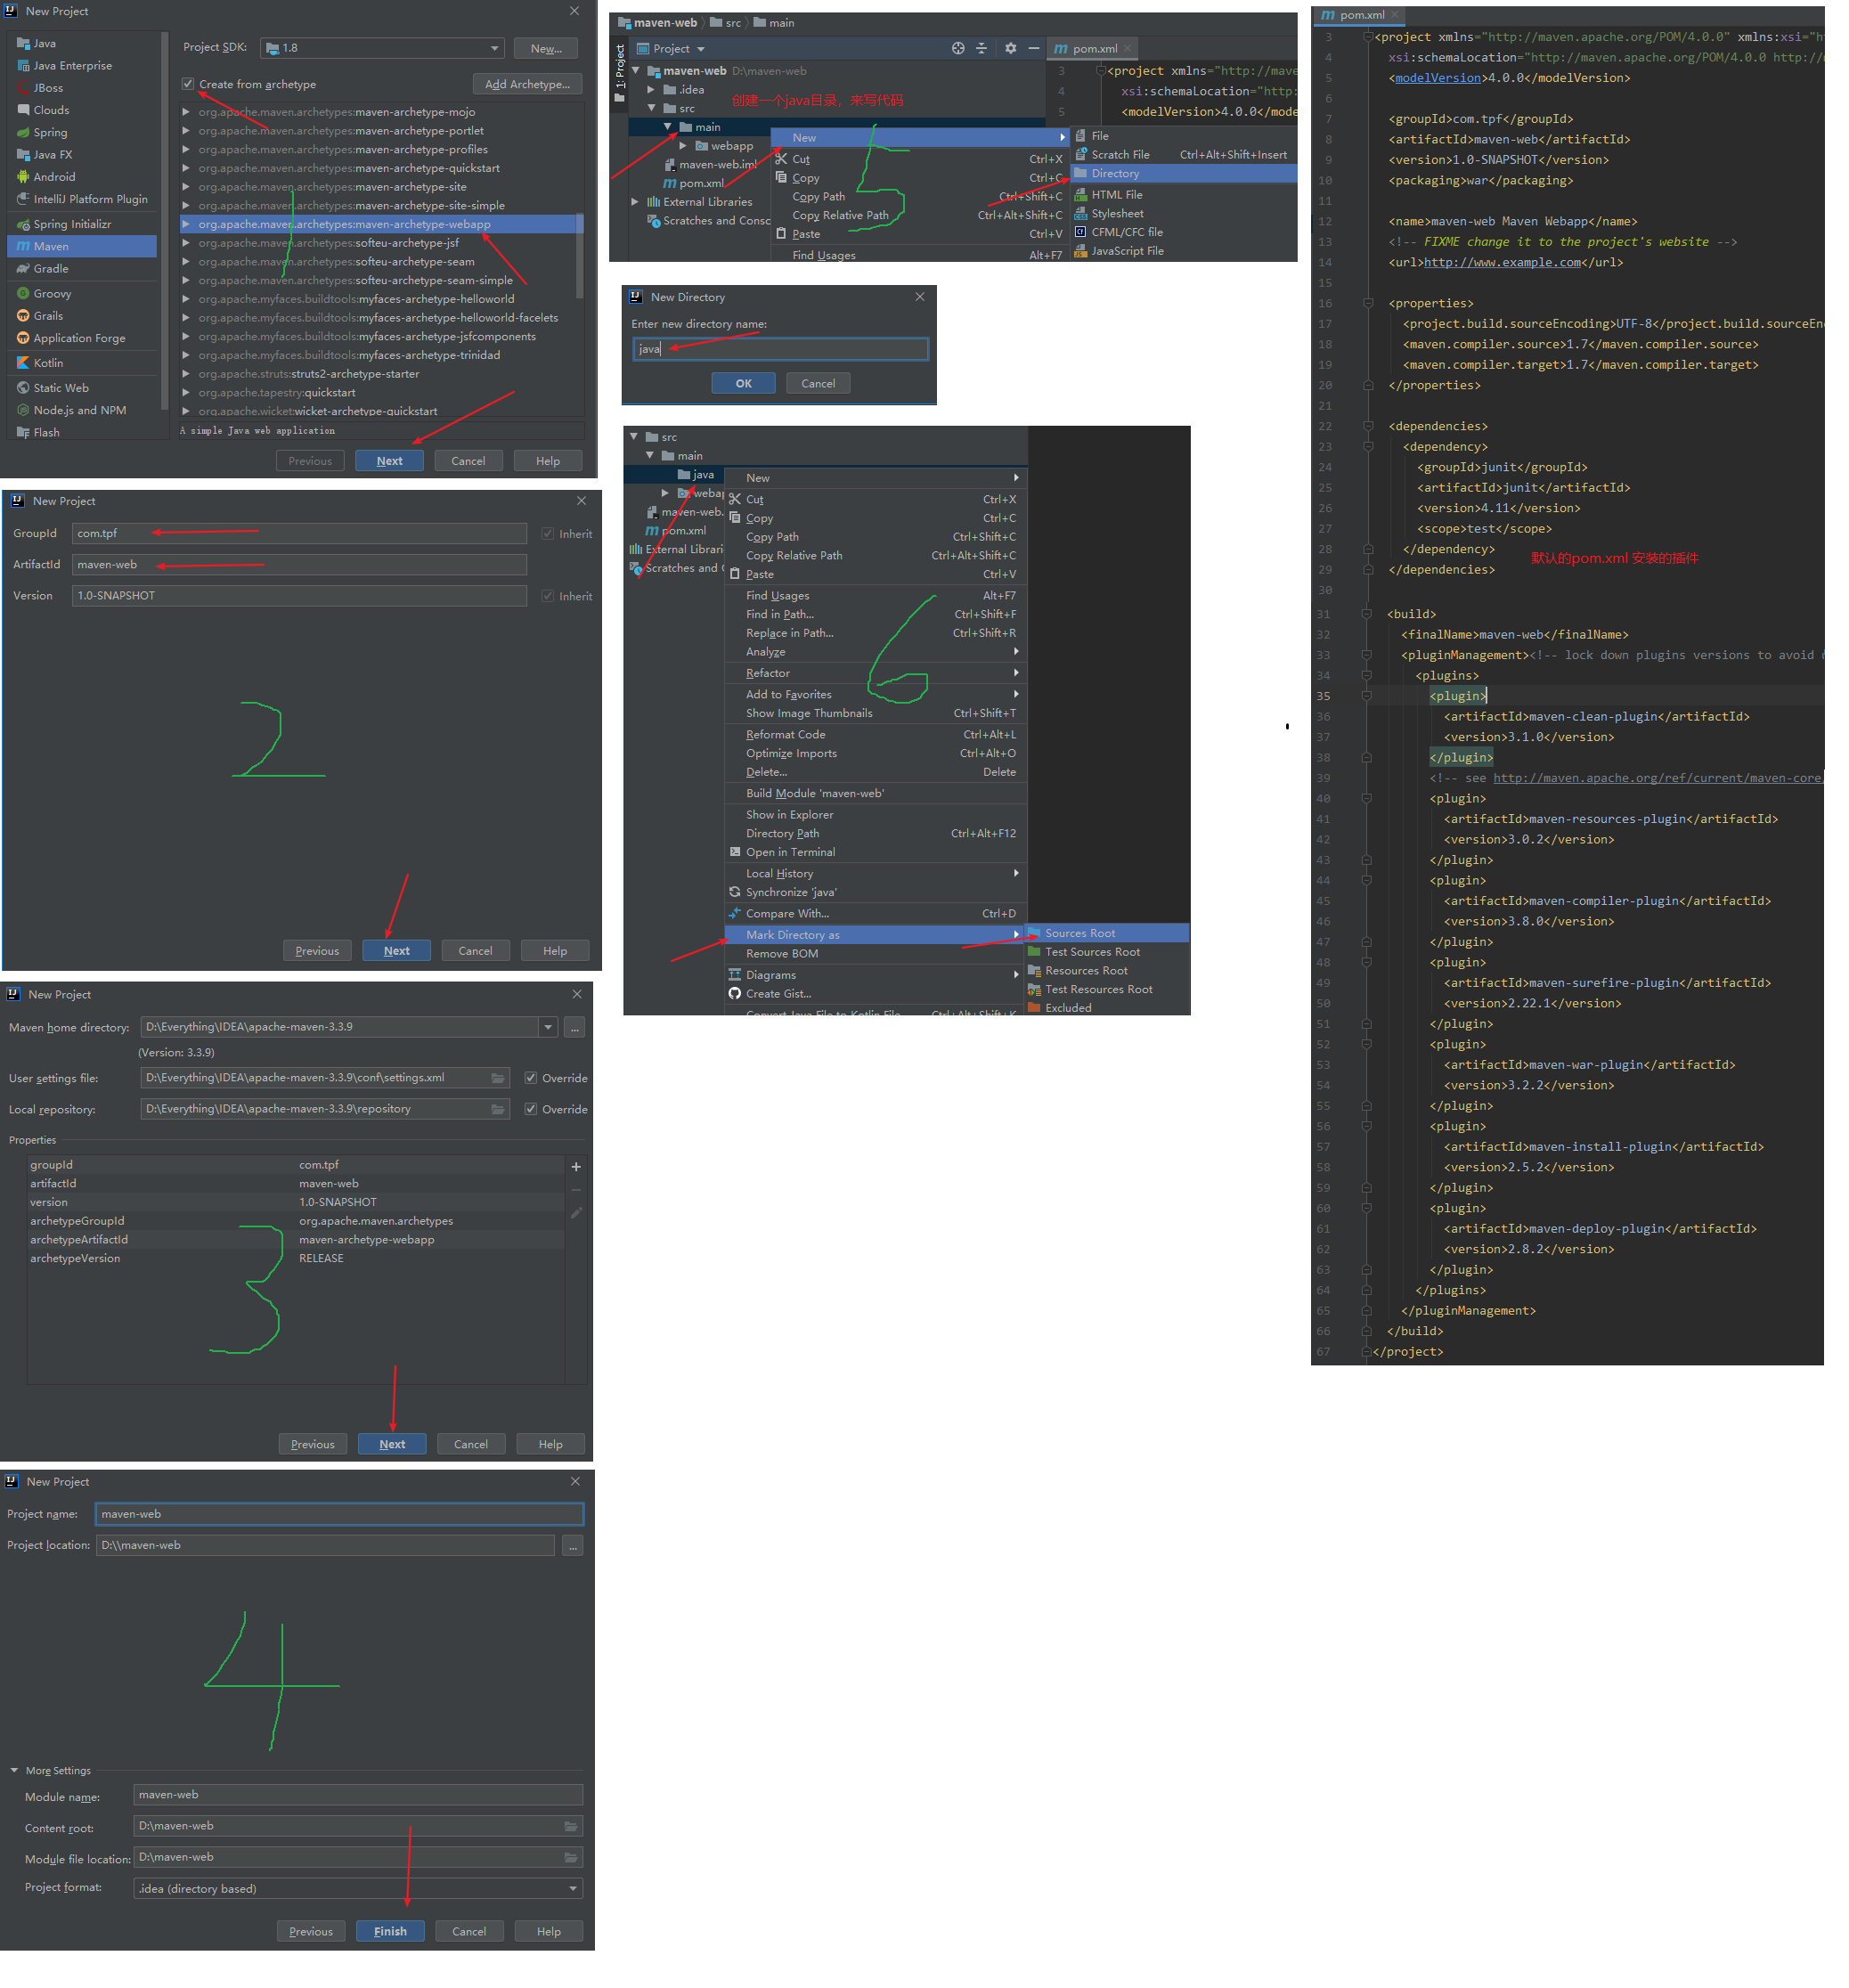
- 使用骨架创建Web项目
打包格式
1 | <groupId>com.tpf</groupId> |
<packaging > :打包类型
jar:执行 package 会打成 jar 包
war:执行 package 会打成 war 包
pom :用于 maven 工程的继承,通常父工程设置为 pom
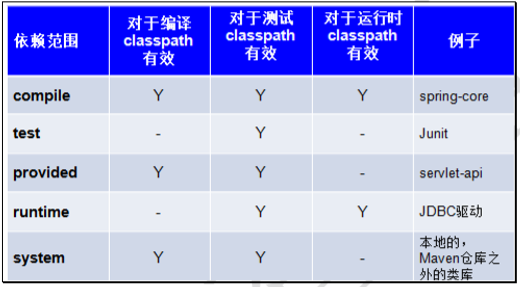
依赖范围
compile:默认依赖范围。会用在 编译、测试、运行,由于运行时需要的依赖会被打包。provided:provided 依赖只有在当 JDK 或者一个容器已提供该依赖之后才使用, provided 依 赖在编译和测试时需要,在运行时不需要,比如:servlet api 运行时由被 tomcat 容器提供,我们就不能指定了。runtime:runtime 依赖在运行和测试系统的时候需要,但在编译的时候不需要。比如:jdbc 的驱动包。由于运行时需要所以 runtime 范围的依赖会被打包。test:test 范围依赖 在编译和运行时都不需要,它们只有在测试编译和测试运行阶段可用, 比如:junit。由于运行时不需要所以test范围依赖不会被打包。 system:system 范围依赖与 provided 类似,但是你必须显式的提供一个对于本地系统中 JAR 文件的路径,需要指定 systemPath 磁盘路径,不推荐使用。 例如:导入oracle8的jar包
Maven运行Web项目
测试源码
pom.xml
1 |
|
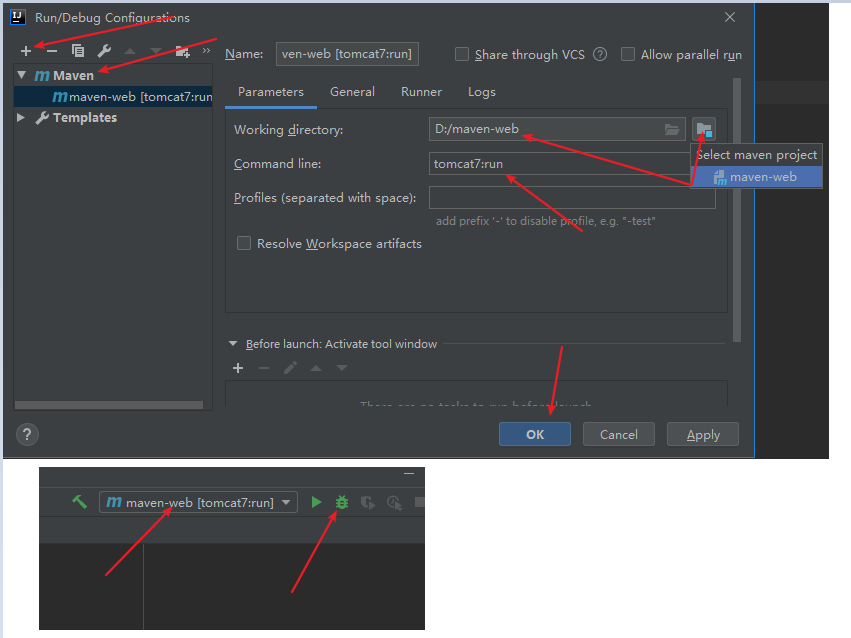
正常启动

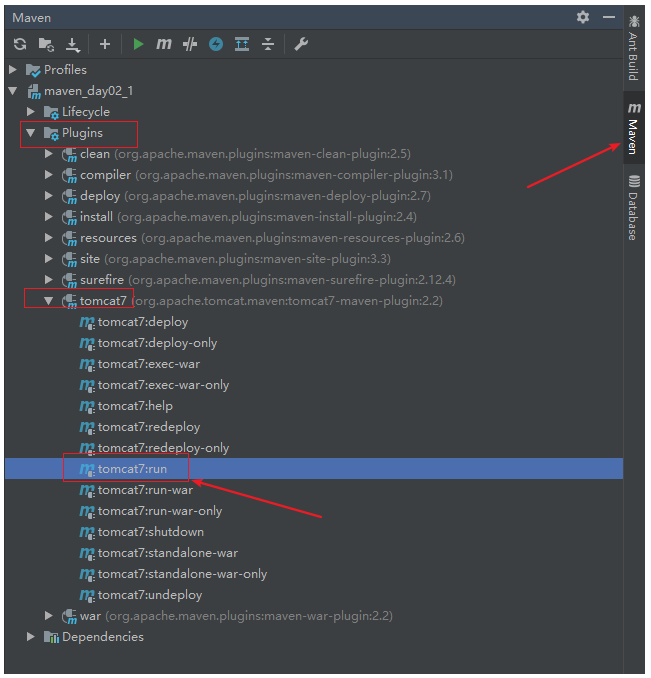
插件启动
Debug启动
导入jar包依赖冲突
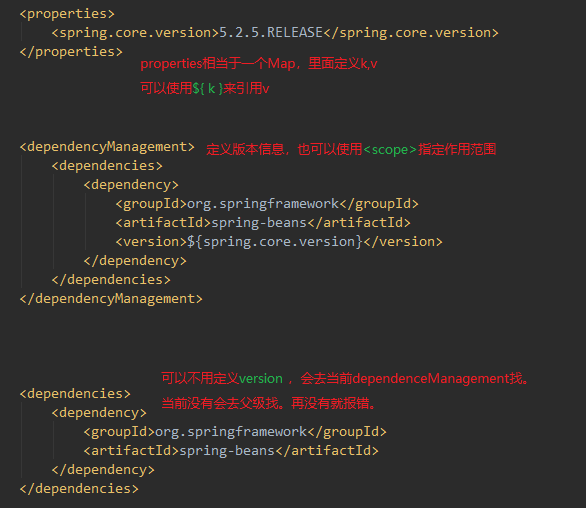
maven工程要导入jar包的坐标,就必须要考虑解决jar包冲突。
maven导入jar包中的一些概念:
①直接依赖:项目中直接导入的jar包,就是该项目的直接依赖包。
例如下面的:spring-expression和spring-beans
②传递依赖:项目中没有直接导入的jar包,可以通过项目直接依赖jar包传递到项目中去。
例如下面的:spring-core和spring-jcl
1 | 1. 第一声明优先原则 |

锁定版本
1 | maven工程是可以分父子依赖关系的。 |
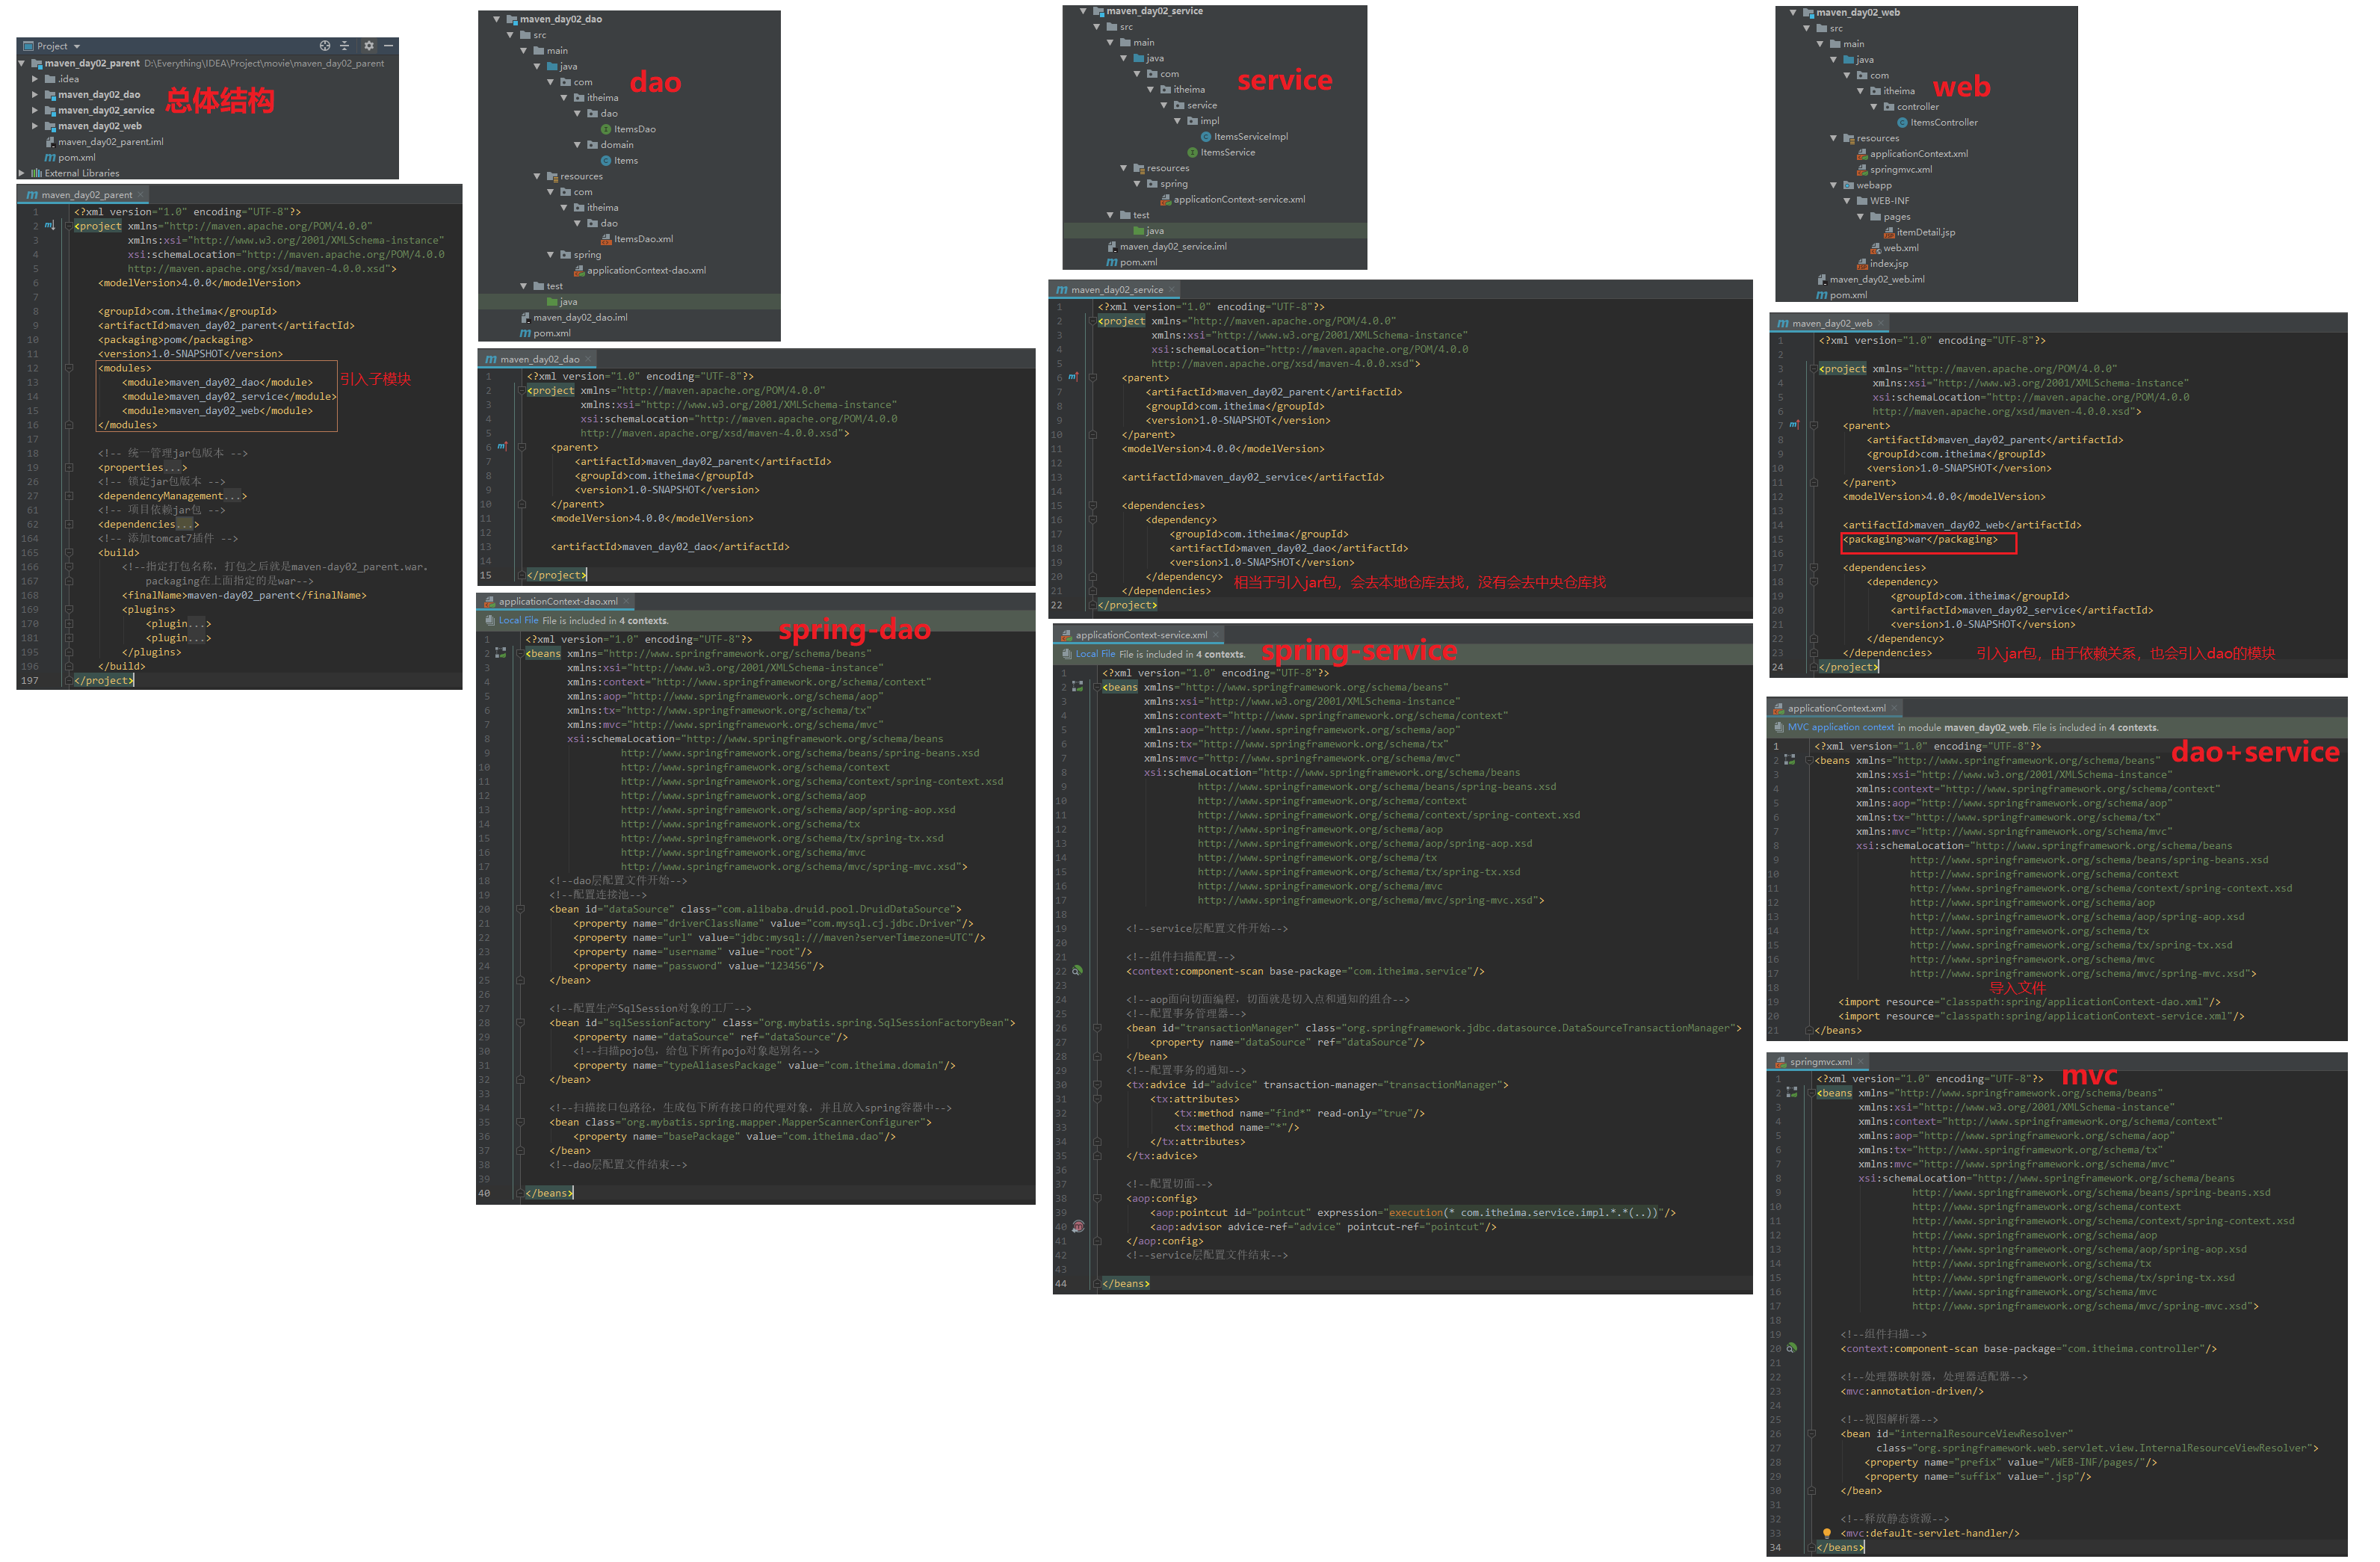
父子工程改造
- 简介本地对应地址:
1
2
3
4
5
6
7
8
9
10
11
12
13* 工程(Project)和模块(Modules)的区别
工程不等于完整的项目,模块也不等于完整的项目,一个完整的项目看的是代码,代码完整,就可以说这是一个完整的项目
和此项目是工程和模块没有关系。
工程天生只能使用自己内部资源,工程天生是独立的。后天可以和其他工程或模块建立关联关系。
模块天生不是独立的,模块天生是属于父工程的,模块一旦创建,所有父工程的资源都可以使用。
* 继承与依赖的关系
父子工程直接,子模块天生集成父工程,可以使用父工程所有资源。
子模块之间天生是没有任何关系的。
父子工程直接不用建立关系,继承关系是先天的,不需要手动建立。
平级直接的引用叫依赖,依赖不是先天的,依赖是需要后天建立的。D:\Everything\IDEA\Project\movie\maven_day02_parent
在线代码分享:代码分享 - 注意:截图的部分只包括修改的部分,其他内容都是SSM整合案例2_Items中的内容复制的。
- 运行时,可以对parent直接Tomcat7:run启动。如果想通过web模块启动,需要先进行parent的clean,install。
install这一步会把parent下的子模块进行打包,dao,service是默认的jar,而web是war,install之后,web模块就可以通过Tomcat7:run启动了。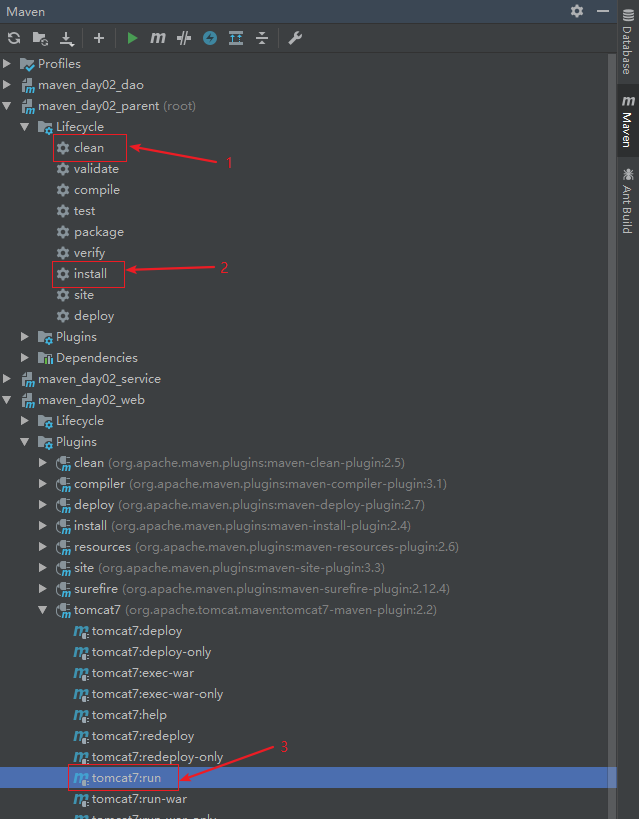
私服
nexus私服简介
nexus下载地址
本地安装包:D:\Everything\IDEA\apache-maven-3.3.9\MyServer\nexus-2.12.0-01-bundle.zip
百度网盘:链接: https://pan.baidu.com/s/1Eu2VesCbkx6lTZ5nodjxAw 提取码: 1cm1
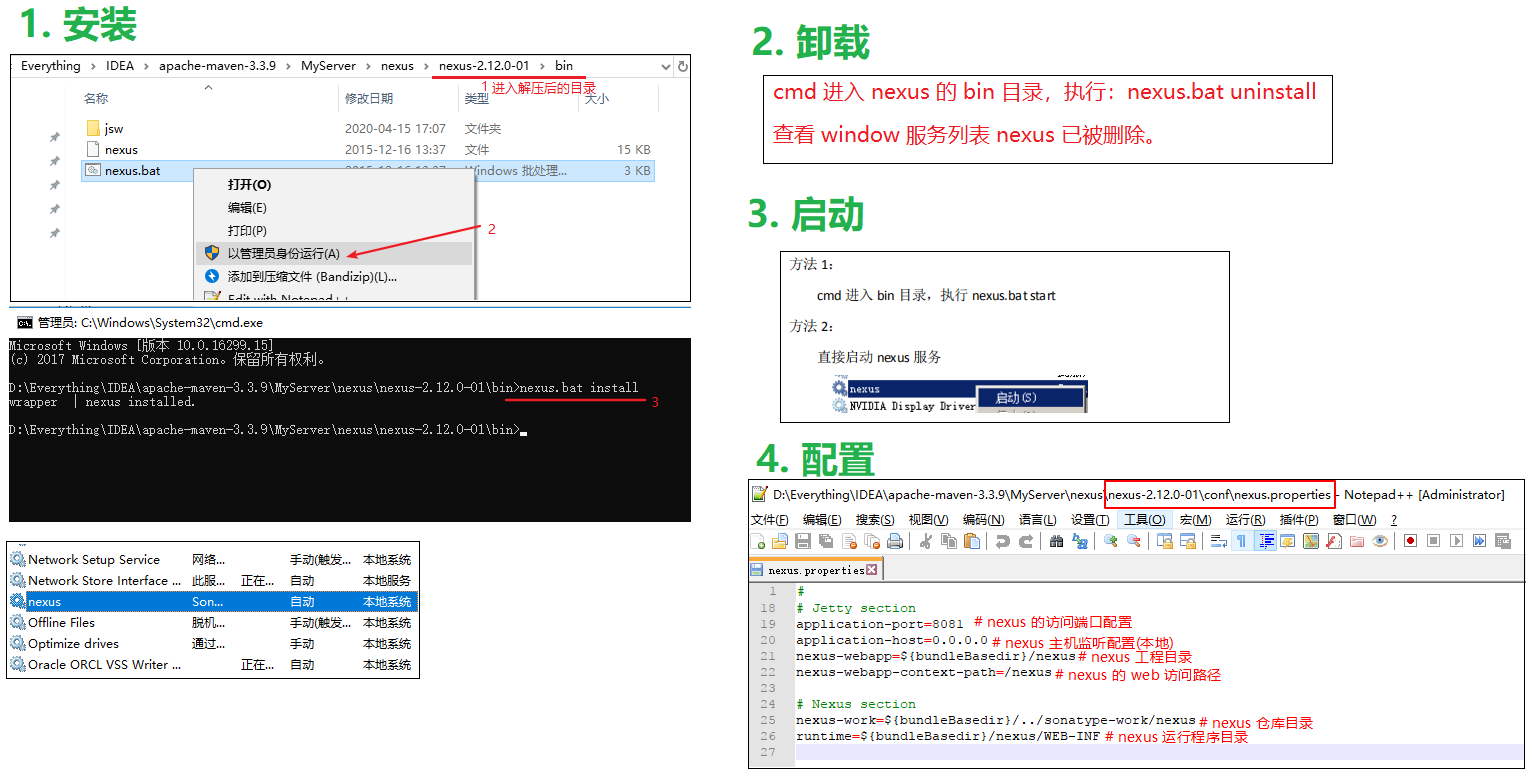
- Maven私服nexus的安装,卸载,启动,配置【使用默认设置即可】
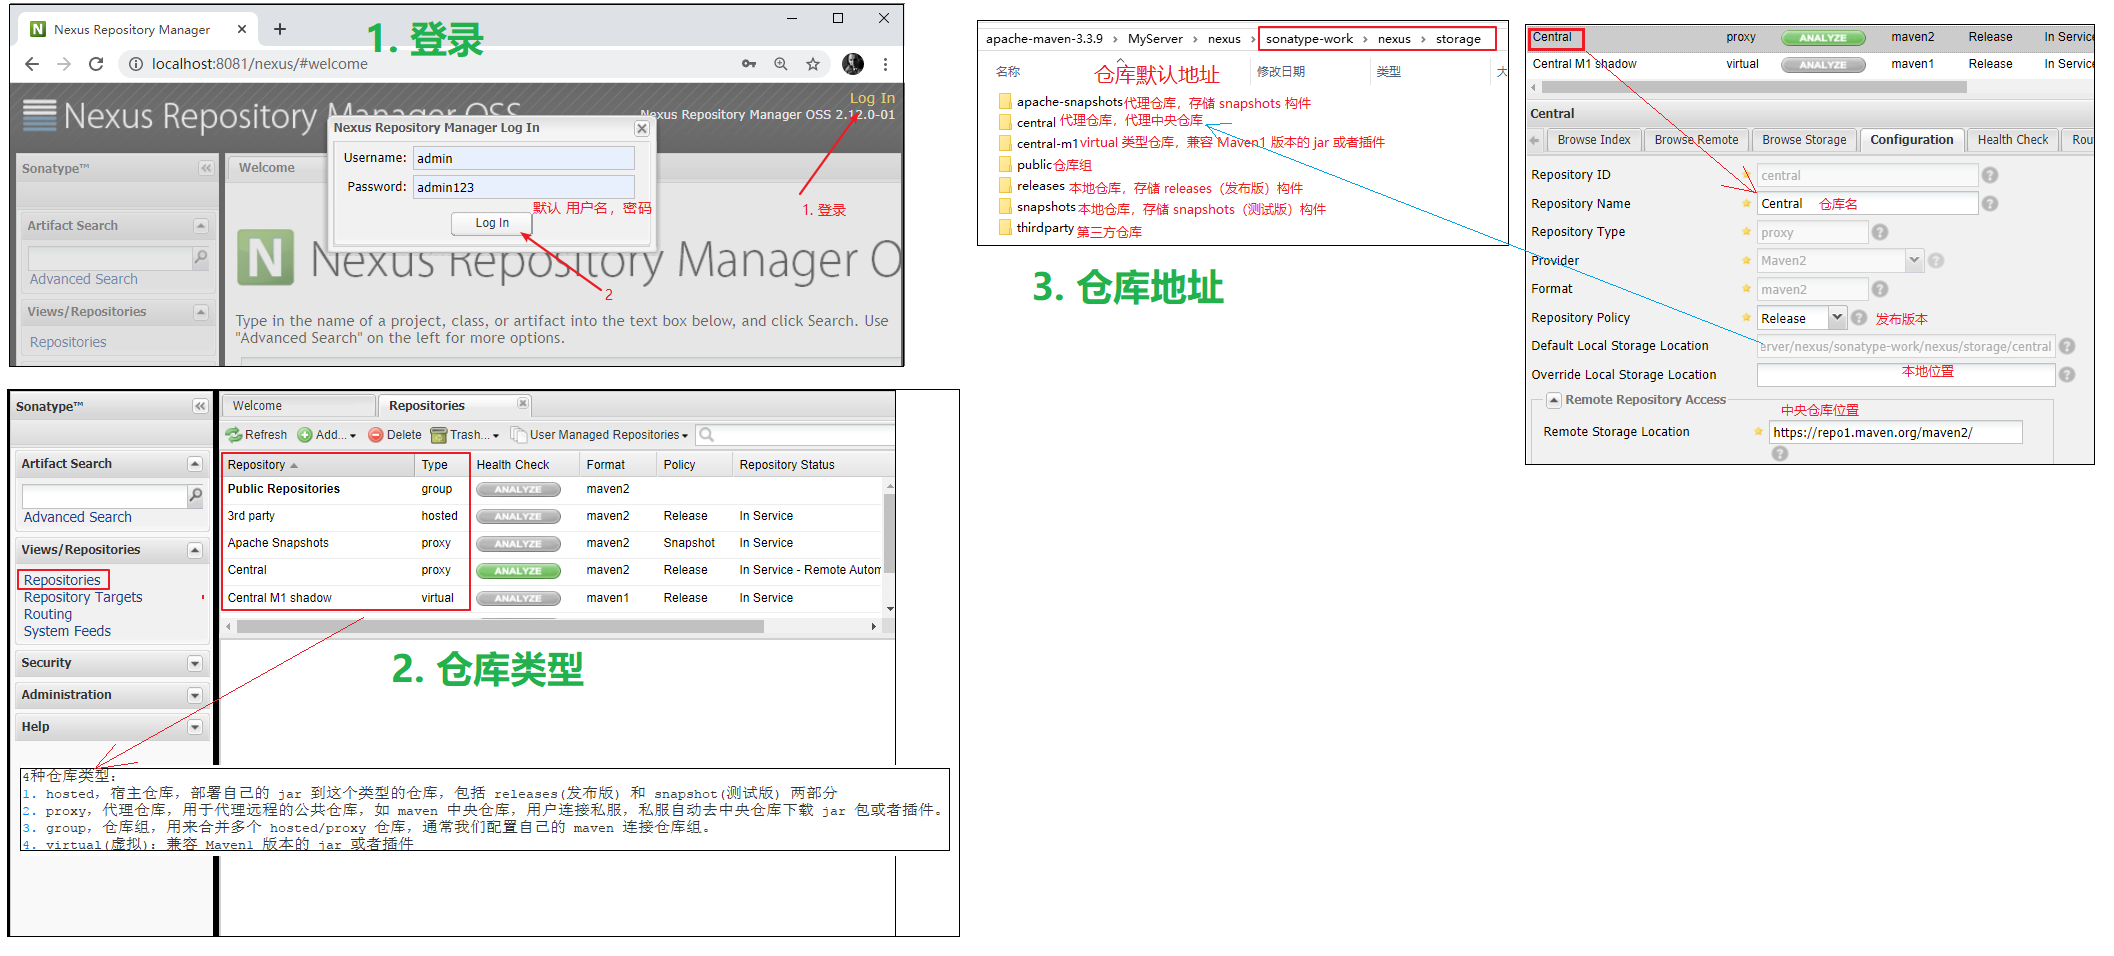
- Maven私服nexus的登录,仓库类型,仓库地址【了解】
项目发布到私服
setting.xml1
2
3
4
5
6
7
8
9
10<server>
<id>releases</id>
<username>admin</username>
<password>admin123</password>
</server>
<server>
<id>snapshots</id>
<username>admin</username>
<password>admin123</password>
</server>pom.xml1
2
3
4
5
6
7
8
9
10
11<!--对此工程进行deploy,部署到私服,并且在setting.xml中也要配置对应的server-->
<distributionManagement>
<repository>
<id>releases</id>
<url>http://localhost:8081/nexus/content/repositories/releases</url>
</repository>
<snapshotRepository>
<id>snapshots</id>
<url>http://localhost:8081/nexus/content/repositories/snapshots</url>
</snapshotRepository>
</distributionManagement>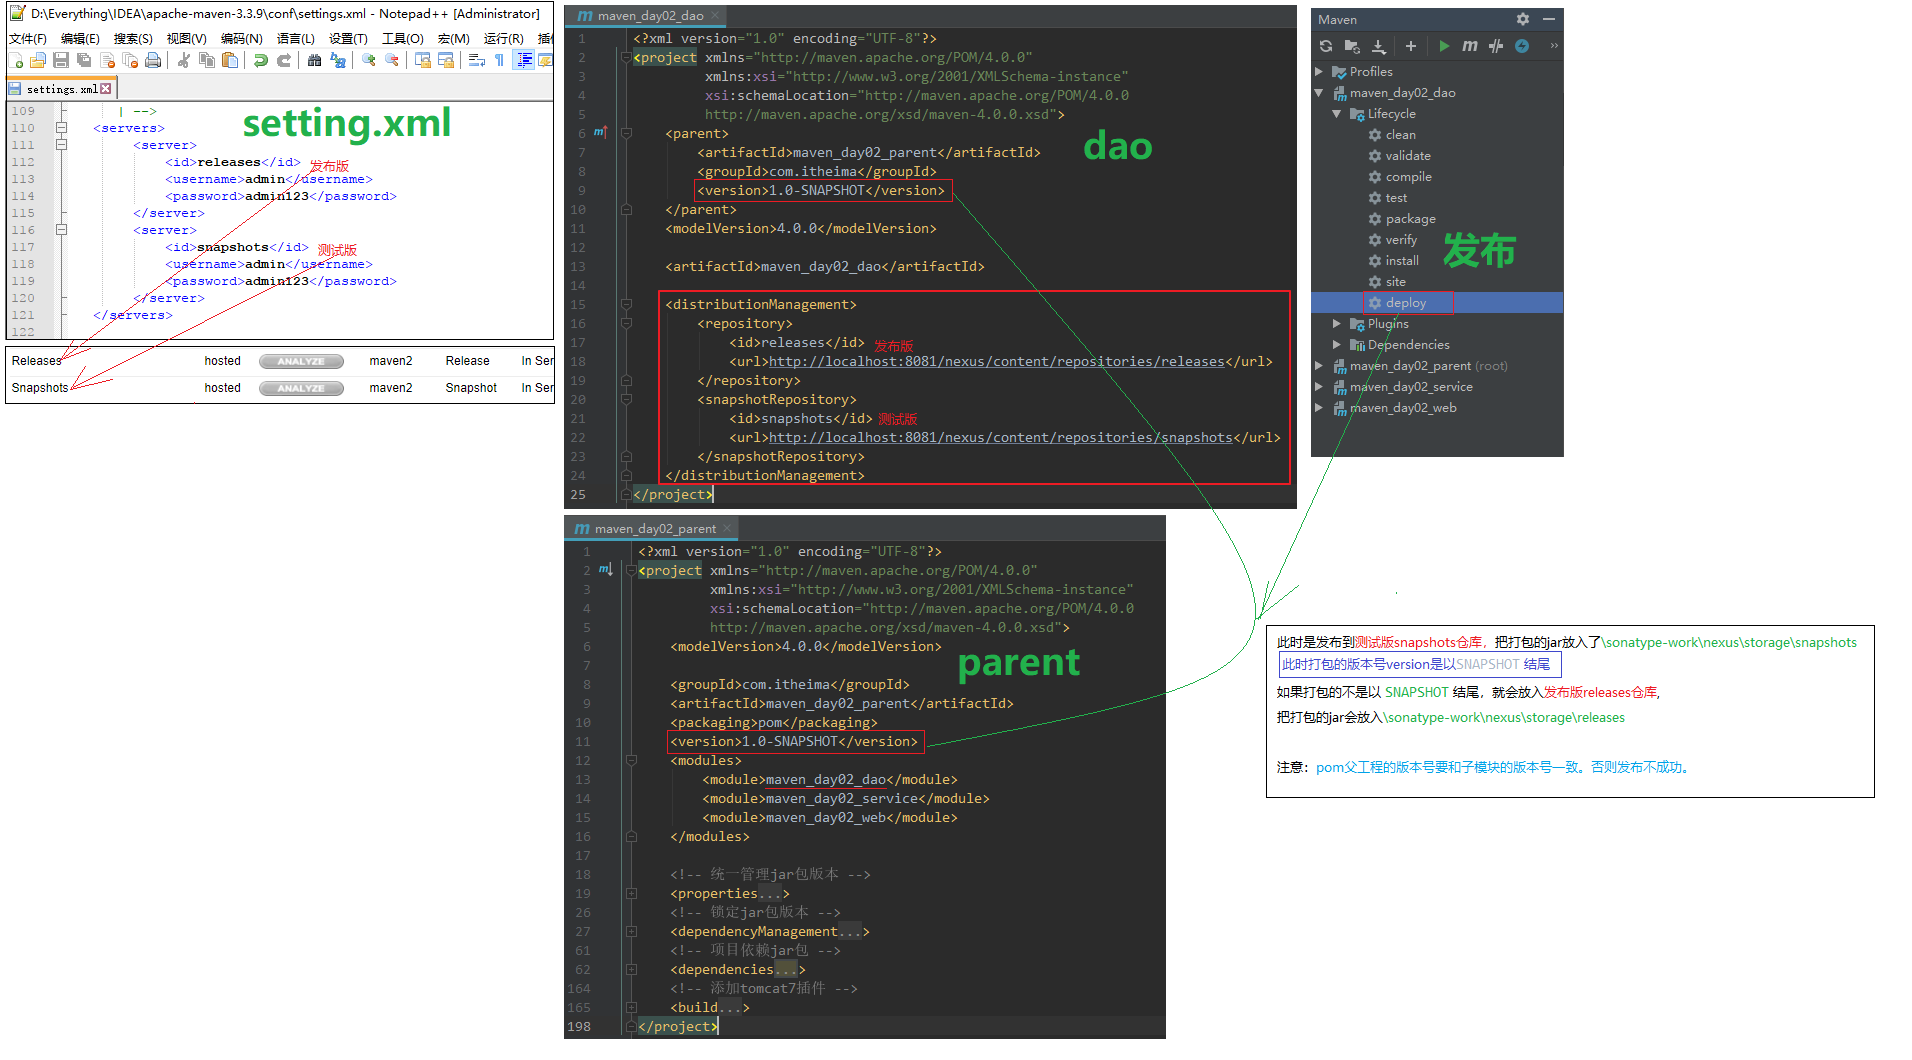
私服下载jar包
setting.xml1
2
3
4
5
6
7
8
9
10
11
12
13
14
15
16
17
18
19
20
21
22
23
24
25
26
27
28
29<!-- 下载jar包配置 -->
<profile>
<!--profile的id -->
<id>dev</id>
<repositories>
<repository> <!--仓库id,repositories可以配置多个仓库,保证id不重复 -->
<id>nexus</id> <!--仓库地址,即nexus仓库组的地址 -->
<url>http://localhost:8081/nexus/content/groups/public/</url> <!--是否下载releases构件 -->
<releases>
<enabled>true</enabled>
</releases> <!--是否下载snapshots构件 -->
<snapshots>
<enabled>true</enabled>
</snapshots>
</repository>
</repositories>
<pluginRepositories> <!-- 插件仓库,maven的运行依赖插件,也需要从私服下载插件 -->
<pluginRepository> <!-- 插件仓库的id不允许重复,如果重复后边配置会覆盖前边 -->
<id>public</id>
<name>Public Repositories</name>
<url>http://localhost:8081/nexus/content/groups/public/</url>
</pluginRepository>
</pluginRepositories>
</profile>
<!-- 激活 下载jar包配置 -->
<activeProfiles>
<activeProfile>dev</activeProfile>
</activeProfiles>pom.xml1
2
3
4
5
6
7
8
9
10
11
12
13
14
15
16
17
18
19
20
21
22
23
24
25
26
27
28
29
30
31
32
33
34
35
36
37
38
39<repositories>
<repository>
<releases>
<enabled>true</enabled>
</releases>
<snapshots>
<enabled>true</enabled>
</snapshots>
<id>public</id>
<name>Public Repositories</name>
<url>http://localhost:8081/nexus/content/groups/public/</url>
</repository>
<repository>
<snapshots>
<enabled>false</enabled>
</snapshots>
<id>central</id>
<name>Central Repository</name>
<url>https://repo.maven.apache.org/maven2</url>
</repository>
</repositories>
<pluginRepositories>
<pluginRepository>
<id>public</id>
<name>Public Repositories</name>
<url>http://localhost:8081/nexus/content/groups/public/</url>
</pluginRepository>
<pluginRepository>
<releases>
<updatePolicy>never</updatePolicy>
</releases>
<snapshots>
<enabled>false</enabled>
</snapshots>
<id>central</id>
<name>Central Repository</name>
<url>https://repo.maven.apache.org/maven2</url>
</pluginRepository>
</pluginRepositories>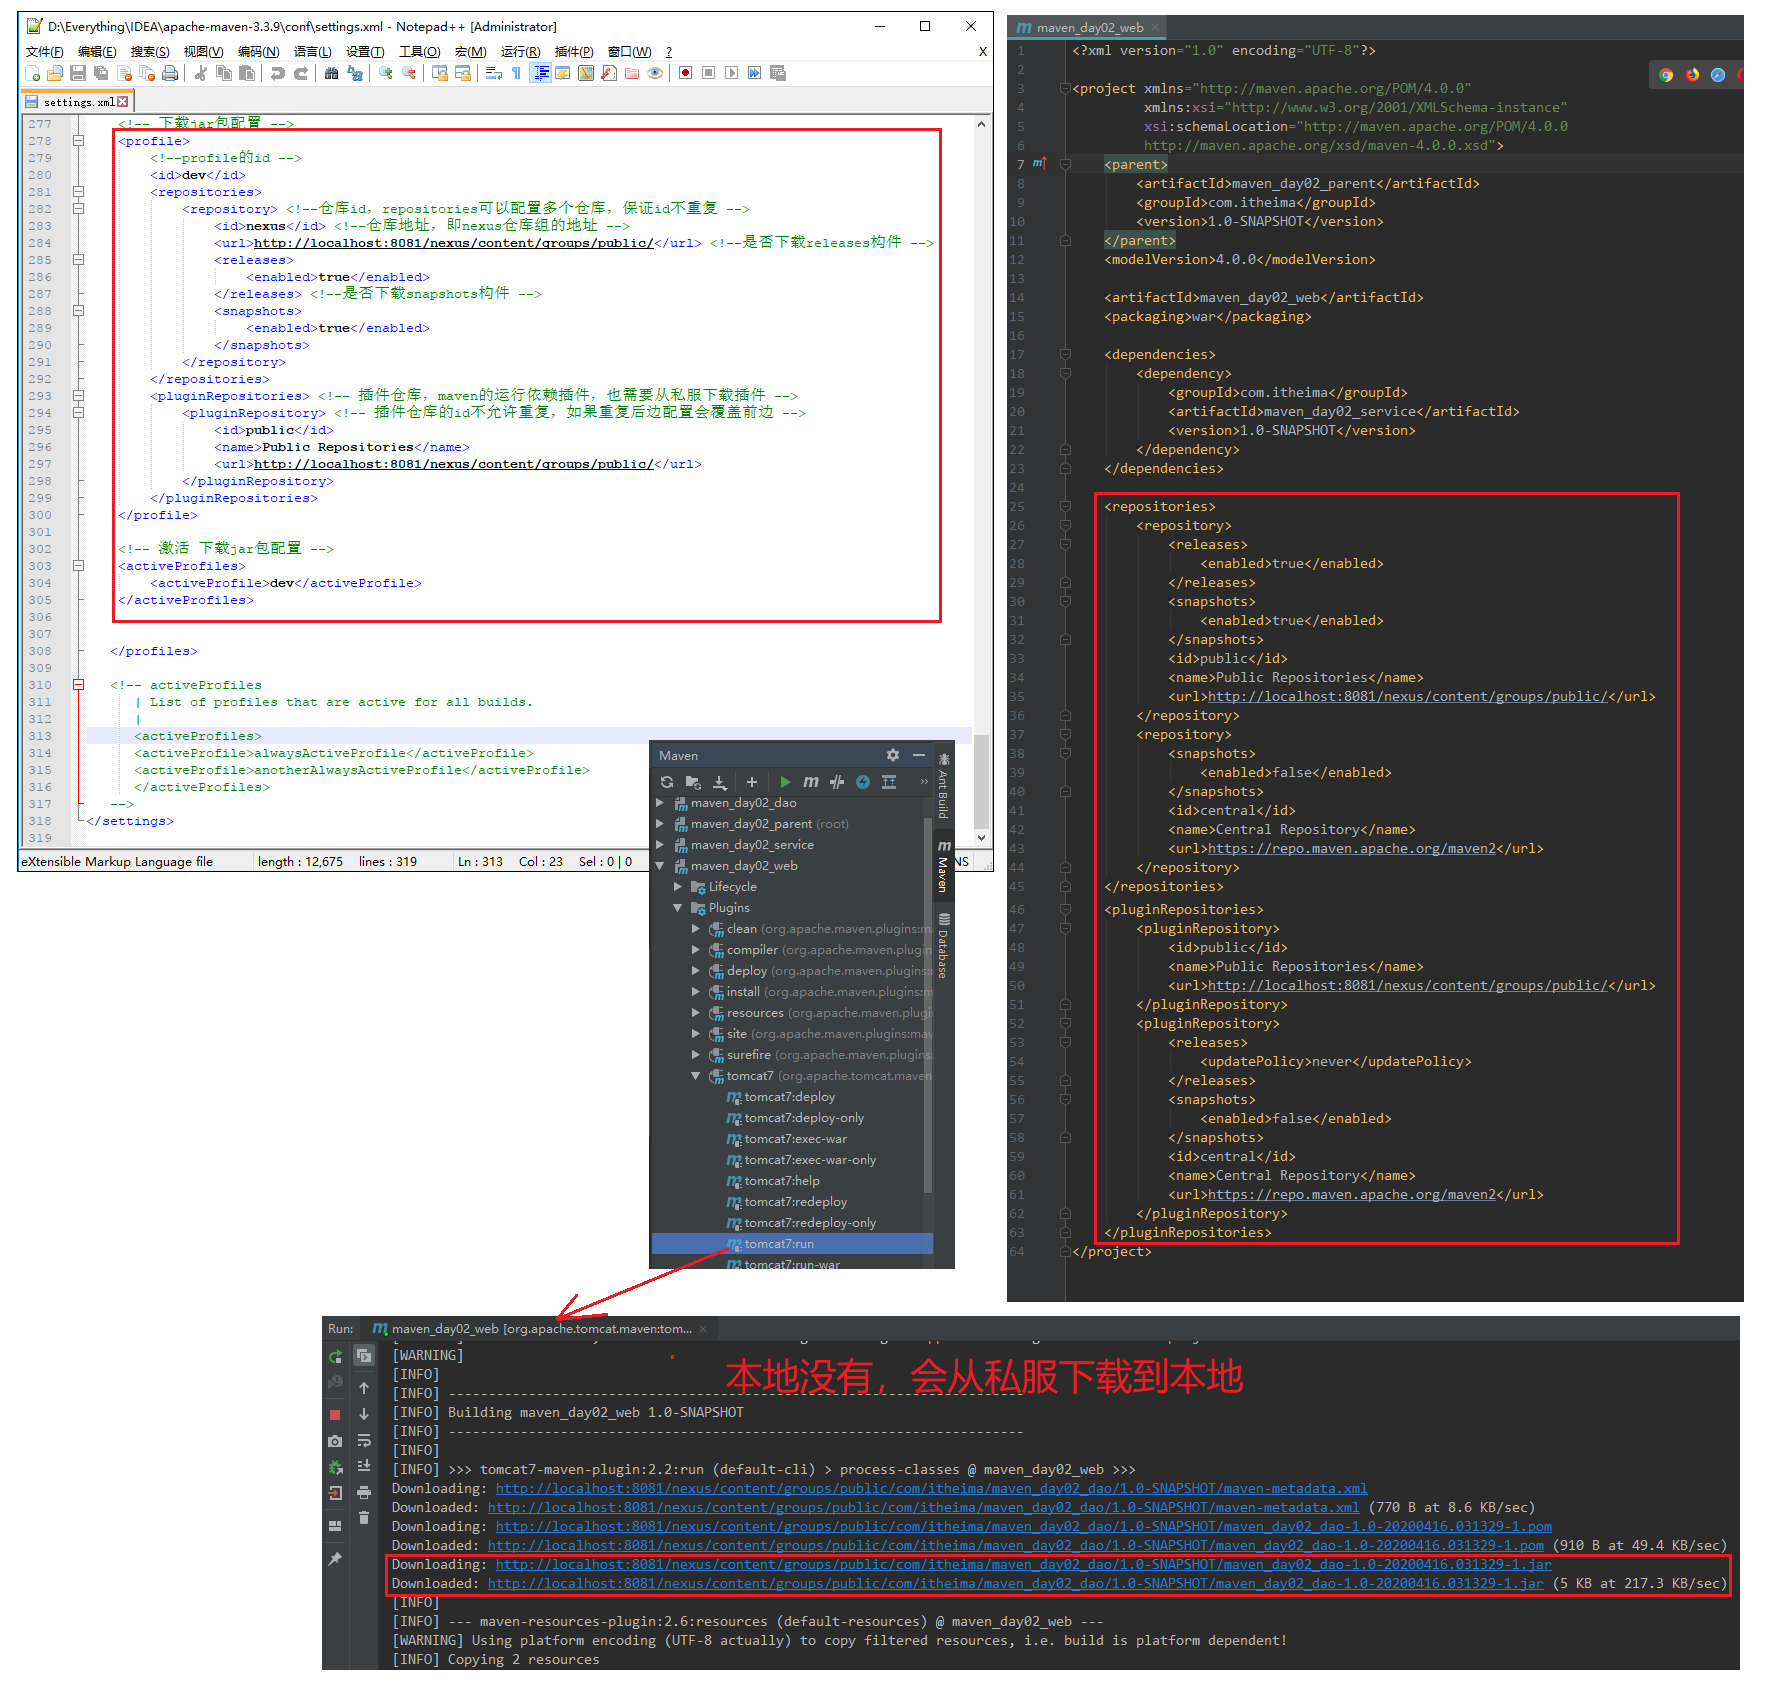
jar包上传本地
使用CMD命令,使用Windows PowerShell会出错。
①绝对路径mvn install:install-file -DgroupId=www.taopanfeng.top -DartifactId=fastjson -Dversion=1.4 -Dpackaging=jar -Dfile=D:\test\maven\fastjson-1.2.68.jar
②相对路径mvn install:install-file -DgroupId=www.taopanfeng.top -DartifactId=fastjson -Dversion=1.4 -Dpackaging=jar -Dfile=fastjson-1.2.68.jar
然后就会在我的Maven本地仓库D:\Everything\IDEA\apache-maven-3.3.9\repository\www\taopanfeng\top\fastjson\1.4\fastjson-1.4.jar
注意:真正上传之后的jar包名称是:-DartifactId+-+-Dversion+.jar
jar包上传私服
在Maven的setting.xml的servers标签中添加
1 | <server> |
①绝对路径mvn deploy:deploy-file -DgroupId=www.taopanfeng.top -DartifactId=fastjson -Dversion=1.4 -Dpackaging=jar -Dfile=D:\test\maven\fastjson-1.2.68.jar -Durl=http://localhost:8081/nexus/content/repositories/thirdparty/ -DrepositoryId=thirdparty
②相对路径mvn deploy:deploy-file -DgroupId=www.taopanfeng.top -DartifactId=fastjson -Dversion=1.4 -Dpackaging=jar -Dfile=fastjson-1.2.68.jar -Durl=http://localhost:8081/nexus/content/repositories/thirdparty/ -DrepositoryId=thirdparty
上传之后的jar包所在位置:http://localhost:8081/nexus/content/groups/public/www/taopanfeng/top/fastjson/1.4/fastjson-1.4.jar
2020-04-16 14:25:33整理完了,还要再回顾一下之前SpringBoot,继续整理。